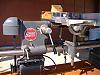
On another thread there has just been a discussion about setting up the Mark V Table Tilt for use with the Conical Sanding Disk. This setup can be done quit effectively using nothing more than a square; however, the tilt angle that you might want is not always exactly equal to 90 degrees.
When that happens to be my task at hand, I employ a Wixey and a simple devise that I keep in the shop for "micro adjustment". It is nothing more than a piece of threaded rod with a knurled nut and a block (with a small hole in it)
that spans the way tubes.
With this setup, I can easily fine tune any angle that I might want the table to be. It is shown here on the Mark V but I often use it on the band saw as well.
[ATTACH]4453[/ATTACH]
[ATTACH]4454[/ATTACH]
[ATTACH]4455[/ATTACH]
[ATTACH]4456[/ATTACH]
Micro Adjust Table Tilt
Moderator: admin
-
dusty

- Platinum Member
- Posts: 21481
- Joined: Wed Nov 22, 2006 6:52 am
- Location: Tucson (Wildcat Country), Arizona
Micro Adjust Table Tilt
- Attachments
-
- P5110001.JPG (156.93 KiB) Viewed 4015 times
-
- P5110002.JPG (135.54 KiB) Viewed 4016 times
-
- P5110003.JPG (138.01 KiB) Viewed 4016 times
-
- P5110004.JPG (139.94 KiB) Viewed 4017 times
"Making Sawdust Safely"
Dusty
Sent from my Dell XPS using Firefox.
Dusty
Sent from my Dell XPS using Firefox.
-
a1gutterman

- Platinum Member
- Posts: 3653
- Joined: Tue Jan 09, 2007 12:45 am
- Location: "close to" Seattle
-
robinson46176

- Platinum Member
- Posts: 4182
- Joined: Mon Mar 09, 2009 9:00 pm
- Location: Central Indiana (Shelbyville)
Great! I love stuff like that. Simple, works well and no complicated setup or removal.
There may be a national rush on all-thread rod tomorrow.
And cheap too.
There may be a national rush on all-thread rod tomorrow.
And cheap too.
--
farmer
Francis Robinson
I did not equip with Shopsmiths in spite of the setups but because of them.
1 1988 - Mark V 510 (bought new), 4 Poly vee 1 1/8th HP Mark V's, Mark VII, 1 Mark V Mini, 1 Frankensmith, 1 10-ER, 1 Mark V Push-me-Pull-me Drillpress, SS bandsaw, belt sander, jointer, jigsaw, shaper attach, mortising attach, TS-3650 Rigid tablesaw, RAS, 6" long bed jointer, Foley/Belsaw Planer/molder/ripsaw, 1" sander, oscillating spindle/belt sander, Scroll saw, Woodmizer sawmill


LOOKS like it just sets on top of the way tubes to me.
SS 500(09/1980), DC3300, jointer, bandsaw, belt sander, Strip Sander, drum sanders,molder, dado, biscuit joiner, universal lathe tool rest, Oneway talon chuck, router bits & chucks and a De Walt 735 planer,a #5,#6, block planes. ALL in a 100 square foot shop.
.
.
Bob
.
.
Bob
-
JPG

- Platinum Member
- Posts: 35457
- Joined: Wed Dec 10, 2008 7:42 pm
- Location: Lexington, Ky (TAMECAT territory)
I assume the end with the cylinder mounted to the end on the thread-all is positioned under the table and nests into a convenient corner between the underside of the table top and a 'vertical' rib. How true is this?:)
BTW Where did you obtain that nice thumbscrew?
BTW Where did you obtain that nice thumbscrew?
╔═══╗
╟JPG ╢
╚═══╝
Goldie(Bought New SN 377425)/4" jointer/6" beltsander/12" planer/stripsander/bandsaw/powerstation /Scroll saw/Jig saw /Craftsman 10" ras/Craftsman 6" thicknessplaner/ Dayton10"tablesaw(restoredfromneighborstrashpile)/ Mark VII restoration in 'progress'/ 10E[/size](SN E3779) restoration in progress, a 510 on the back burner and a growing pile of items to be eventually returned to useful life. - aka Red Grange
-
wlhayesmfs
- Platinum Member
- Posts: 667
- Joined: Fri Jul 21, 2006 10:50 am
- Location: Broken Arrow OK
-
dusty
- Platinum Member
- Posts: 21481
- Joined: Wed Nov 22, 2006 6:52 am
- Location: Tucson (Wildcat Country), Arizona
I just don't take pictures when it is unkept. Unkept, I learned that from my grand mother.rayjack wrote:Obviously Dusty by name but not by nature!! I wish my SS was as clean as yours. Have you cracked the problem of dust collection with the tablesaw?
Ray
No, I have not solved the dust collection problem and it is not because I have not tried. I'd bet I've used at least a full roll of duct tape tried to eliminate the discharge that comes out from just ahead of the lower saw guard and that that accumulates on the front edge of the carriage.
I've even taped the lower side of the table to the lower saw guard. Ot seems like it should be simple but if it was Shopsmith would already have fixed that irritant.
"Making Sawdust Safely"
Dusty
Sent from my Dell XPS using Firefox.
Dusty
Sent from my Dell XPS using Firefox.