Restoration progress on my bandsaw

Forum for Maintenance and Repair topics. Feel free to ask questions or contribute.

Moderator: admin

User avatar
heathicus
Platinum Member
Posts: 2648
Joined: Wed Oct 22, 2008 1:02 am
Location: WhoDat Nation

Restoration progress on my bandsaw

Post by heathicus »

So I started taking apart my bandsaw this evening and I have some questions.

I've taken the cover off and poked around in it a couple times and I've hadn't noticed this before, but today as I was taking everything apart, there was a burnt oil type smell.

One of the roller bearings in the back is VERY stiff. The other one turns OK, but I'm thinking they both need to be replaced. Could this be the source of the bunt oil smell?

The wheel bearings both seem fine. When mounted, the bottom wheel turned free and smooth. The top wheel turned smooth, but wasn't quite as free. Is this typical?

Here's a picture that I took once before of my tires. Both are in about the same condition.

Image

Do they need replacing? I'm not looking forward to that task. Is there a way to recondition them without replacing the tires?

The new bandsaw cover has a window and hole for the wrench so you can adjust the tension without removing the cover. I'm thinking I could just do this myself. I could use my handheld jigsaw to cut the window, glue a piece of plexiglas on the inside to cover the window hole, and then drill a hole for the allen wrench to go in. Anybody see any problem with that?
Heath
Central Louisiana
-10ER - SN 13927, Born 1949, Acquired October 2008, Restored November, 2008
-10ER - SN 35630, Born 1950, Acquired April 2009, Restored May 2009, A34 Jigsaw
-Mark V - SN 212052, Born 1986, Acquired Sept 2009, Restored March 2010, Bandsaw
-10ER - SN 39722, Born 1950, Acquired March 2011, awaiting restoration
User avatar
billmayo
Platinum Member
Posts: 2342
Joined: Fri Jul 21, 2006 3:31 pm
Location: Plant City, FL

Post by billmayo »

I use "Belt Conditioner" from an auto parts store on the black tires every few months to prevent checking and cracking. I normally replace tires that are cracked like your tires. However I would continue to use the bandsaw until the tires start to chunk or miss pieces. I find the black tires are not that hard to install. I only use the black tires on bandsaws when I have to replace the tires.

It is very easy to add the 2 1/2" vaccum port, viewing window and drill a hole for the tension adjustment. I use a hole saw with a different cutter for cutting both the viewing window and vaccum port. Harbor Freight has cheap hole saw set that works well for this task.
Bill Mayo bill.mayo@verizon.net
Shopsmith owner since 73. Sell, repair and rebuild Shopsmith, Total Shop & Wood Master headstocks, SPTs, attachments, accessories and parts. US Navy 1955-1975 (FTCS/E-8)
cml
Gold Member
Posts: 32
Joined: Mon Mar 15, 2010 9:59 pm
Location: CA

Post by cml »

Hi Heath,

I literally -just- went through a bandsaw recondition. I took some pictures of the saw on my workbench, where I just finished replacing the lower and upper blade guides with Bill Mayo's 627ZZ bearing mod.

Burnt oil smell is probably bearing grease, but could be from the decaying rubber tires. My lower wheel turns quite freely, but the upper one is maybe 20% stiffer. It's easy to remove, clean out the old grease, and re-grease it, but be careful with the little spiral snap ring which holds the upper wheel on. It's fragile.

The blade guides don't actually turn all that much unless you're using the bandsaw, then they keep the blade from flexing backwards and de-tracking while you're pushing material through. The original bearings are steel rollers on brass bushings. You can probably clean them off fairly easily. I opted to replace them with 627ZZ bearings as I mentioned above. You will need to buy two "autotrack shoulder screws" and four 627ZZ bearings to accomplish this. The shoulder screw is SS item number 514008, and the bearings are 514011. If you want to replace the autotrack bearings as well, you will need 6 bearings in total. Shopsmith has the cheapest ones I have been able to find. You will need to shim with a washer or file down the lower blade guard slightly so the bearing doesn't rub. I used the shims from the original lower guide roller.

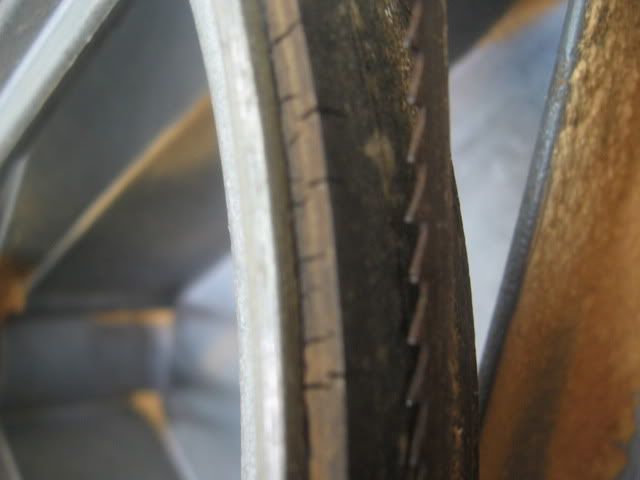
I would say yes, your tires need replacing. The urethane tires Shopsmith sells are very easy to install, but do require a bit of elbow grease. Just heat them up in some hot water and stretch them onto the wheel with a wooden dowel for leverage. When you pull the old tires off, there may be hardened glue stuck to the wheels. I used a wire wheel on my bench grinder to remove all of that crud to insure a uniform smooth surface. I do not know if this is even remotely necessary, but it seemed like a good idea.

One other thing that is a common replacement/mod is the blade guide blocks. Shopsmith sells "cool blocks" which are some kind of (ceramic?) composite material which is supposed to track better, quieter, and improve blade life.

Feel free to contact me if you have any questions. The bandsaw reconstruction is still quite fresh in my mind. :-)

Here are some pictures. The orange tires are the Urethane ones.

Auto-track Bearing Replacement

Lower Blade Guide Bearing Mod

Upper Blade Guide Bearing Mod

Reconditioned Bandsaw Guts
Chris in CA
oldc6
Gold Member
Posts: 233
Joined: Mon Feb 11, 2008 9:22 pm
Location: central minnesota

Post by oldc6 »

I bought a used one last year from craigs list. The tires looked just like yours. I put the pretty orange ones back on, and now the blade runs quiet and no lumpty lump noise when running. Also ordered the 90 degree vacum connection and mounted per instructions. it was spendy but, could not find anything else with the 90 degree bend that keeps the vac hose out of way. it works very well no more sawdust all over the bottom of machine.........
charlese
Platinum Member
Posts: 7501
Joined: Fri Dec 08, 2006 10:46 pm
Location: Lancaster, CA

Post by charlese »

I think you can re-condition those bandsaw tires by applying silicone. I use the silicone in a spray can - spraying the stuff onto a rag and wiping several coats on the tires. I would use several applications at first, making sure the silicone sinks in. (you can spray the silicone directly on the tire - but be careful not to let overspray get all over the place) I've used it on my tires for several years and it has closed up most of the cracks and made the tires softer. Another benefit is sawdust does not stick well to silicone.

A Word of Caution! If you get silicone on the table, make sure you clean it off with mineral spirits. Silicone causes fisheye on wood finishes - you want to keep it off of all wood. I've never had a problem, but some folks have.

This tire was un-treated for 5 years, then treated with silicone for 6 years. In just 5 years the tires began to crack and were quite hard. I can now make a thumb nail depression in the tire and this is what it looks like after use, with no cleaning.
[ATTACH]8326[/ATTACH]

[ATTACH]8327[/ATTACH]
Attachments
HPIM1939.jpg
HPIM1939.jpg (124.1 KiB) Viewed 4623 times
HPIM1940.jpg
HPIM1940.jpg (109.49 KiB) Viewed 4628 times
Octogenarian's have an earned right to be a curmudgeon.
Chuck in Lancaster, CA
User avatar
heathicus
Platinum Member
Posts: 2648
Joined: Wed Oct 22, 2008 1:02 am
Location: WhoDat Nation

Post by heathicus »

Thanks for the answers and the help!

I spent most of yesterday after work and today (since I was off) working on the bandsaw. I picked up some "belt conditioner" yesterday evening and sprayed it on the tires (directly). I think I might have sprayed too much because today, 24 hours later, they were still very sticky. I used a rag soaked in acetone and wiped off most of the extra stick stuff. How often should I reapply? Next time I'll try spraying it on a rack and wiping it on the wheel!

I took the roller bearings to a local bearing specialty store (which I didn't know about until recently). They only had one bearing that matched the front upper and lower roller bearing and they wanted $11.00 for it. I decided mine wasn't in that bad of shape after all. And the bearings they matched with the rear (or "Auto-Tract") roller bearings don't fit on the shoulder screw. The inside diameter on the new bearings are less than .5 mm too small. So I'll be returning them tomorrow. (I should have taken the shoulder screw with me. Lesson learned.) But the old bearings are completely frozen and will not turn. What I did as a temporary solution on the "auto-tract" bearing assembly was to place the lock washer on the opposite side of the hex nut (reverse parts 55 and 58 in this parts view). That way, the two nuts on the shoulder screw could be tightened against the mounting bracket, but I could leave the pressure on the inner races of the bearings just loose enough for the entire bearing to turn.

So I did get it put back together and actually used it this evening! I didn't go the whole repaint and polishing route. Maybe later. I just wanted to make it usable. I wasn't really making anything but sawdust and spent my time cutting up some scrap pieces. Since I haven't touched a bandsaw since high school shop class almost 20 years ago, I'm just not sure if everything is adjusted right. Like the guide blocks and blade tension and such. Is there a Sawdust Session on tuning up and adjusting the bandsaw? It seems like the tension on my blade is very loose, but any tighter and it works off the wheels pretty quick. The only problem I had when using it was if I was making a tight curve and backed out of it, there was a tendency for the blade to come off the wheels unless I made sure to take it slow and follow the curve out. Is that normal?
Heath
Central Louisiana
-10ER - SN 13927, Born 1949, Acquired October 2008, Restored November, 2008
-10ER - SN 35630, Born 1950, Acquired April 2009, Restored May 2009, A34 Jigsaw
-Mark V - SN 212052, Born 1986, Acquired Sept 2009, Restored March 2010, Bandsaw
-10ER - SN 39722, Born 1950, Acquired March 2011, awaiting restoration
User avatar
JPG
Platinum Member
Posts: 35598
Joined: Wed Dec 10, 2008 7:42 pm
Location: Lexington, Ky (TAMECAT territory)

Post by JPG »

Which wheel is the blade tending to come off? Methinks greater tension should decrease the tendency to come off.

Is the upper wheel canted properly? A straight edge held against the top and bottom of the upper wheel should clear the bottom wheel with more clearance at the bottom of the lower wheel than at its top. If this is not the case, grasp the upper wheel at the top and bottom, and push in at the top, while pulling out at the bottom.

The upper wheel is suspended on an arm that can take a set from being under tension too long. This 'procedure' can help put it back, but eventually the support must be replaced.

This is the reason the tension should be relieved when not using it!
╔═══╗
╟JPG ╢
╚═══╝

Goldie(Bought New SN 377425)/4" jointer/6" beltsander/12" planer/stripsander/bandsaw/powerstation /Scroll saw/Jig saw /Craftsman 10" ras/Craftsman 6" thicknessplaner/ Dayton10"tablesaw(restoredfromneighborstrashpile)/ Mark VII restoration in 'progress'/ 10
E[/size](SN E3779) restoration in progress, a 510 on the back burner and a growing pile of items to be eventually returned to useful life. - aka Red Grange
User avatar
heathicus
Platinum Member
Posts: 2648
Joined: Wed Oct 22, 2008 1:02 am
Location: WhoDat Nation

Post by heathicus »

Good info, JPG. I just went and checked and a straight edge held against the upper wheel hits the top of the lower wheel so there is a gap between the straight edge and the bottom of the upper wheel. If I hold the straight edge against the lower wheel, it clears the upper wheel with a larger gap at the top of the upper wheel.

With the blade tightened to what I think is a more suitable tension, I can turn the wheels by hand and within a dozen turns or so, it will work its way to the edge on both wheels. It looks like it comes off of the top wheel first, if that answers your question.
Heath
Central Louisiana
-10ER - SN 13927, Born 1949, Acquired October 2008, Restored November, 2008
-10ER - SN 35630, Born 1950, Acquired April 2009, Restored May 2009, A34 Jigsaw
-Mark V - SN 212052, Born 1986, Acquired Sept 2009, Restored March 2010, Bandsaw
-10ER - SN 39722, Born 1950, Acquired March 2011, awaiting restoration
User avatar
JPG
Platinum Member
Posts: 35598
Joined: Wed Dec 10, 2008 7:42 pm
Location: Lexington, Ky (TAMECAT territory)

Post by JPG »

Something is not right! The cant of the top wheel should be causing the blade to drift to the back of the upper wheel, not the front. This is what the two guide bearings are for(to limit the backward drift of the blade).

Do you have the manual and adjusted the upper blade guide bearing?

Are you setting the tension by the blade dimensions on the tension scale?

I am guessing that the upper guide bearing is causing the drift off the front of the wheels. To determine if so, remove the upper guide bearing, and see if blade quits drifting off the front. MAKE SURE THE BACK OF THE BLADE DOES NOT INTERFERE WITH ANYTHING! ROTATE THE LOWER WHEEL BY HAND.

Make sure the blade is the proper length(72").
╔═══╗
╟JPG ╢
╚═══╝

Goldie(Bought New SN 377425)/4" jointer/6" beltsander/12" planer/stripsander/bandsaw/powerstation /Scroll saw/Jig saw /Craftsman 10" ras/Craftsman 6" thicknessplaner/ Dayton10"tablesaw(restoredfromneighborstrashpile)/ Mark VII restoration in 'progress'/ 10
E[/size](SN E3779) restoration in progress, a 510 on the back burner and a growing pile of items to be eventually returned to useful life. - aka Red Grange
charlese
Platinum Member
Posts: 7501
Joined: Fri Dec 08, 2006 10:46 pm
Location: Lancaster, CA

Post by charlese »

Yep! Your upper wheel needs adjusting~ What probably happened was tension was left on a blade for an extended time- like a year or so and the upper wheel arm got sprung. You can spring it back by applying hand pressure to the upper and lower parts of the wheel. Just pull the bottom part of the wheel out while pushing the upper rim of the wheel in toward the back of the case.

When finished whit this adjustment, the straight edge laid along the upper wheel should be 1/8" or so from the edge of the lower wheel. Mine is a little more than that, but it works wonderfully well.

I'm not familiar with belt conditioner, so can't say how often to apply, other than Bill Mayo's post.
Octogenarian's have an earned right to be a curmudgeon.
Chuck in Lancaster, CA
Post Reply