Chuck,
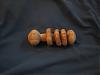
In reference to your questions about the chair in my personal picture, the seat is made out of popular, 2 inches thick to start and then shaped using an adze first, then used a gouge to smooth it out better and finally a orbital sander to give it the final sanding. The bottom of the seat was shaped with a spoke shave. The legs are made from maple and the brown color is caused by putting them in hot sand to dry them out so after they are in place, they expand again to a tight fit. The spindles and seat back are made from oak using a spoke shave to shape them. After holes are drilled in the seat and arm rest, everything is glued together with wooden shims used to insure the legs and spindles stay tight. One of these days I need to paint it, as traditional Windsor chairs are painted. I wish all those clamps in the picture were mine, but this picture was taken at the woodcraft store in Franklin, TN where I built this Windsor chair in a intensive 3 day class. Never worked that hard in a long time, especially doing the seat. The turned object next to my name is a captive ring baby rattle I turned on my SS for my granddaughter and it's made out of sugar maple. Thanks for the compliments and also for your answers about the pepper mill.
Weekly Blog - June 25th
Moderators: HopefulSSer, admin

John,
Thanks for the input on the rocking horse. Your problems with attaching the body to the rockers was one of my concerns. I was very careful to insure that my mortises for the foot supports were the right distance front to rear, but I'm still leary of the feet landing perfectly on the rockers at assembly time using only the leg-to-body template as my guide. When I built my first small row boat, I cut all of the pieces out very carefully before assembly using the supplied templates. Boy, did I use a lot of epoxy filling gaps!!!
I like your idea of attaching diagonals first, thanks.
Alan
'Baking The World A Better Place'
'Baking The World A Better Place'

Alan:
Your mention of mortises reminds me of one of my "experiences".
After assembling the rockers and cross pieces, I noticed that when I turned the unit upside down, (don't ask why), the whole unit was off so that one end would not touch the table it was on.
Further examination revealed I had accidently reversed one of the rockers (back to front) when making the mortises. I disassembled the unit which was already glued and screwed and reshaped the rockers so they were even again with the new match-up, then reassembled the unit.
It was still off when turned upside down. It turns out the angle of one of my mortises was slightly off which made the unit sort of twisted when put together.
Interestingly enough it rocked perfectly when right side up so I proceeded with the total assembly and everthing was fine except as I mentioned in a previous post, "I know it's there".
Have fun.
John