Page 1 of 1
Bandsaw mounts too low?
Posted: Sat Nov 27, 2010 3:28 pm
by avispex
I did a search and could not find the answer, but I sense this is an embarrassingly trivial question that muct have been asked a billion times before.
I bought my Shopsmith in parts. The bandsaw came from one guy with who knows what configuration he had used it in. The rest of the unit came from somebody else, 6 months later and across town, etc.
I went to put the bandsaw on the unit. I mounted it on the left side and the two dark metal cylinders slid perfectly into their shafts and everything went great, except that the mechanical connection between the headstock and the bandsaw were not aligned. The bandsaw sat about 3/4 of in inch low. I fixed it temporarily by adjusting it by hand, kind of lifting and tightening until it was in the right spot, but what is the official and correct way to do this?
I then tried out my jointer, which mounted perfectly and worked great. I even made a few edges and I think it worked really well. The only frightening thing was when I went to tighten the unit where it mounts to the SS base by turning that aluminum cylindrical shaft and I realized that my hand and fingers were inches from the exposed blades. (This was with the unit turned off and unplugged, but I still didn't like reaching my hands into a blind cavity with exposed blades.) Am I missing a guard under there?
Thanks for any advice,
Andy
Posted: Sat Nov 27, 2010 4:19 pm
by SDSSmith
The bandsaw legs come in two versions: straight tubes and offset legs. If you have the straight legs you will want to acquire a couple of 1-1/4" stop collars to use to set the height. If you have the offset legs (make sure the allen screws that lock the legs in the bandsaw housing are loose), the shorter length goes down into the power mount. You rotate them to get the front to back alignment. Once you have the front to back alignment with the headstock, tighten the power mount handle. Then raise the bandsaw for proper vertical alignment and then tighten the allen screws in the bandsaw housing.
Posted: Sat Nov 27, 2010 4:28 pm
by JPG
avispex wrote:I did a search and could not find the answer, but I sense this is an embarrassingly trivial question that muct have been asked a billion times before.
I bought my Shopsmith in parts. The bandsaw came from one guy with who knows what configuration he had used it in. The rest of the unit came from somebody else, 6 months later and across town, etc.
I went to put the bandsaw on the unit. I mounted it on the left side and the two dark metal cylinders slid perfectly into their shafts and everything went great, except that the mechanical connection between the headstock and the bandsaw were not aligned. The bandsaw sat about 3/4 of in inch low. I fixed it temporarily by adjusting it by hand, kind of lifting and tightening until it was in the right spot, but what is the official and correct way to do this?
I then tried out my jointer, which mounted perfectly and worked great. I even made a few edges and I think it worked really well. The only frightening thing was when I went to tighten the unit where it mounts to the SS base by turning that aluminum cylindrical shaft and I realized that my hand and fingers were inches from the exposed blades. (This was with the unit turned off and unplugged, but I still didn't like reaching my hands into a blind cavity with exposed blades.)
Am I missing a guard under there?
Thanks for any advice,
Andy
Current ones do have a 'guard'. Actually a chip chute underneath. Older ones do not. There is not much danger, since you are now aware and 'know' where the clamp is in that 'blind cavity'. Tis only 'blind' when looking from above - bend over and all will be revealed unto thee!]
Re the bandsaw, a pix of the mounting tubes that includes the tubes residing in their holes inside would be helpful. There is a limited amount of adjustment where the tubes are secured inside. However we need to know what mounting tubes you have(there are three variations). Any one of them should work on any bandsaw, but they require different means to adjust the height.
Posted: Sat Nov 27, 2010 4:35 pm
by SDSSmith
The third version that jpg alludes to is also a straight tube with a ring around it that takes the place of the stop collar. Height is adjusted similarly to the offset legs. In this case the shorter side of the leg measured from the ring goes down into the power moutn.
Posted: Sat Nov 27, 2010 4:44 pm
by JPG
SDSSmith wrote:The third version that jpg alludes to is also a straight tube with a ring around it that takes the place of the stop collar. Height is adjusted similarly to the offset legs. In this case the shorter side of the leg measured from the ring goes down into the power moutn.
Well that makes a fourth version that I was unaware of!
The 'other' version I was referring to is the 'offset' ones that allow for the wider aluminum table on the bandsaw. Since he mentioned the ' dark metal cylinders' I presume he has that 'version'. However the 3/4" vertical offset seems excessive for that.
Hence the pix request.
Posted: Sat Nov 27, 2010 7:21 pm
by avispex
I owe you guys some pics for this one also. I will try to get them up later this evening.
Thanks,
Andy
Posted: Sat Nov 27, 2010 11:44 pm
by avispex
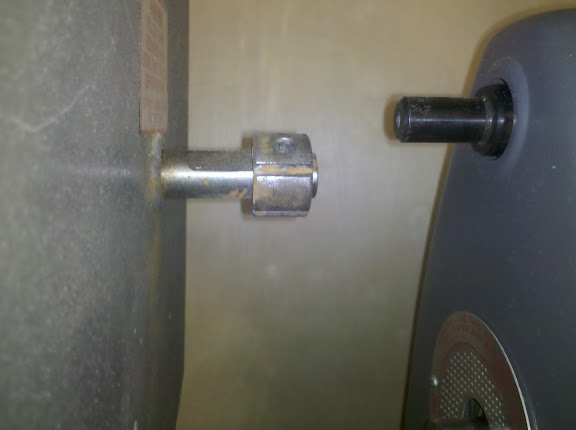
Here is a side view of my bandsaw on the frame, left side-
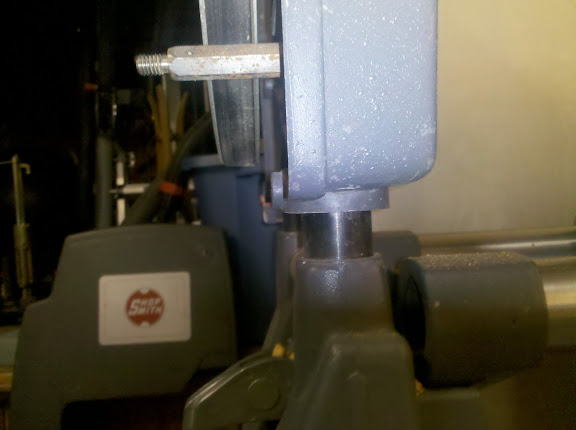
Front view-
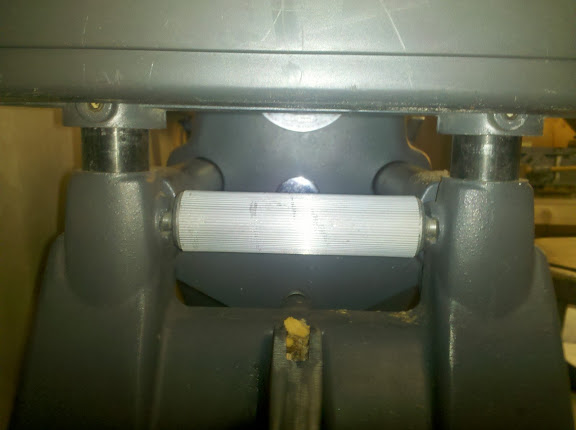
Front view, cover off-
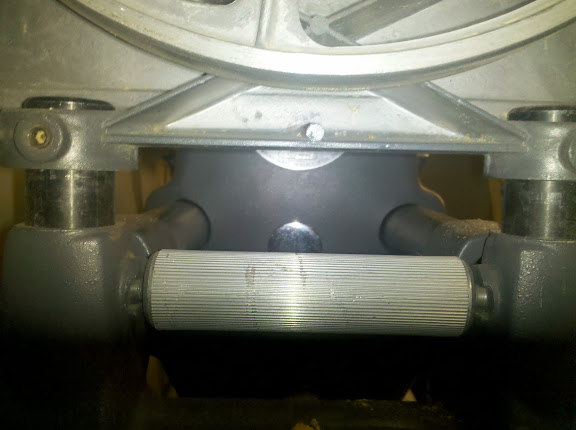
I appreciate any help I can get. Although I think the plan is to make some kind of spacer block.
Thanks,
Andy
Posted: Sun Nov 28, 2010 12:49 am
by JPG
You have straight mounting tubes. You need stop collars as Rob mentioned. They are the same as should be on the tail stock to fix its height. In a pinch you could use one on the tailstock and one on the bandsaw. Two on each is preferable. They are fairly inexpensive(from ss). $3.53 each. Much more on EB!