Page 1 of 2
Part 3: Need some input on repairs needed.
Posted: Thu Jun 09, 2011 1:40 am
by Shop_Smith_Poppi
What would be the best way to fix the broken wire on the drive motor ?

( I hope you can see it better now JPG!)
And yes it does not look like it but several of the small strands are broken.
I was thinking of using electrical tape.
But I really think it would be best to replace the wire with a new one. If I do this how do I find out what gauge I need to use.
I also am wanting to know what is the original length of the way tubes for a 10 ER? I have not taken a picture of my tubes yet but will tomorrow.
Also my Bench is made up of three 2x6's instead of 2 2x12's and it does not have the original leg supports either. Any suggestions on how to rebuild the bench I really do not like the way it is now.
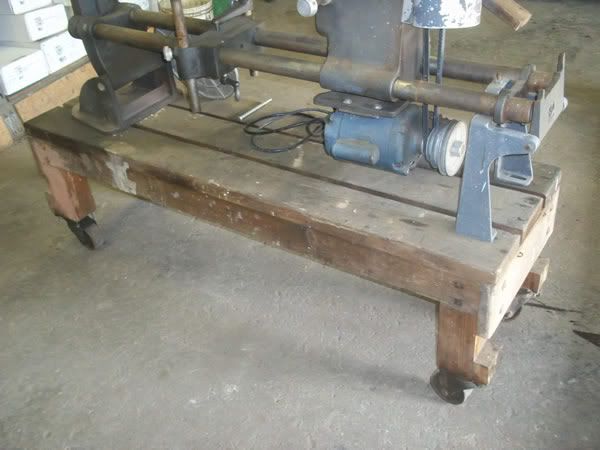
I know I want some king of storage under neath it.
One more question how do you if possible take apart a Craftsman Drill chuck.

Posted: Thu Jun 09, 2011 6:04 am
by michaeltoc
Shop_Smith_Poppi wrote:What would be the best way to fix the broken wire on the drive motor ?
And yes it does not look like it but several of the small strands are broken.
I was thinking of using electrical tape.
But I really think it would be best to replace the wire with a new one. If I do this how do I find out what gauge I need to use.
Don't just wrap it with tape. You will need to cut, strip and solder the wire. Then use tape or shrink tubing to insulate it.
Yes - it probably would be best to replace it - but first see if you can determine what caused it to break in the first place (chafing, flexing, etc) then you may be able to prevent it from happening again.
As for the gauge - if you have a dial caliper, measure the diameter and look it up in an AWG wire size table.
http://www.seas.gwu.edu/~ecelabs/appnot ... at/swc.pdf
If that's not possible, then use at least #14, which can easily handle 15 A.
Posted: Thu Jun 09, 2011 11:56 am
by JPG
Shop_Smith_Poppi wrote:What would be the best way to fix the broken wire on the drive motor ?
( I hope you can see it better now JPG!)
And yes it does not look like it but several of the small strands are broken.
I was thinking of using electrical tape.
But I really think it would be best to replace the wire with a new one. If I do this how do I find out what gauge I need to use.
I also am wanting to know what is the original length of the way tubes for a 10 ER? I have not taken a picture of my tubes yet but will tomorrow.
Also my Bench is made up of three 2x6's instead of 2 2x12's and it does not have the original leg supports either. Any suggestions on how to rebuild the bench I really do not like the way it is now.
I know I want some king of storage under neath it.
One more question how do you if possible take apart a Craftsman Drill chuck.
I would attempt a crimped splice if there is sufficient room for it. If not 16(or even 18) is robust enough for the short length. Temperature and voltage ratings are more important for this environment. I would not recommend soldering unless it was the only option(solder melts when heated sufficiently).
IIRC the 'norm' for the bench is 2-2x8. The stock leg set is 15 3/8" wide.(this allowed a 1/8" separation back in the 7 5/8" 2x8 days). Mine is doubled 3/4" plywood.
I guess the Craftsman chuck is a cushman which is probably very similar to a jacobs in construction.
Tis possible, but . . .
https://forum.shopsmith.com/viewtopic.php?t=4262
I am about to do the same thing to a 20N Jacobs chuck(1" capacity) - not sure the HF puller is up to it though! We shall see!
IIWY I would just pick up a 3326 jacobs on e-bay. The 5/8" to 1/2-20 adapter has to increase runout.
Posted: Fri Jun 10, 2011 6:10 am
by michaeltoc
JPG40504 wrote:I would not recommend soldering unless it was the only option(solder melts when heated sufficiently).
I beg to differ - if a wire gets hot enough to melt a solder joint, then you have far greater problems (or you're repairing a toaster

).
Original Shopsmith Wiring
Posted: Fri Jun 10, 2011 11:08 am
by billmayo
I find once I see a breakdown in the insulation/jacket (regardless of the reason) in any Shopsmith wiring, I replace all the wiring with new 14 ga 3 wire wiring. A ground connection to the motor is very important and could be a shocking experience if missing a ground wire or one that is not connected.
I find the ground prong has been cut off on a few power cords because of an internal short in the motor. The motor will still operate most times even with the run or start windings being shorted to the motor case. You most likely will not get shocked unless you are standing on a wet surface or touching something that is actually grounded. When looking at any Shopsmith with a cutoff ground prong, I figure another motor will be needed and allow for that replacement if I do decide to buy the Shopsmith.
Posted: Fri Jun 10, 2011 11:44 am
by JPG
michaeltoc wrote:I beg to differ - if a wire gets hot enough to melt a solder joint, then you have far greater problems (or you're repairing a toaster
).
FWIW a toaster is 3x as hot as the melting temp of solder(60-40).

Agreed temps high enough to melt solder would indicate a major problem. That is not a good time to 'separate' and become an additional problem.

Just plain not good practice(although effective). That is why motor winding to external wires are crimped today(the result of previous experience with soldering I believe).
Very rainy day case though.

I agree with Bill Mayo on the minimum size for external wiring(power cord, switch wiring) but internally smaller is ok especially the start winding wires.
Posted: Fri Jun 10, 2011 1:21 pm
by jcraigie
I have a tendency to "over engineer" but I used 12-3 wiring. I know I don't have to worry about amp draw thru that cord. The price difference between 14 and 12 gauge was not enough to deter me from the 12-3.
Posted: Fri Jun 10, 2011 11:49 pm
by Shop_Smith_Poppi
Well I did not mean to start a war of words between you all but it is fun to watch!

Either way I Believe I will try and replace the wires it will give me one less thing to worry about. So now the question is how do I do that. And Since I have some 12 gauge wire at the muffler shop already I think I will use it.
So when you say 12 - 3 wire do you mean Black white green? or are you saying its is one wire of 3 12 gauge wires inside of the one wire.
Posted: Sat Jun 11, 2011 12:19 am
by JPG
Shop_Smith_Poppi wrote:Well I did not mean to start a war of words between you all but it is fun to watch!
Either way I Believe I will try and replace the wires it will give me one less thing to worry about. So now the question is how do I do that. And Since I have some 12 gauge wire at the muffler shop already I think I will use it.
So when you say 12 - 3 wire do you mean Black white green? or are you saying its is one wire of 3 12 gauge wires inside of the one wire.
I believe he was referring to a power cord. 3 #12 conductors with an outer sheath(jacket). Inside 1 white insulated, 1 black insulated, and 1 green insulated and three filler 'strings' and maybe a wrapper.
Posted: Sat Jun 11, 2011 10:57 am
by beeg
Shop_Smith_Poppi wrote:And Since I have some 12 gauge wire at the muffler shop already I think I will use it.
Use stranded wire, KNOT solid copper.