I found the "woodworkingtoolsharpening.com" website through a Google search for lathe chisel grinding. Maybe the SS webmaster can answer the question about where it located or what else may be out there.
There are instructions in this site that show how to set up the sharpening guide on the strip sander table (left end of MV). That will be my next step to try as a comparison to the using it with a disc sander on the main or aux table.
Anyway, it appears that lathe chisel grinding is not as much witchcraft as I was trying to make it. My old PTWFE shows tool angles that are much different also.
I'm just now trying to get started with turning so as my turning skills improve, so will my tool sharpening skills and knowledge.
All of the discussions and insights are greatly appreciated.
Thanks to all and have a wonderful Thanksgiving.
Lathe Chisel Grinding
Moderators: HopefulSSer, admin
-
johnmccrossen
- Gold Member
- Posts: 173
- Joined: Wed Feb 21, 2007 8:09 pm
- Location: Washington
John McCrossen
Everett, Wa.
1954 Mk 5 SN 269454, 1955 Mk 5 SN 316013, 1960 Mk 5 SN 360792, 1962 Mk 5 SN 380102, Magna band saw, (2) jointers, (1) belt sander, (1) air compressor, (1) jig saw, (1) strip sander, (1) 20" scroll saw, DC 3300 dust collector, Sawsmith RAS, Craftsman table saw, 13" DeWalt planer, Triton 3 1/4 HP plunge router & table

John-
Check out the price on the chisel sharpening attachment for the strip sander. I have used both methods and I very much prefer the strip sander attachment to the other method of sharpening chisels. One tip I would pass on to you. If you have a cleaned out one gallon paint bucket, fill it with cold water so you can cool the chisel off immediately after sharpening it so you don't lose the temper of the steel. I also leave the burr on as an aid in turning since it will come off anyway (a tip from the Travelling academy course).
Have a great Thanksgiving,
BPR
-
dusty

- Platinum Member
- Posts: 21371
- Joined: Wed Nov 22, 2006 6:52 am
- Location: Tucson (Wildcat Country), Arizona
Lathe Chisel Grinding
I have a set of chisels that have never touched a piece of wood. I've been to and am enrolled in the Traveling Academy Turning Session. I have a box of wood that I have been saving for practise. I watched Nick sharpen chisels on the Saw Dust Session.
I decided it was time to give it a try. First of all - no one lied when they said that new chisels need to be sharpened.
So I've been trying. I got a couple that look like they might be OK. The gouges, however, are another story. Nick says "Make sure the ears are even". For me, that's easier said than done.
Someone wrote earlier is this thread that their chisels might be too short to sharpen using the sharpening fixture. Mine are not too short now (they are brand new 20 year old chisels) but they may be before I get a set of chisels that I can work with.
There certainly is a skill involved here that I have not yet acquired.
"Making Sawdust Safely"
Dusty
Sent from my Dell XPS using Firefox.
Dusty
Sent from my Dell XPS using Firefox.
-
dusty
- Platinum Member
- Posts: 21371
- Joined: Wed Nov 22, 2006 6:52 am
- Location: Tucson (Wildcat Country), Arizona
Lathe Chisel Grinding
Grinding the roundnose looked to be the simplest of all. Actually, grinding it might be. Mounting the roundnose in the grinding fixture is my current problem.
It seems to me that there is NO WAY I can achieve the angle that is on that roundnose with the fixture I have.
If anyone has a camera that would allow a closeup of a properly ground roundnose, while mounted in the sharpening fixture, I would sure appreciate it.
It seems to me that there is NO WAY I can achieve the angle that is on that roundnose with the fixture I have.
If anyone has a camera that would allow a closeup of a properly ground roundnose, while mounted in the sharpening fixture, I would sure appreciate it.
"Making Sawdust Safely"
Dusty
Sent from my Dell XPS using Firefox.
Dusty
Sent from my Dell XPS using Firefox.
-
dusty
- Platinum Member
- Posts: 21371
- Joined: Wed Nov 22, 2006 6:52 am
- Location: Tucson (Wildcat Country), Arizona
Lathe Chisel Grinding
I have just come to realize that woodworkingtoolsharpening.com, referenced in a couple previous posts is actually an extract of information from PTWFE. This should not be a surprise but it sure was for me. I thought I had read that book cover to cover. several times.
I still don't know how to grind the roundnose.
I still don't know how to grind the roundnose.
"Making Sawdust Safely"
Dusty
Sent from my Dell XPS using Firefox.
Dusty
Sent from my Dell XPS using Firefox.

I think if I can recall back that far... the jig provides a very different angle then is on the orginal tool.
Some where in the manual or in the book I think they mention this. I know when I set it up I expected it to be off by a small amount but the amout was a lot larger then that.
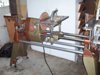
I went with making a plywood table that mounts the jig. The table is for the left end of the shopsmith on an extension table. In my case I need to flop the jig 180 to get the proper side of the jig facing the sanding disk. If I recall on this operation you need to have the sharpener base (in my case the plywood) vertically centered on the sanding disk. The guide is set to 0 deg. Move the sanding disk between a 1/16" and 1/4" away and lock it there. The chisel has the bevel up and you just touch the disk then lock it in that location. Rotate it so it is not touching turn on the machine. Now as you rotate it the proper curve is established, when it is no longer grinding shut things down and take the chisel out. The gap between the fixture and the disk changes the radius. If you want to see what is happening when you are working use a black felt tip to mark the area and then as you grind you see the fresh metal where it was ground away.
Hope this gets you back in the ball park... anyway make sure you read the manual in case I have some of this wrong...... I'll check sometime tonight and see if I messed up my instructions.... so make sure you do it the way the manual says if the instructions don't agree.
Ed
Some where in the manual or in the book I think they mention this. I know when I set it up I expected it to be off by a small amount but the amout was a lot larger then that.
I went with making a plywood table that mounts the jig. The table is for the left end of the shopsmith on an extension table. In my case I need to flop the jig 180 to get the proper side of the jig facing the sanding disk. If I recall on this operation you need to have the sharpener base (in my case the plywood) vertically centered on the sanding disk. The guide is set to 0 deg. Move the sanding disk between a 1/16" and 1/4" away and lock it there. The chisel has the bevel up and you just touch the disk then lock it in that location. Rotate it so it is not touching turn on the machine. Now as you rotate it the proper curve is established, when it is no longer grinding shut things down and take the chisel out. The gap between the fixture and the disk changes the radius. If you want to see what is happening when you are working use a black felt tip to mark the area and then as you grind you see the fresh metal where it was ground away.
Hope this gets you back in the ball park... anyway make sure you read the manual in case I have some of this wrong...... I'll check sometime tonight and see if I messed up my instructions.... so make sure you do it the way the manual says if the instructions don't agree.
Ed
{Knight of the Shopsmith} [Hero's don't wear capes, they wear dog tags]
-
dusty
- Platinum Member
- Posts: 21371
- Joined: Wed Nov 22, 2006 6:52 am
- Location: Tucson (Wildcat Country), Arizona
Lathe Chisel Grinding
ed, you are so right. I have been reading PTWFE and the info in this post and referenced by this post. You have stated, almost to the word (well, at least to the thought) what is stated in PTWFE.
It's curious to me that Shopsmith would deliver this one chisel ground so differently than the grinding jig.
It also seems strange, to me, that Nick didn't mention it in his Sawdust Session on chisel sharpening. Maybe I better go view that again.
It's curious to me that Shopsmith would deliver this one chisel ground so differently than the grinding jig.
It also seems strange, to me, that Nick didn't mention it in his Sawdust Session on chisel sharpening. Maybe I better go view that again.
"Making Sawdust Safely"
Dusty
Sent from my Dell XPS using Firefox.
Dusty
Sent from my Dell XPS using Firefox.
Why I like the SS sharpening guide for my chisels
When I attended one of several of the traveling turning sessions, one of my instructors suggested removing the shaper portion from the guide. It cleared up a lot of space, and my chisels come up sharp.
Sorry for the lack of posts, I was sick all summer and ended up is the hospital. I finely escaped on Sunday.
Sorry for the lack of posts, I was sick all summer and ended up is the hospital. I finely escaped on Sunday.
-
dusty
- Platinum Member
- Posts: 21371
- Joined: Wed Nov 22, 2006 6:52 am
- Location: Tucson (Wildcat Country), Arizona
Stay out of Hospitals
smredleg, you have my sympathy and congratulations. I spent a long haul incarsarated (in the hospital) just awhile back. It ain't no fun.
If there ever is a next time, heaven forbid, I'll have a connection to the outside world or I ain't going in. I've come to need this computer almost as much as I need my shop equipment.")
Hang in there. Keep chattin with us until it interferes with sawdust therapy. Nothing should get in the way of shop time.
If there ever is a next time, heaven forbid, I'll have a connection to the outside world or I ain't going in. I've come to need this computer almost as much as I need my shop equipment.
Hang in there. Keep chattin with us until it interferes with sawdust therapy. Nothing should get in the way of shop time.
"Making Sawdust Safely"
Dusty
Sent from my Dell XPS using Firefox.
Dusty
Sent from my Dell XPS using Firefox.
Sorry John - I'll get to your 13 degrees left grinding as soon as I address Ed's recall.reible wrote:I think if I can recall back that far... the jig provides a very different angle then is on the orginal tool.
Some where in the manual or in the book I think they mention this. I know when I set it up I expected it to be off by a small amount but the amout was a lot larger then that...
...Hope this gets you back in the ball park... anyway make sure you read the manual in case I have some of this wrong...... I'll check sometime tonight and see if I messed up my instructions.... so make sure you do it the way the manual says if the instructions don't agree.
Ed
If the Sharpening Jig is set to 0 degrees, the angle ground on the Gouge and the Skew is 45 degrees. This is in between a scraping and a shearing grind. Also with the jig set at 0 degrees]Note[/U] This sharpening operation is the only one that does not repeat the factory angle..."
Not being an accomplished turner - I have decided to continue using the "factory grind setting" at 45 deg. and learn how to both scrape and shear. I've had good results using that grind. Maybe now the time is right to try a little less angle.
For me the Roundnose Chisel is the easiest to re-sharpen with the jig. Just follow the instructions in the 8 page guide. Moving the jig closer to the sandpaper gives a smaller and rounded tip, while moving the Jig back 1/4" will give a larger diameter with slight corners.
johnmcrossen - I can now understand (after a bit of re-reading) why your instructor recommended a 13 degree left angle on the jig. This does yield a 33 degree angle on the gouge, as you said. I guess he thought (knows) that it is easier/faster to do shearing work than scraping. As I understand - scraping is for beginners like me. If you are using Shopsmith lathe tools, I believe you can make the tool touch the sander (at the 13 deg. setting) by moving the jig forward so the front of the jig misses the sander. With the disk - you would have to grind near the center of the disk. With the belt sander, it would be no problem. I noticed that if a person drills holes in a table using the paper template that came with the jig, there are 4 holes, so the jig can be moved.
Octogenarian's have an earned right to be a curmudgeon.
Chuck in Lancaster, CA
Chuck in Lancaster, CA