AllenH,
Thank you for sharing the videos of your progress. I have enjoyed seeing your progress and am happy for you in getting your Goldie restored.
For those who have watched the video for tips and help there are things to know about what was shown. This Goldie has been upgraded in this restoration process. Originally it had a 3/4 HP Motor and the Gilmer Drive. What is shown in the Headstock video is it being upgraded to a 1-1/8 HP Motor and the Poly V Drive with a double bearing Quill. It is a nice upgrade for this Goldie made just prior to the 1-18 HP Motor and the Poly V Drive changes.
Allen probably knows I cringed with every strike of the hammer he used while getting the Drive Sleeve Assembly back into the Headstock. :eek:
He acknowledged that the hammer was not the best choice. Metal to metal striking can "mushroom" the end being struck. The saving thing on the Drive Sleeve Assembly is the beveled end on the spindle. Enough about that.
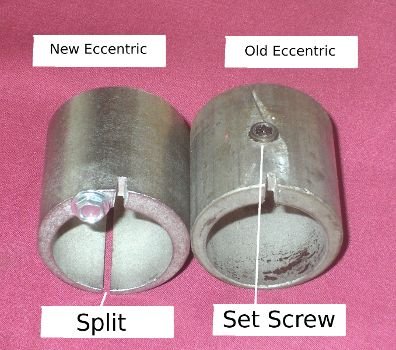
When the Idler Shaft Assembly was put back into the Headstock, he didn't put the Eccentric in with it. This is fine for the version of the Eccentric he was putting in with the Poly V Drive upgrade. Some versions of the Eccentric have a set screw to hold it on the Idler Shaft Bearing. Those Eccentrics need to be attached to the Bearing prior to the Idler Shaft Assembly being re-inserted in the Headstock. Below is a picture of two of the Eccentric types. The new type is the one used in the upgrade shown in the video. Note the split in the thin wall side of the casting. The other is the type with the set screw. His caution about tightening the cap screw and nut which holds the Idler Shaft Assembly in the Headstock Casting should be followed. DO NOT OVERTIGHTEN. Doing so can break the Headstock casting.
_
.
Not shown in the video is when the "V" Belt was put back on the Idler Shaft Assembly. This is done prior to re-installing the Speed Control Assembly and the Loop on the end of the Idler Shaft Assembly is put over the Quadrant (porkchop) of the Speed Control.