Page 1 of 5

Is there more interest in Kreg pocket hole stuff?

Posted: Wed Jan 15, 2020 4:01 pm
by reible
I have a nice collection of the screws, jigs and clamps and would be willing to do a few posts for those that might be interested. Most of this would be at a 101 level for beginners and is already "out there" somewhere but here it you would be able to ask questions and see detailed photos.

Let me know if there is interest and I'll see what I can come up with.

There will be no testing of joint types as I'm not a fan of what has been done out there as it is pretty much meaning less. We might discuss that however.

Ed

Re: Is there more interest in Kreg pocket hole stuff?

Posted: Sat Jan 18, 2020 7:30 pm
by JPG
Not much apparently!

As a total newbie to kreg etc. I would benefit from such effort, but that is hardly justification for the effort . :)

Re: Is there more interest in Kreg pocket hole stuff?

Posted: Sat Jan 18, 2020 7:43 pm
by BuckeyeDennis
I may or may not learn anything new about the jigs and clamps. I have an early/basic Kreg drill guide that that works fine for my limited purposes. But I’d definitely be very interested in your thoughts on joint testing.

Re: Is there more interest in Kreg pocket hole stuff?

Posted: Sun Jan 19, 2020 12:30 am
by reible
Not much interest now how ever thing might get more interesting after we get started, let's give it a try.

I'd like to start by looking at the screws involved. They come in difference lengths, not unlike other screws. They come with different head types, difference finishes and yes different thread types. They even have a larger stronger version of these. And one of the advantages is that this is a system so one needs to get the right screws for the job but they make that pretty easy to do. If you chose to wing it well who knows what you will end up with.

Kreg provides the information you need. You are much better off if you follow that information.

Looking first at finishes, the most expensive option is stainless steel, and if you need the corrosion resistance then it is the way to go. Next is something the call Blue-Kote™, good for damp/wet location or if you are working with treated wood. Zinc is the more common one for working on dry indoor projects and also is the cheapest. I personally have used the zinc and blue-kote but never the ss.

Guess which one is which:
ks1.jpg
ks1.jpg (68.46 KiB) Viewed 14382 times
Next up is the thread selection. Fine-Thread is used for hard dense woods, higher thread count and less likely to split the wood. Coarse-Thread screws are for soft woods and plywood/MDF.

Since you did so well on the last picture see how you do on this one:
ks3.jpg
ks3.jpg (61.56 KiB) Viewed 14382 times
There are two head types, Pan-Head and Maxi-Loc. The later is the most common one used with the large head. The pan-head is sometimes used with hard dense wood and when joining 1/2" materials. The shank is also finer which brings other advantages in certain situations such as they are less likely to split the wood and can be places closer together and in tighter locations.

Head types are just as easy as the other two:
ks2.jpg
ks2.jpg (53.87 KiB) Viewed 14382 times
Lastly we need to talk about lengths of screws. This varies with the screw types. SS screws come in 1-1/4" both fine and course threads, the 1-1/2" and 2-1/2" are course only. I have no reason to spout other types because that information resides places. What I did want to point out is that length matters and you really need some help to get you going on this. On my next post we will get more into this.

Ed

Re: Is there more interest in Kreg pocket hole stuff?

Posted: Sun Jan 19, 2020 8:42 am
by Ed in Tampa
I am in the class so keep going!

Re: Is there more interest in Kreg pocket hole stuff?

Posted: Sun Jan 19, 2020 9:15 am
by Gene Howe
Ed in Tampa wrote:I am in the class so keep going!
Ditto.

Re: Is there more interest in Kreg pocket hole stuff?

Posted: Sun Jan 19, 2020 10:17 am
by dusty
I'll read everything you post.

Incidently, I use Kreg screws for many tasks not related to pocket holes. I like the head for jobs where it will be visible,

Re: Is there more interest in Kreg pocket hole stuff?

Posted: Sun Jan 19, 2020 4:38 pm
by reible
The length of the screw is important because if it is too long it might have the point come through and wreck your project or too short it might not have enough grip and could fail. That is the obvious bits.

A secondary thing to think about is the how the screw is made to work. Note that the screw only has threads part way up the shank.
ks4.jpg
ks4.jpg (48.92 KiB) Viewed 14296 times
The top portion has no threads, because this is how the screw pulls the mating parts together. The threaded portion is in the mating part and the un-threaded is in the pocket hole part. If the screw length is wrong then it will also likely not work the way it should. By either having threaded screw bits in the pocket hole portion thus not let the joint pull together or clearance in the mating part reducing holding power.

If this confuses you at first don't worry as we go on this will come up again.

The typical wood thickness for pocket holes are in the lower range of 1/2" and work up to 1-1/2". So as you might guess there are a few different screw lengths that are also common. The most common I feel are the 1", 1-1/4", 1-1/2", 2" and 2-1/2". I did get some .75" ones for a project but that would be an outlier.

So why the various lengths? The idea behind the pocket hole is that the pocket hole jig puts the pocket hole in the the work piece with the exit hole being in the middle of the thickness of the work piece. The jig is a fixed (I believe) 15 degrees so to accomplish this for different thickness of materials the jig has to be placed at different locations from the joint. As this point moves so changes the length of screw needed.

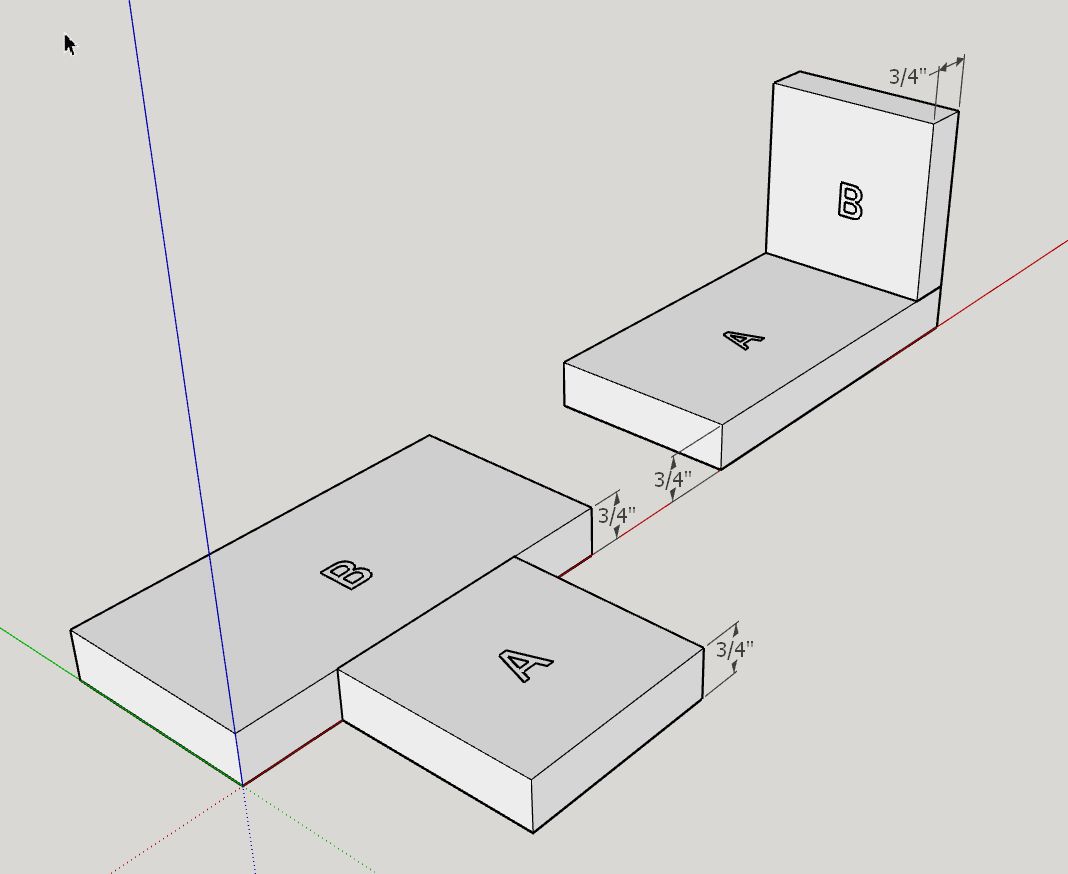
There are two basic joints that you make, one they call a face joint the other an edge joint. A face joint is where the materials are on the same plane and the edge is when they are not, most commonly they are at 90 degrees to each other.
kjoints.jpg
kjoints.jpg (47.2 KiB) Viewed 14296 times
Before we get to far on this keep in mind that the thickness is the actual thickness not the nominal one. As an example a 1 x 4 the thickness is 3/4" so that is what you use not the 1".

Looking at the face joint (left one) and assuming the thickness is 3/4" for both pieces you would use a 1-1/4" screw. If the two parts were say 1/2" thick then the screw length would be 1". If they were 1-1/2" thick then the screw length would be 2-1/2". Kreg provides tables for this but I got this screw selector wheel seen below.
ks5.jpg
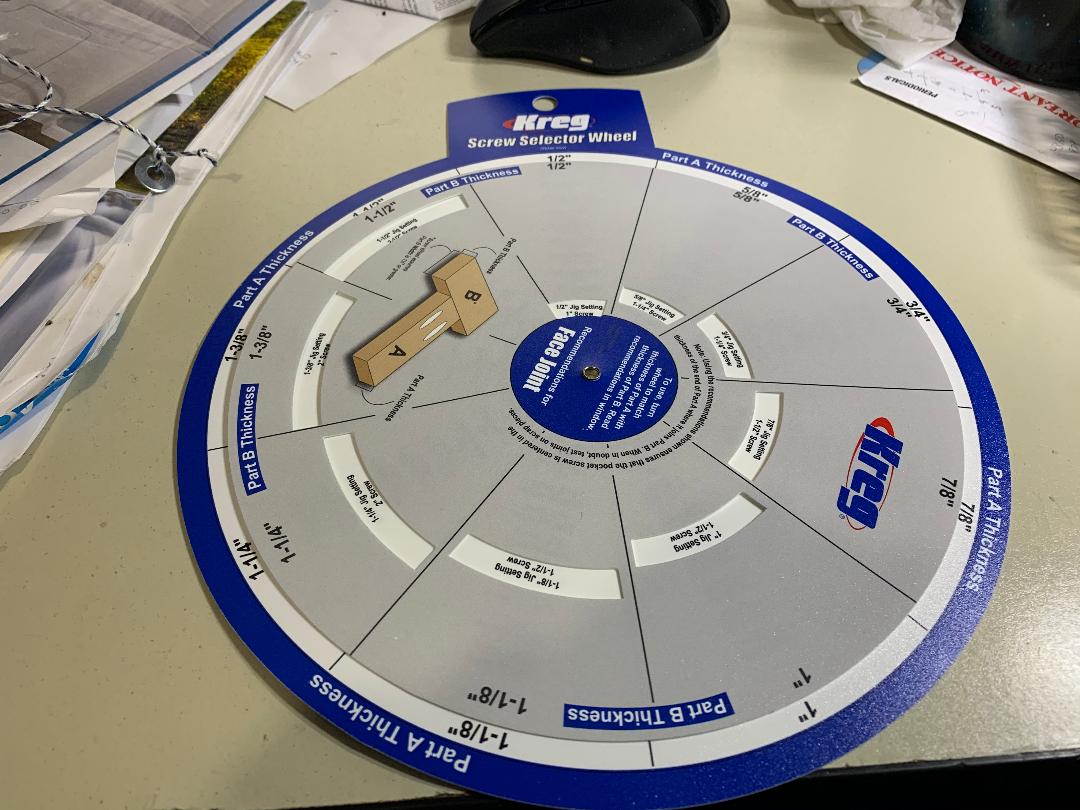
ks5.jpg (123.37 KiB) Viewed 14296 times
What ever works for you is fine but you do need to do more then guess.

The side that the pocket holes are on is the hidden side if possible. The opposite side is the good face. You of course want to keep that face nice so besides the screw length you also have to set the depth stop on the drill bit and the jig based on material thickness. So we will leave the screw lengths for a while and look at the basics of those settings in my next post.

Ed

Re: Is there more interest in Kreg pocket hole stuff?

Posted: Sun Jan 19, 2020 6:12 pm
by reible
The kreg jig requires a special bit to make the pockets. It is basically a stepped bit that looks like this:
ks6.jpg
ks6.jpg (70.85 KiB) Viewed 14277 times
When we talk about setting the collar depth stop it is from the collar to the step of the bit as shown with the green measurement. The point is not in the measurement.

In this picture note how the pilot part of the bit corresponds to the screws un-threaded portion.
ks7.jpg
ks7.jpg (100.49 KiB) Viewed 14277 times
As an aide in setting the depth kreg has various helpers. On this jig they have a depth gauge built in. Not really easy to see in the photo but not so bad on the tool.
ks8.jpg
ks8.jpg (141.04 KiB) Viewed 14277 times
This is only an example so what you have many or many not look like this.

To set the depth you first need to know the actual thickness of the material. Then you loosen the collar and put the bit in the jig, set the depth and tighten the collar. Here is the bit set for 3/4" material:
ks9.jpg
ks9.jpg (126.01 KiB) Viewed 14277 times
A little heads up, 3/4" plywood is less then 3/4" so you can fudge the collar placement towards a lower number, but don't get too carried away and doing a test before hand is a good idea before jumping in and doing damage because you were a bit too far off.

This brings us to the the main part of the jig. There are metal guide bushings to guide the bit and keep in on course. Again kreg makes a few of these so this is just one example. In this picture you can see the portion of the jig that is against the material when drilling.
ks10.jpg
ks10.jpg (63.78 KiB) Viewed 14277 times
This is what the bit looks like when set to 3/4" material and inserted in the jig all the way. Also note the markings on the side of the jig.
ks11.jpg
ks11.jpg (60.2 KiB) Viewed 14277 times
Those numbers are used to locate the jig into the mounting system as seen here:
ks12.jpg
ks12.jpg (75.96 KiB) Viewed 14277 times
At this point we have our bit and jig set to drill pocket holes in 3/4" material.

There have been quite a number of different jigs along the way and what I have been showing is the K4. I have the K3 and a couple of older ones including the very first one I got many many years ago. They have now progressed to several newer models which I have had no exposure to.

Next we will talk a bit about some simple joints and other topics.

Ed

Re: Is there more interest in Kreg pocket hole stuff?

Posted: Mon Jan 20, 2020 8:53 pm
by reible
In the drawing below which piece should the pocket holes be drilled in? This is a pretty typical joint and we can assume it is ordinary wood so typical wood working techniques would apply.
ks13.jpg
ks13.jpg (53.42 KiB) Viewed 14164 times
Have you locked in your answers?

If you said "A" then you are correct. You really don't want to put screws into end grain so the better choice is to have the pockets put in and have the nice large head to be on the end grain.

Now a big question is how many pockets should you put in? Well again that depends but there are rules of thumb for this. And if you happen to have the jig I do then we can get some information from that.
ks14.jpg
ks14.jpg (93.48 KiB) Viewed 14164 times
As you can see there are 3 holes, and they are labeled A,B, and C. The spacing of the holes then relates to the spacing that is best for the pocket holes depending on how wide part "A" is. This type of joint pretty much needs two pockets minimum. If the part were 1" to 2" wide then you use the hole pair of B and C. If the part were 2" to 3" then the pair A and B is best. If the part is 3" to 4" then the A and C is used. These are not set in stone and you might find a reason to cheat a little.....

Now while we are at it there are times where you might be attaching a panel where there are longer lengths involved. In that case start in 2" on both ends and then space the pockets every 6". You can use any of the holes for this.

If you happen to have one of the jigs without the hole pattern this might help. I just have a cheap plastic rule here with me so these dimensions are close but not likely right on, but should be close enough to use. The A-B hole are 7/8", the A-C is 1-3/8" and the B-C is 9/16". I'm sure kreg has this spelled out some where so you could see if you can find it if it importation to you.

Another question is about glue. I think the answer is that you get a better joint with the addition of glue but you don't have to glue......... I think half or so of the joints I don't use glue.

Another thing that seems to come up is how tight to try and pull the joint. It is quite easy to over tighten, and that is not far from either stripping the threads or driving too deep and having the screw come through the part. I think a good snug fit is the best you can do. If you are using a modern battery powered drill then set the ring to a lower setting then test with a screw driver, if you can easily get a couple more turns then reset the drill and try again. Once the screwdriver doesn't let you tighten more then stop. And yes softer woods are easier to mess up with over tightening.

I think next we will talk about clamping. So stay tuned, and if have questions or comments let me know.

Ed