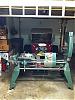
Just to be sure - if your gilmer drive setup is as shown in the 3rd photo, then you need to reseat it and/or replace the bearings. The bearing on the left side of where the belt is sitting should be seated into the headstock casting.athomas01 wrote:Well... only one way to find out... I went exploring into the unit... took my time and felt my way through it... I mean what the heck... saw a video online! hehe
Here is what I found... I don't know what I'm looking at but I'm sure you will...


Need some help...
Moderator: admin


Mark 7, Pro Planer, Jointer, Bandsaw w/Kreg, Biscuit Joiner, Belt Sander, Jig Saw, Ringmaster, DC3300, Overarm Pin Router, Incra Ultimate setup
JWBS-14 w/6" riser, RBI Hawk 226 Ultra, Bosch GSM12SD Axial Glide Dual Compound Miter Saw
-- I have parts/SPTs available, so if you are in the Seattle area and need something let me know --
damagi AT gmail DOT com
JWBS-14 w/6" riser, RBI Hawk 226 Ultra, Bosch GSM12SD Axial Glide Dual Compound Miter Saw
-- I have parts/SPTs available, so if you are in the Seattle area and need something let me know --
damagi AT gmail DOT com
-
JPG

- Platinum Member
- Posts: 35598
- Joined: Wed Dec 10, 2008 7:42 pm
- Location: Lexington, Ky (TAMECAT territory)
damagi wrote:Just to be sure - if your gilmer drive setup is as shown in the 3rd photo, then you need to reseat it and/or replace the bearings. The bearing on the left side of where the belt is sitting should be seated into the headstock casting.
Good Catch! I missed that(too busy looking at the casting).
It is missing the retaining ring! It may be missing the one at the inside end also/,maybe/couldbe.
The casting is indeed a sand-cast early production headstock. Rougher finish wise, but heavier(more aluminum) and IMHO stouter. Not sure, but there may have been an access hole added to the back side. I say that after observing the wear on the paint above the medallion(slips up/down?) and what may be the bottom edge in the pix showing the drive belt.
Inside looks immaculate, so somebody has definitely cleaned it up!
BTW when actually being used, the jointer goes on the end where the bandsaw currently resides.
A word of caution if you take out the idler shaft(the one in the middle), do not over tighten the screw clamping it in place. Those ears will break. Later versions use a screw. split ring lock washer and nut. Our resident expert(Bill Mayo) recommends tightening just to point the lock washer is squeezed flat.
He also recommends adding(tapping) a retaining washer/screw, but I prefer the original retaining brackets(missing from yours), but they require much futzing to get them installed correctly and can fray the gilmer belt if not positioned just right..
╔═══╗
╟JPG ╢
╚═══╝
Goldie(Bought New SN 377425)/4" jointer/6" beltsander/12" planer/stripsander/bandsaw/powerstation /Scroll saw/Jig saw /Craftsman 10" ras/Craftsman 6" thicknessplaner/ Dayton10"tablesaw(restoredfromneighborstrashpile)/ Mark VII restoration in 'progress'/ 10E[/size](SN E3779) restoration in progress, a 510 on the back burner and a growing pile of items to be eventually returned to useful life. - aka Red Grange

-
JPG
- Platinum Member
- Posts: 35598
- Joined: Wed Dec 10, 2008 7:42 pm
- Location: Lexington, Ky (TAMECAT territory)
athomas01 wrote:Part III
Now this one was for me... my real time exploded view so I know how to reassemble.
[ATTACH]14433[/ATTACH]
Whoops! You are also missing the sleeve(and probably the woodruff key).
Another 'exploded' view.
https://forum.shopsmith.com/viewtopic.php?t=3776&highlight=reassembling
- Attachments
-
- quill exploded missing parts 2.jpg (403.88 KiB) Viewed 3161 times
╔═══╗
╟JPG ╢
╚═══╝
Goldie(Bought New SN 377425)/4" jointer/6" beltsander/12" planer/stripsander/bandsaw/powerstation /Scroll saw/Jig saw /Craftsman 10" ras/Craftsman 6" thicknessplaner/ Dayton10"tablesaw(restoredfromneighborstrashpile)/ Mark VII restoration in 'progress'/ 10E[/size](SN E3779) restoration in progress, a 510 on the back burner and a growing pile of items to be eventually returned to useful life. - aka Red Grange
╟JPG ╢
╚═══╝
Goldie(Bought New SN 377425)/4" jointer/6" beltsander/12" planer/stripsander/bandsaw/powerstation /Scroll saw/Jig saw /Craftsman 10" ras/Craftsman 6" thicknessplaner/ Dayton10"tablesaw(restoredfromneighborstrashpile)/ Mark VII restoration in 'progress'/ 10E[/size](SN E3779) restoration in progress, a 510 on the back burner and a growing pile of items to be eventually returned to useful life. - aka Red Grange
-
JPG
- Platinum Member
- Posts: 35598
- Joined: Wed Dec 10, 2008 7:42 pm
- Location: Lexington, Ky (TAMECAT territory)
dusty wrote:I believe there are some pictures already on the forum that show how the bearing should be seated in the raceway. I'll spend some time later today to see if I can find them -OR- maybe the original poster will beat me to it.
These?:D
Although it shows a Poly-v drive it serves to illustrate the Gilmer drive as well.
https://forum.shopsmith.com/viewtopic.php?p=40968#post40968
Note it is one of two.
Use the link in the line near the bottom to get to further links.
╔═══╗
╟JPG ╢
╚═══╝
Goldie(Bought New SN 377425)/4" jointer/6" beltsander/12" planer/stripsander/bandsaw/powerstation /Scroll saw/Jig saw /Craftsman 10" ras/Craftsman 6" thicknessplaner/ Dayton10"tablesaw(restoredfromneighborstrashpile)/ Mark VII restoration in 'progress'/ 10E[/size](SN E3779) restoration in progress, a 510 on the back burner and a growing pile of items to be eventually returned to useful life. - aka Red Grange
╟JPG ╢
╚═══╝
Goldie(Bought New SN 377425)/4" jointer/6" beltsander/12" planer/stripsander/bandsaw/powerstation /Scroll saw/Jig saw /Craftsman 10" ras/Craftsman 6" thicknessplaner/ Dayton10"tablesaw(restoredfromneighborstrashpile)/ Mark VII restoration in 'progress'/ 10E[/size](SN E3779) restoration in progress, a 510 on the back burner and a growing pile of items to be eventually returned to useful life. - aka Red Grange
Yep... when assembled again it was seated... so much to learndamagi wrote:Just to be sure - if your gilmer drive setup is as shown in the 3rd photo, then you need to reseat it and/or replace the bearings. The bearing on the left side of where the belt is sitting should be seated into the headstock casting.
Big Time Rookie!


It actually is domed washer... just didn't show up in the photo as the retaining ring as well... the second washer was seated on top of the depth stop dial so didn't show up either... however, I am missing the spring washer and another one that I'm not sure what it's called... one more thing on my to do list!
Also, was not real clear on the download I did last night as to which way the domed washer goes in... flat to center or domed to center...
thank you!
Big Time Rookie!
[quote="JPG40504"]...Inside looks immaculate, so somebody has definitely cleaned it up!
BTW when actually being used, the jointer goes on the end where the bandsaw currently resides.]
I did some cleaning while in there.... and I'm not even going to admit how long it took me to realize that about the jointer!
BTW when actually being used, the jointer goes on the end where the bandsaw currently resides.]
I did some cleaning while in there.... and I'm not even going to admit how long it took me to realize that about the jointer!
Big Time Rookie!
-
JPG
- Platinum Member
- Posts: 35598
- Joined: Wed Dec 10, 2008 7:42 pm
- Location: Lexington, Ky (TAMECAT territory)
athomas01 wrote:I did some cleaning while in there.... and I'm not even going to admit how long it took me to realize that about the jointer!
Hey! All it needs is a flexible shaft to run under the headstock and leg and up to the jointer shaft.
[ATTACH]14434[/ATTACH]
The large flat washer was probably not there from day one(not to worry about).
Let us know how you 'make out' with the 'Magi'. ;>}
- Attachments
-
- quillexploded2 2.jpg (369.44 KiB) Viewed 3169 times
╔═══╗
╟JPG ╢
╚═══╝
Goldie(Bought New SN 377425)/4" jointer/6" beltsander/12" planer/stripsander/bandsaw/powerstation /Scroll saw/Jig saw /Craftsman 10" ras/Craftsman 6" thicknessplaner/ Dayton10"tablesaw(restoredfromneighborstrashpile)/ Mark VII restoration in 'progress'/ 10E[/size](SN E3779) restoration in progress, a 510 on the back burner and a growing pile of items to be eventually returned to useful life. - aka Red Grange
╟JPG ╢
╚═══╝
Goldie(Bought New SN 377425)/4" jointer/6" beltsander/12" planer/stripsander/bandsaw/powerstation /Scroll saw/Jig saw /Craftsman 10" ras/Craftsman 6" thicknessplaner/ Dayton10"tablesaw(restoredfromneighborstrashpile)/ Mark VII restoration in 'progress'/ 10E[/size](SN E3779) restoration in progress, a 510 on the back burner and a growing pile of items to be eventually returned to useful life. - aka Red Grange
[quote="JPG40504"]Hey! All it needs is a flexible shaft to run under the headstock and leg and up to the jointer shaft.
[ATTACH]14434[/ATTACH]
The large flat washer was probably not there from day one(not to worry about). But if opportunity occurs, get one!
Let us know how you 'make out' with the 'Magi'. ]
Actually I have two of the connecting shafts... will post pic so I can find out what the differences are and why I would use one over the other... The color and key are there as well... just were not in photo...
[ATTACH]14434[/ATTACH]
The large flat washer was probably not there from day one(not to worry about).
Let us know how you 'make out' with the 'Magi'. ]
Actually I have two of the connecting shafts... will post pic so I can find out what the differences are and why I would use one over the other... The color and key are there as well... just were not in photo...
Big Time Rookie!