Heath's Woodworking Projects
Moderator: admin
-
judaspre1982
- Platinum Member
- Posts: 1237
- Joined: Tue Jul 08, 2008 10:10 pm
-----------------------------
Last edited by judaspre1982 on Wed Apr 26, 2017 5:40 pm, edited 1 time in total.

My First Bowl
Thanks to Hurricane Isaac, I got Wed-Fri off from work. And all we got from the storm was a little rain and a light breeze. So, my experimentation with the lathe continued today. I practiced some spindle turning a week or so back, so today I thought I'd try a bowl with the faceplate.
It started out great. I already had some glued-up cedar, so I cut out a round-ish piece on the bandsaw, screwed the 3" faceplate to it and trued it up on the lathe (using the tailstock even though I don't think it was necessary).
Hollowing out the bowl is where things got tricky. My only lathe tools are a skew, a parting tool, and 3 gouges of varying sizes (from bigger than my thumb to about the size of a pencil). So I don't know if I was just using the wrong type of lathe knives, they weren't sharp enough, my technique was poor, or it was the wood itself, but I had problems with it "grabbing" the gouge. I don't know how to explain it other than that, but I'm pretty sure it wasn't supposed to happen.
Since this was just for the turning experience, I didn't put a lot of work into sanding and finishing. I sanded it somewhat smooth and then rubbed on a coat of BLO.
I plan to use it to replace the old ball cap I have in the utility room that I have been emptying my pockets into when I come home from work.
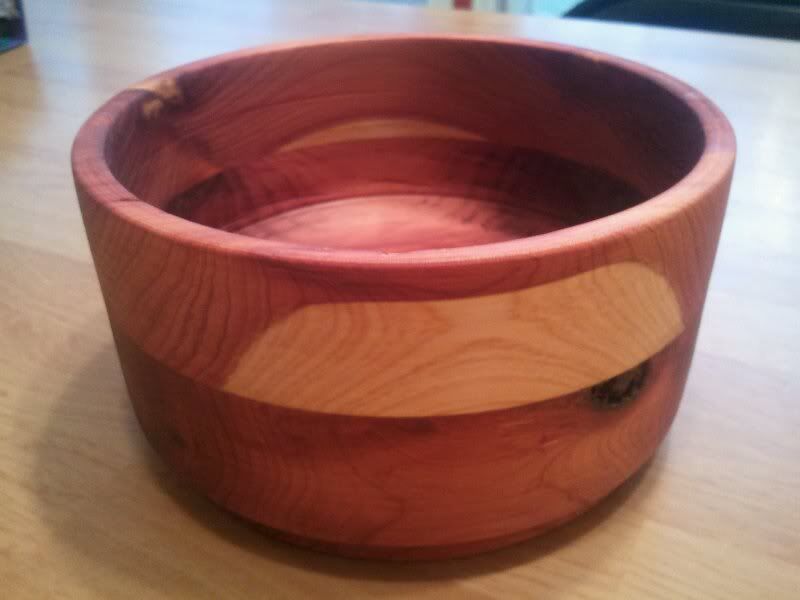
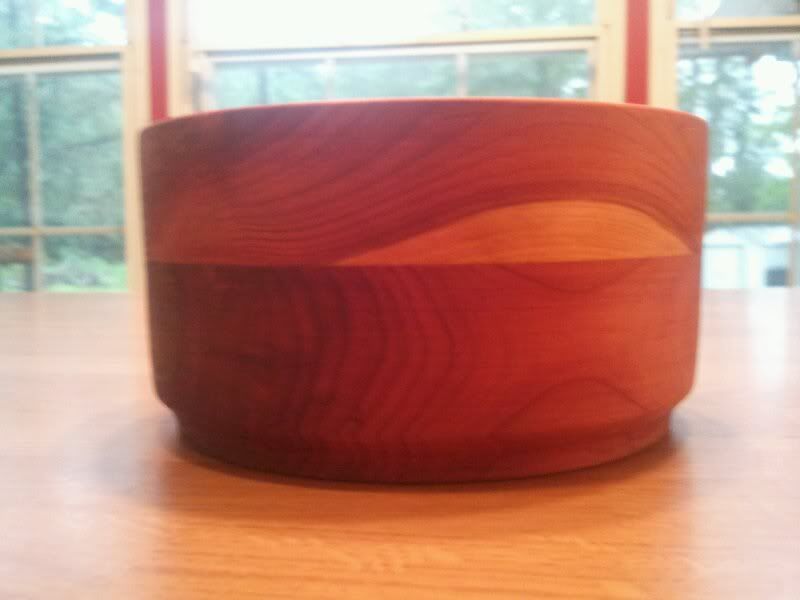
It started out great. I already had some glued-up cedar, so I cut out a round-ish piece on the bandsaw, screwed the 3" faceplate to it and trued it up on the lathe (using the tailstock even though I don't think it was necessary).
Hollowing out the bowl is where things got tricky. My only lathe tools are a skew, a parting tool, and 3 gouges of varying sizes (from bigger than my thumb to about the size of a pencil). So I don't know if I was just using the wrong type of lathe knives, they weren't sharp enough, my technique was poor, or it was the wood itself, but I had problems with it "grabbing" the gouge. I don't know how to explain it other than that, but I'm pretty sure it wasn't supposed to happen.
Since this was just for the turning experience, I didn't put a lot of work into sanding and finishing. I sanded it somewhat smooth and then rubbed on a coat of BLO.
I plan to use it to replace the old ball cap I have in the utility room that I have been emptying my pockets into when I come home from work.
Heath
Central Louisiana
-10ER - SN 13927, Born 1949, Acquired October 2008, Restored November, 2008
-10ER - SN 35630, Born 1950, Acquired April 2009, Restored May 2009, A34 Jigsaw
-Mark V - SN 212052, Born 1986, Acquired Sept 2009, Restored March 2010, Bandsaw
-10ER - SN 39722, Born 1950, Acquired March 2011, awaiting restoration
Central Louisiana
-10ER - SN 13927, Born 1949, Acquired October 2008, Restored November, 2008
-10ER - SN 35630, Born 1950, Acquired April 2009, Restored May 2009, A34 Jigsaw
-Mark V - SN 212052, Born 1986, Acquired Sept 2009, Restored March 2010, Bandsaw
-10ER - SN 39722, Born 1950, Acquired March 2011, awaiting restoration
-
terrydowning

- Platinum Member
- Posts: 1678
- Joined: Mon Jul 19, 2010 3:26 pm
- Location: Windsor, CO
Glad to hear Isaac was a non event for you.heathicus wrote:Thanks to Hurricane Isaac, I got Wed-Fri off from work. And all we got from the storm was a little rain and a light breeze. So, my experimentation with the lathe continued today. I practiced some spindle turning a week or so back, so today I thought I'd try a bowl with the faceplate.
It started out great. I already had some glued-up cedar, so I cut out a round-ish piece on the bandsaw, screwed the 3" faceplate to it and trued it up on the lathe (using the tailstock even though I don't think it was necessary).
Hollowing out the bowl is where things got tricky. My only lathe tools are a skew, a parting tool, and 3 gouges of varying sizes (from bigger than my thumb to about the size of a pencil). So I don't know if I was just using the wrong type of lathe knives, they weren't sharp enough, my technique was poor, or it was the wood itself, but I had problems with it "grabbing" the gouge. I don't know how to explain it other than that, but I'm pretty sure it wasn't supposed to happen.
Since this was just for the turning experience, I didn't put a lot of work into sanding and finishing. I sanded it somewhat smooth and then rubbed on a coat of BLO.
I plan to use it to replace the old ball cap I have in the utility room that I have been emptying my pockets into when I come home from work.
It's a nice bowl. Keep it for future reference and for tracking your progress. I certainly can't argue or complain about the result especially being your first. You set out to make a bowl, and you succeeded!
Regarding catches, probably a combination of all of the things you mentioned.
Cedar and softer open grained woods are notorious for being "grabby", this makes them ideal for practice woods. If you can turn and finish soft open grain woods with minimal sanding and minimal catches, then you have the right tool, the right edge, and the right technique and harder tighter woods will be a real joy to turn. Tearing up relatively inexpensive pine and fir (cedar if you have it in abundance) is much easier to take on the wallet than an expensive burl or hardwood balnk.
Tool sharpness is always an issue for turners. I recommend masteirng sharpening if you contuniue turning.
Tool selection
Never use a skew on the inside of a bowl, it's just a disaster in the making. That straight edge on the compound curves on the inside of a bowl will just get caught, dig in, send the chisel flying, break what you're turning, it's just a bad scenario.
Resist the urge to use spindle gouges on the inside of a bowl. It can be done, but use a scraping action at the center line rather than a shearing cut above the center line. Spindle gouges have too flat of a shape to get a good cutting action off the inside of the bowl. They are also too thin. Spindle gouges are designed to resist the compression force of a spindle coming at you and don't have the tensile strength for working insides. I have bent spindle gouges during a catch on the inside of a bowl.
Use a round nose scraper or a bowl gouge for best results. Bowl gouges are much beefier and can handle the tensile loads that occur when turning the inside of a bowl. Just look at different lathe chisel profiles from photos on the internet and you will see that bowl gouges have more metal than spindle gouges, have a much tighter "U" profile, and have a different grind for working the compound curves on the inside of a bowl.
My guess is that your three gouges are spindle gouges. The grind on spindle gouges lends itself to catches, it's just geometry.
I use a few of my practice bowls for the same thing. They are great for holding onto the contents of pocket and much nicer to look at than an old ball cap or just laying out.
Great job on a first bowl!! Welcome to the madness of turning!!
--
Terry
Copy and paste the URLs into your browser if you want to see the photos.
1955 Shopsmith Mark 5 S/N 296860 Workshop and Tools
https://1drv.ms/i/s!AmpX5k8IhN7ahFCo9VvTDsCpoV_g
Public Photos of Projects
http://sdrv.ms/MaXNLX
Terry
Copy and paste the URLs into your browser if you want to see the photos.
1955 Shopsmith Mark 5 S/N 296860 Workshop and Tools
https://1drv.ms/i/s!AmpX5k8IhN7ahFCo9VvTDsCpoV_g
Public Photos of Projects
http://sdrv.ms/MaXNLX
My shop is still in disarray from installing the wall and ceiling panels so I haven't been doing much in the format of woodworking. But I somehow got volunteered to help my niece with a project. She wanted to paint a pumpkin to look like R2D2 (the little robot from Star Wars) as her entry in a 4H contest. They wanted me to build the legs and I agreed. Even though I could only get to my hand held jig saw and drill.
They brought me the pumpkin already with a white base coat of paint on it to me this morning, and this is what I came up with.

And they just sent me this picture of their rough paint of the detail.

The stretcher across the bottom supports the weight of the pumpkin.
They brought me the pumpkin already with a white base coat of paint on it to me this morning, and this is what I came up with.
And they just sent me this picture of their rough paint of the detail.
The stretcher across the bottom supports the weight of the pumpkin.
Heath
Central Louisiana
-10ER - SN 13927, Born 1949, Acquired October 2008, Restored November, 2008
-10ER - SN 35630, Born 1950, Acquired April 2009, Restored May 2009, A34 Jigsaw
-Mark V - SN 212052, Born 1986, Acquired Sept 2009, Restored March 2010, Bandsaw
-10ER - SN 39722, Born 1950, Acquired March 2011, awaiting restoration
Central Louisiana
-10ER - SN 13927, Born 1949, Acquired October 2008, Restored November, 2008
-10ER - SN 35630, Born 1950, Acquired April 2009, Restored May 2009, A34 Jigsaw
-Mark V - SN 212052, Born 1986, Acquired Sept 2009, Restored March 2010, Bandsaw
-10ER - SN 39722, Born 1950, Acquired March 2011, awaiting restoration

Finished R2D2 pumpkin.

Heath
Central Louisiana
-10ER - SN 13927, Born 1949, Acquired October 2008, Restored November, 2008
-10ER - SN 35630, Born 1950, Acquired April 2009, Restored May 2009, A34 Jigsaw
-Mark V - SN 212052, Born 1986, Acquired Sept 2009, Restored March 2010, Bandsaw
-10ER - SN 39722, Born 1950, Acquired March 2011, awaiting restoration
Central Louisiana
-10ER - SN 13927, Born 1949, Acquired October 2008, Restored November, 2008
-10ER - SN 35630, Born 1950, Acquired April 2009, Restored May 2009, A34 Jigsaw
-Mark V - SN 212052, Born 1986, Acquired Sept 2009, Restored March 2010, Bandsaw
-10ER - SN 39722, Born 1950, Acquired March 2011, awaiting restoration

Got in a pretty nice weekend of shop time for once! And, also for once, I was working in my shop rather than on my shop.
I have a couple sets of double-six dominoes I want to make as Christmas presents. I had actually wanted to do this a couple years ago, but my time before we moved ran out and I'm just now able to get back to it.
I acquired the Maple from some folks online, including Jayhawk on this forum, trading a flat rate box of red aromatic cedar for a flat rate box of maple. Almost all of the maple I got was 3/4" thick and I needed it 3/8" thick. I resawed with the SS bandsaw (setting the waste aside for possible construction of the boxes for the dominoes). Since the pieces were no longer than 12", they were a little short to run through the planer without losing a couple inches to snipe. So I used my Wagner Safe-T-Planer on my 10ER drill press to plane them down mostly smooth and to a consistent thickness of 3/8".
After ripping them into 1" strips, I used this quickly assembled sled to crosscut them to 2" in length.

One day I'll get around to making a real crosscut sled, but for now, this worked for these small pieces. Instead of milling runners to attach to the "small parts cuttoff sled", I just clamped it to a couple miter gauges (I happen to have 3 that fit this table saw).

So now I have about 160 1" x 2" x 3/8" dominoes. I made a lot because I wanted enough to pick and choose 28 per set that had similar color and grain characteristics. I also needed some to experiment with the pips, center kerf, etc. I'll make as many sets as I can, and whatever is left over I'll give to the kids - and I wanted to have a bunch to give them.

I also used the lathe and turned a piece of oak into a 1/4" dowel. I'll use that in the drill chuck to burn/bore the pips onto each domino. My brief testing of this worked out great.
So one thing I need to do is round over each corner. Not all the edges, but just the 4 corners, and in a pretty tight radius. I think sanding is preferable to something like a router table, but I'm just not sure how to keep it consistent and controllable. I guess that's why I made extra. Any suggestions?
Also, any suggestions on a finish? I was thinking a spray polyurethane. Quick, easy, and durable. Any better suggestions? It has to be simple!
I have a couple sets of double-six dominoes I want to make as Christmas presents. I had actually wanted to do this a couple years ago, but my time before we moved ran out and I'm just now able to get back to it.
I acquired the Maple from some folks online, including Jayhawk on this forum, trading a flat rate box of red aromatic cedar for a flat rate box of maple. Almost all of the maple I got was 3/4" thick and I needed it 3/8" thick. I resawed with the SS bandsaw (setting the waste aside for possible construction of the boxes for the dominoes). Since the pieces were no longer than 12", they were a little short to run through the planer without losing a couple inches to snipe. So I used my Wagner Safe-T-Planer on my 10ER drill press to plane them down mostly smooth and to a consistent thickness of 3/8".
After ripping them into 1" strips, I used this quickly assembled sled to crosscut them to 2" in length.
One day I'll get around to making a real crosscut sled, but for now, this worked for these small pieces. Instead of milling runners to attach to the "small parts cuttoff sled", I just clamped it to a couple miter gauges (I happen to have 3 that fit this table saw).
So now I have about 160 1" x 2" x 3/8" dominoes. I made a lot because I wanted enough to pick and choose 28 per set that had similar color and grain characteristics. I also needed some to experiment with the pips, center kerf, etc. I'll make as many sets as I can, and whatever is left over I'll give to the kids - and I wanted to have a bunch to give them.
I also used the lathe and turned a piece of oak into a 1/4" dowel. I'll use that in the drill chuck to burn/bore the pips onto each domino. My brief testing of this worked out great.
So one thing I need to do is round over each corner. Not all the edges, but just the 4 corners, and in a pretty tight radius. I think sanding is preferable to something like a router table, but I'm just not sure how to keep it consistent and controllable. I guess that's why I made extra. Any suggestions?
Also, any suggestions on a finish? I was thinking a spray polyurethane. Quick, easy, and durable. Any better suggestions? It has to be simple!
Heath
Central Louisiana
-10ER - SN 13927, Born 1949, Acquired October 2008, Restored November, 2008
-10ER - SN 35630, Born 1950, Acquired April 2009, Restored May 2009, A34 Jigsaw
-Mark V - SN 212052, Born 1986, Acquired Sept 2009, Restored March 2010, Bandsaw
-10ER - SN 39722, Born 1950, Acquired March 2011, awaiting restoration
Central Louisiana
-10ER - SN 13927, Born 1949, Acquired October 2008, Restored November, 2008
-10ER - SN 35630, Born 1950, Acquired April 2009, Restored May 2009, A34 Jigsaw
-Mark V - SN 212052, Born 1986, Acquired Sept 2009, Restored March 2010, Bandsaw
-10ER - SN 39722, Born 1950, Acquired March 2011, awaiting restoration
-
fredsheldon

- Platinum Member
- Posts: 1175
- Joined: Tue Jan 17, 2012 1:31 pm
- Location: The Woodlands, Texas
Can't wait to see how you are going to do the dimples. Looks like you have an assembly line going. I did the same when making 40 pen and letter opener sets for gifts this year. That's a total of 120 blocks to be drilled, glued and turned. 
Fred Sheldon
The Woodlands, Tx
'52 10ER # 60869 (restored in 2012, used as a dedicated drill press), '52 10ER # 88712 (restored 01/2013), 52 10ER # 71368 (in process of restoring), '83 500 Shorty with OPR installed, '83 520 PowerPro with Lift Assist, 6" Joiner, 6" Belt Sander, 18" Jig Saw, 11" Band Saw, 12" ProPlaner, SS Crosscut Table. SS Dust Collector, Hitachi 1/2" router, Work Sharp 3000 with all attachement, Nova G3 Chuck, Universal Tool Rest, Appalachia Tool Works Sled.
The Woodlands, Tx
'52 10ER # 60869 (restored in 2012, used as a dedicated drill press), '52 10ER # 88712 (restored 01/2013), 52 10ER # 71368 (in process of restoring), '83 500 Shorty with OPR installed, '83 520 PowerPro with Lift Assist, 6" Joiner, 6" Belt Sander, 18" Jig Saw, 11" Band Saw, 12" ProPlaner, SS Crosscut Table. SS Dust Collector, Hitachi 1/2" router, Work Sharp 3000 with all attachement, Nova G3 Chuck, Universal Tool Rest, Appalachia Tool Works Sled.
I'm thinking that the router table and a 1/8" round over bit would would be the simplest and fastest way. You could use a board behind the domino blocks to help square them to the router bit as their being pushed past the cutter. But you need a small opening in the table as well as the fence because of the small size of the dominos. A slightly larger round over bit might works is you limit how much of the bit contacts the corners of the dominos.
Sanding with the disk sander would work if you can make a small jig that would pivot at the right focal point to put a small radius on the corners. Since you would have to start with an edge of the domino parallel to the sanding disk and very close to it, you likely could take advantage of the quill action and stop to make room for positioning each domino before advancing the sanding disk and rotating the domino to round over the corner.
For next time, you could consider using your planer for short pieces by butting end-to-end each piece as it is being fed through the planer. Start the first piece through and then just keep butting up the next one until you've run them all through the planer. No gaps between the boards. If there's any snipe to be had, it will affect only the first and last piece. It helps to have someone catch the pieces as they come out the other end of the planer, but if not then just put pencil marks on both sided of the boards so you'll know which side was planed after they've all been run through once and fallen to the floor.
Sanding with the disk sander would work if you can make a small jig that would pivot at the right focal point to put a small radius on the corners. Since you would have to start with an edge of the domino parallel to the sanding disk and very close to it, you likely could take advantage of the quill action and stop to make room for positioning each domino before advancing the sanding disk and rotating the domino to round over the corner.
For next time, you could consider using your planer for short pieces by butting end-to-end each piece as it is being fed through the planer. Start the first piece through and then just keep butting up the next one until you've run them all through the planer. No gaps between the boards. If there's any snipe to be had, it will affect only the first and last piece. It helps to have someone catch the pieces as they come out the other end of the planer, but if not then just put pencil marks on both sided of the boards so you'll know which side was planed after they've all been run through once and fallen to the floor.
Art in Western Pennsylvania