
First Stage Complete
Moderator: admin
First Stage Complete
Just got my recently acquired 82 Mark V put together so that I can actually use it. First project will be a ramp for the right leg. The SS is in my patio which is canted for water runoff. Over the length of the SS, the elevation drop is a full 2 inches. It does feel good to finally have this machine in a condition where it can be used. Still have the SPT's and accessories to work on. At least they came with the purchase so I can't complain.

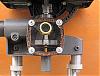
To my surprise, the first use of my Shopsmith turned out to be metal cutting! I decided to try building a dial indicator holder using my Shopsmith Maxi-Clamp components. But, in order to attach the clamp to the tool holder, I either needed longer screws or a shim. I had a convenient shim in the form of a 1/8" lathe tool bit so I used that. The tool bit, however, interfered with the movement of the dial indicator so I used a Shopsmith cutoff wheel to remove the excess. Here's the result:

-
derekdarling

- Gold Member
- Posts: 318
- Joined: Wed Mar 17, 2010 2:53 pm
- Location: Surrey, BC
First rule of the internet
If there ain't pictures... It didn't happen!:D
Derek Darling
Surrey, B.C. Canada
10ERs, other stuff, you know.
Surrey, B.C. Canada
10ERs, other stuff, you know.
-
JPG

- Platinum Member
- Posts: 35451
- Joined: Wed Dec 10, 2008 7:42 pm
- Location: Lexington, Ky (TAMECAT territory)
derekdarling wrote:If there ain't pictures... It didn't happen!:D
They were posted as links to a url.
If you are not 'getting' them perhaps that is a 'factor'?
Orrrr perhaps you are on the wrong side of the continent.
╔═══╗
╟JPG ╢
╚═══╝
Goldie(Bought New SN 377425)/4" jointer/6" beltsander/12" planer/stripsander/bandsaw/powerstation /Scroll saw/Jig saw /Craftsman 10" ras/Craftsman 6" thicknessplaner/ Dayton10"tablesaw(restoredfromneighborstrashpile)/ Mark VII restoration in 'progress'/ 10E[/size](SN E3779) restoration in progress, a 510 on the back burner and a growing pile of items to be eventually returned to useful life. - aka Red Grange
Used my dial indicator today to re-check my Shopsmith's alignment. For my initial alighment effort, I followed the official Shopsmith alignment instructions. What instructions are those? I don't really know. I received a xeroxed copy of what looks like something from the appendix of a 510 User's Manual when I purchased my 510 main table on ebay. I wanted to use the dial indicator to see how well I'd done. Miter track to saw blade axis was spot on. It took some fiddling but I can now repeatably get the rip fence to within .0005" of parallel to the miter track. The extension table, however, was way off. Although I had it in the same plane as the main table, it was .030" out of parallel. More fiddling, and, now, the rip fence, when placed on the extension table, is within .001" of parallel to the miter track. All things considered, I'm pretty happy with the results of my alignment efforts.
Moving on, I was a little disappointed, but not too surprised, that my two bearing quill showed a runout of .0025". It's an old, two piece quill so that may have something to do with it. When I put new bearings on it, I was surprised to see that the roll pin that attaches the two pieces, was close to coming out. I may have to keep an eye on that.
Tomorrow, I think I'll break out my bevel protractor and double check the table tilt angles.

I think you need to make us a "How to Align Your Shopsmith" video.
I know none of my alignments ever approached 5/10000". I can get within .002 to .003 but am satisfied at .005 long term. I'd like to see how you were able to get it so close, got to learn from the best and you are the best I've heard of. Please share with us.
Ed
I know none of my alignments ever approached 5/10000". I can get within .002 to .003 but am satisfied at .005 long term. I'd like to see how you were able to get it so close, got to learn from the best and you are the best I've heard of. Please share with us.
Ed
Sorry, Ed, but I don't have a video camera. Like I said above, I just followed the instructions in the manual to get things close, then used the dial indicator to get things really close. I don't mean to make it sound like it was easy, I probably spent 6 hours total on the process but, since this was my initial setup and alignment, I felt that the time was justified. I've had a small metalreible wrote:I think you need to make us a "How to Align Your Shopsmith" video.
I know none of my alignments ever approached 5/10000". I can get within .002 to .003 but am satisfied at .005 long term. I'd like to see how you were able to get it so close, got to learn from the best and you are the best I've heard of. Please share with us.
Ed
working setup that I've worked with for years and these tolerances are not out of line with what I would expect to achieve on that. Not having used a Shopsmith before, I had no idea what to expect from it. Probably just beginner's luck.