Been searching the forums for how you might modify a fence from a 500 to fit the CI bandsaw table. Has anybody done it successfully and if so how did you accompish this task.
Thanks in advance for any advice you might we willing to provide.
Fred
Modifying 500 Fence to fit CI Bandsaw
Moderator: admin
-
fredsheldon

- Platinum Member
- Posts: 1175
- Joined: Tue Jan 17, 2012 1:31 pm
- Location: The Woodlands, Texas
Modifying 500 Fence to fit CI Bandsaw
Fred Sheldon
The Woodlands, Tx
'52 10ER # 60869 (restored in 2012, used as a dedicated drill press), '52 10ER # 88712 (restored 01/2013), 52 10ER # 71368 (in process of restoring), '83 500 Shorty with OPR installed, '83 520 PowerPro with Lift Assist, 6" Joiner, 6" Belt Sander, 18" Jig Saw, 11" Band Saw, 12" ProPlaner, SS Crosscut Table. SS Dust Collector, Hitachi 1/2" router, Work Sharp 3000 with all attachement, Nova G3 Chuck, Universal Tool Rest, Appalachia Tool Works Sled.

How do you define the task, Fred?fredsheldon wrote:Been searching the forums for how you might modify a fence from a 500 to fit the CI bandsaw table. Has anybody done it successfully and if so how did you accompish this task.
Thanks in advance for any advice you might we willing to provide.
Fred
Do you define the task as the fence in the following picture without a rear lock:
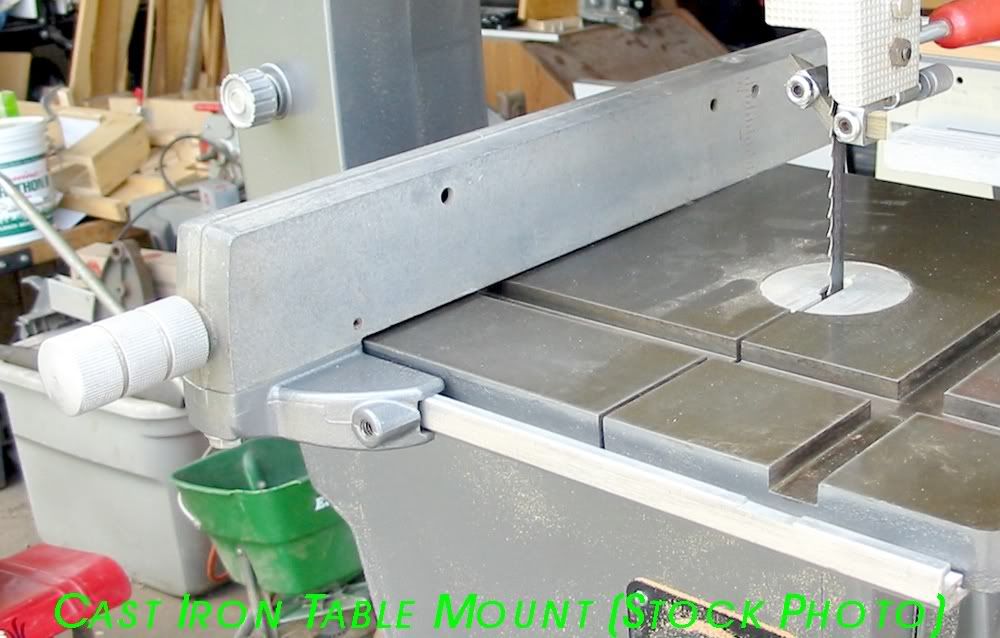
Or did you want the rear lock? There is a fellow in one of the Shopsmith groups (I think the yahoo ssusers) with welding skill and machinist skill did a beautiful job a number of years back. Or??
Rob in San Diego
Email: SDSSmith51 AT gmail.com
Email: SDSSmith51 AT gmail.com
-
fredsheldon
- Platinum Member
- Posts: 1175
- Joined: Tue Jan 17, 2012 1:31 pm
- Location: The Woodlands, Texas
Rob, exactly how this picture shows. How did you attach the front rail to the bottom of the table. I found an older post from you with this exact photo and requested the same information in another thread. Did you modify the fence or use it as is.
Thanks,
Fred
Thanks,
Fred
Fred Sheldon
The Woodlands, Tx
'52 10ER # 60869 (restored in 2012, used as a dedicated drill press), '52 10ER # 88712 (restored 01/2013), 52 10ER # 71368 (in process of restoring), '83 500 Shorty with OPR installed, '83 520 PowerPro with Lift Assist, 6" Joiner, 6" Belt Sander, 18" Jig Saw, 11" Band Saw, 12" ProPlaner, SS Crosscut Table. SS Dust Collector, Hitachi 1/2" router, Work Sharp 3000 with all attachement, Nova G3 Chuck, Universal Tool Rest, Appalachia Tool Works Sled.
The Woodlands, Tx
'52 10ER # 60869 (restored in 2012, used as a dedicated drill press), '52 10ER # 88712 (restored 01/2013), 52 10ER # 71368 (in process of restoring), '83 500 Shorty with OPR installed, '83 520 PowerPro with Lift Assist, 6" Joiner, 6" Belt Sander, 18" Jig Saw, 11" Band Saw, 12" ProPlaner, SS Crosscut Table. SS Dust Collector, Hitachi 1/2" router, Work Sharp 3000 with all attachement, Nova G3 Chuck, Universal Tool Rest, Appalachia Tool Works Sled.
I shortened the fence as I was also using it with the aluminum table and did not want it to protrude from the front too far. I utilized the holes in the front of the table for my initial mount of the fence rail. Once the rail is mounted, though the fence can be used without modification since it sticks out to the rear of the table. I used a file to cut the notch for the miter slot.SDSSmith wrote:How do you define the task, Fred?
Do you define the task as the fence in the following picture without a rear lock:
Or did you want the rear lock? There is a fellow in one of the Shopsmith groups (I think the yahoo ssusers) with welding skill and machinist skill did a beautiful job a number of years back. Or??
Rob in San Diego
Email: SDSSmith51 AT gmail.com
Email: SDSSmith51 AT gmail.com
-
fredsheldon
- Platinum Member
- Posts: 1175
- Joined: Tue Jan 17, 2012 1:31 pm
- Location: The Woodlands, Texas
Rob, did you drill two new holes in the rail. Using the existing holes the front lip of my rail doesn't clear the leading edge of the table. I guess I could grind down the front of the rail but I think I will just drill two new holes. You said you modified the fence. What did you do to modify it?
Fred
Fred
Fred Sheldon
The Woodlands, Tx
'52 10ER # 60869 (restored in 2012, used as a dedicated drill press), '52 10ER # 88712 (restored 01/2013), 52 10ER # 71368 (in process of restoring), '83 500 Shorty with OPR installed, '83 520 PowerPro with Lift Assist, 6" Joiner, 6" Belt Sander, 18" Jig Saw, 11" Band Saw, 12" ProPlaner, SS Crosscut Table. SS Dust Collector, Hitachi 1/2" router, Work Sharp 3000 with all attachement, Nova G3 Chuck, Universal Tool Rest, Appalachia Tool Works Sled.
The Woodlands, Tx
'52 10ER # 60869 (restored in 2012, used as a dedicated drill press), '52 10ER # 88712 (restored 01/2013), 52 10ER # 71368 (in process of restoring), '83 500 Shorty with OPR installed, '83 520 PowerPro with Lift Assist, 6" Joiner, 6" Belt Sander, 18" Jig Saw, 11" Band Saw, 12" ProPlaner, SS Crosscut Table. SS Dust Collector, Hitachi 1/2" router, Work Sharp 3000 with all attachement, Nova G3 Chuck, Universal Tool Rest, Appalachia Tool Works Sled.
As I recall, I enlarged one hole and drilled a second hole. I cut the fence, shortened the rod that operates the front table lock and cut new threads on one end of the shortened rod.fredsheldon wrote:Rob, did you drill two new holes in the rail. Using the existing holes the front lip of my rail doesn't clear the leading edge of the table. I guess I could grind down the front of the rail but I think I will just drill two new holes. You said you modified the fence. What did you do to modify it?
Fred
Rob in San Diego
Email: SDSSmith51 AT gmail.com
Email: SDSSmith51 AT gmail.com