I set the width of the lower saw guard so that is clears by about 1/8", the piece on the right side that it will hit (when lowering the table) if it is set too narrow. (Does that make sense? Maybe a picture would help). Then I made the width of the baffle to fit that opening.
After reading some of the other posts, I now realize that I will have to remove the baffle if I want to do any sawing with the table tilted - bummer. Maybe I can fix that with a Rev. 2.
A little challenge
Moderator: admin
-
mountainbreeze

- Platinum Member
- Posts: 511
- Joined: Sun Jan 30, 2011 9:58 pm
- Location: Ocala, FL
-
mountainbreeze
- Platinum Member
- Posts: 511
- Joined: Sun Jan 30, 2011 9:58 pm
- Location: Ocala, FL
-
dusty

- Platinum Member
- Posts: 21530
- Joined: Wed Nov 22, 2006 6:52 am
- Location: Tucson (Wildcat Country), Arizona
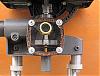
In post #27, this thread, I provided a dimensioned drawing of my deflector. I have since made that deflector from a piece of metal flashing and attached it to the lower saw guard using pop rivets.
It works as well as the images I posted earlier in this thread and no longer comes off due to poor adhesion.
It works as well as the images I posted earlier in this thread and no longer comes off due to poor adhesion.
"Making Sawdust Safely"
Dusty
Sent from my Dell XPS using Firefox.
Dusty
Sent from my Dell XPS using Firefox.
-
mountainbreeze
- Platinum Member
- Posts: 511
- Joined: Sun Jan 30, 2011 9:58 pm
- Location: Ocala, FL
Obviously the drawers are each approximately 567 yards long.mbcabinetmaker wrote:...
[ATTACH]9415[/ATTACH]
This is my Shopsmith 520 after cutting a 1/4" x 1/4" groove for the drawer bottoms on 5 small drawers. ...?
Mark V 520, Power-Pro!; Speed Reducer; B/S; Jointer; ShopMate DCS; SS Tenon Master; Rip-Strate; Incra; BCTW; DW734; var. SS sanding systems; Wood River;
shouldn't that be "Why dost saw dust escape?"?dusty wrote:...
Why dust saw dust escape. ...
I believe that came from a dissertation on shop cleanliness by a Russian janitor/author by the name of Dustitoffski.
Mark V 520, Power-Pro!; Speed Reducer; B/S; Jointer; ShopMate DCS; SS Tenon Master; Rip-Strate; Incra; BCTW; DW734; var. SS sanding systems; Wood River;
There's a definite recommendation regarding spacing the lower guard, by ShopSmith I believe. IIRC it is to place the guard withing 3/4" to the sanding disc, or well away from a saw blade.tryinhard wrote:Dusty,
Maybe I misunderstood your reply. I do not put the flat disk through the table insert. I use it just like you describe, but I use the lower guard as a dust collector in that configuration.
But this investigation has led me to change how I will use the lower guard for sanding. I believed that the reason the lower guard was movable with the knurled knobs was so that it could be narrowed down to almost touching the sanding disk, which would result in more suction directed at where the dust enters the guard. But it appears that closing the guard down that narrow actually causes the DC suction port to be blocked by the fixed portion of the guard, actually reducing airflow. So, now I will use the guard open like for the table saw for sanding.
I'll try and find it. It IS there. And I've found that the guard works best (largely) when the spacing recommendation is taken.
But that leads to another question: why are there two m's in recommendation?
UPDATE: Upon further investigation I've changed my mind. With a 40 tooth crosscut (my usual) blade and the lower guard closed to the max (closest to the blade) and a simple piece of painter's tape closing the gap at the front of the guards, I get nearly zero dust underneath. What there is comes mostly from under the upper guard. The tape is against the edge of the sliding part so does not effect it at all. Cut depth 2-7/8".
Mark V 520, Power-Pro!; Speed Reducer; B/S; Jointer; ShopMate DCS; SS Tenon Master; Rip-Strate; Incra; BCTW; DW734; var. SS sanding systems; Wood River;

I've been experimenting with a new design. First, it is attached with machine screws and nuts so it is reversible. Second it is built out of some metal dryer vent I had laying around. The curve/slpring of the dryer vent metal allows it to function equaly well whether the lower guard is fully open, fully closed or anywhere in between. I am not at home but when I get back after the holidays I will post pics.
Gale's Law: The bigger the woodworking project, the less the mistakes show in any photo taken far enough away to show the entire project!