
Im having problems adjusting the belt tension. I have followed the instructions to adjust the springs to 27/32. But the reducer won't turn. So I loosened the spring tension a 1/32 tried it again, didn't turn so kept on doing this untill it would turn. But it wouldn't reduce the speed. Readjusted to 27/32 it ran but quickly started to heat up and squeal, belts tightening up and seaze.
I looked under the speed reducer shaft covers where the spring tension screws are and am wondering if the Idler bar is not moving or should it move to adjust on the springs as the belts heat up? Should I take it apart and see if the belts are aligned properly? And if so do I start with the bolts separating the housings?
Any suggestions will be greatly appreciated.
Thanks
Wally
Speed reducer adjustment
Moderator: admin
Speed reducer adjustment
1985 Mark V, "2" Greenies, ShopSmith Bandsaw, jointer, belt sander. 14" Laguna bandsaw, craftsman 12" bandsaw, 12" DeWalt chopsaw,Delta 6" jointer, 12" Delta plainer, 16"-32" Performax sander, Shopsmith Jig Saw,
-
joshh

- Platinum Member
- Posts: 723
- Joined: Tue Jan 08, 2013 8:53 pm
- Location: Dallas / Fort Worth, Texas
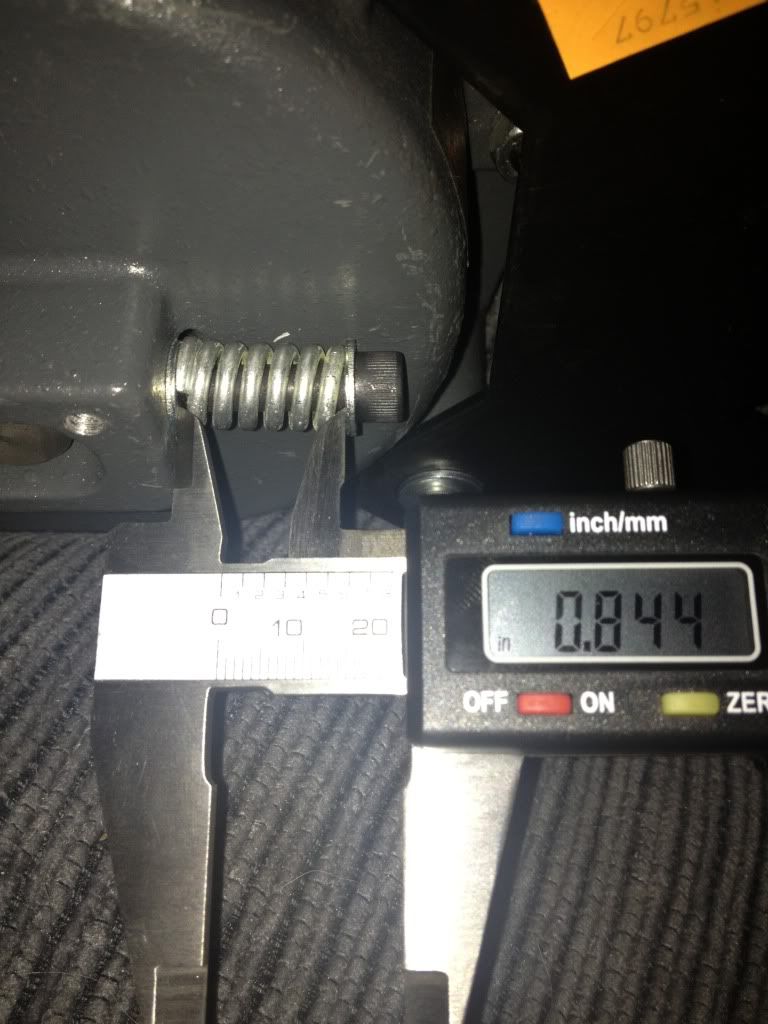
Are you measuring the distance between the INSIDE edges of the washers?
I used a digital micrometer to adjust them to exactly .844 (close enough to .84375) I found measuring with a ruler to be several turns off.
The output shaft will be all but impossible to turn by hand with the belt tensioned. The input shaft should turn by hand but may be difficult if the belts have taken a set. You will probably feel it change from hard to turn to easy to hard again as the belt rotates off its set then back on.
You may have a seized bearing. I say this since the top shaft spins without the belt tensioned.
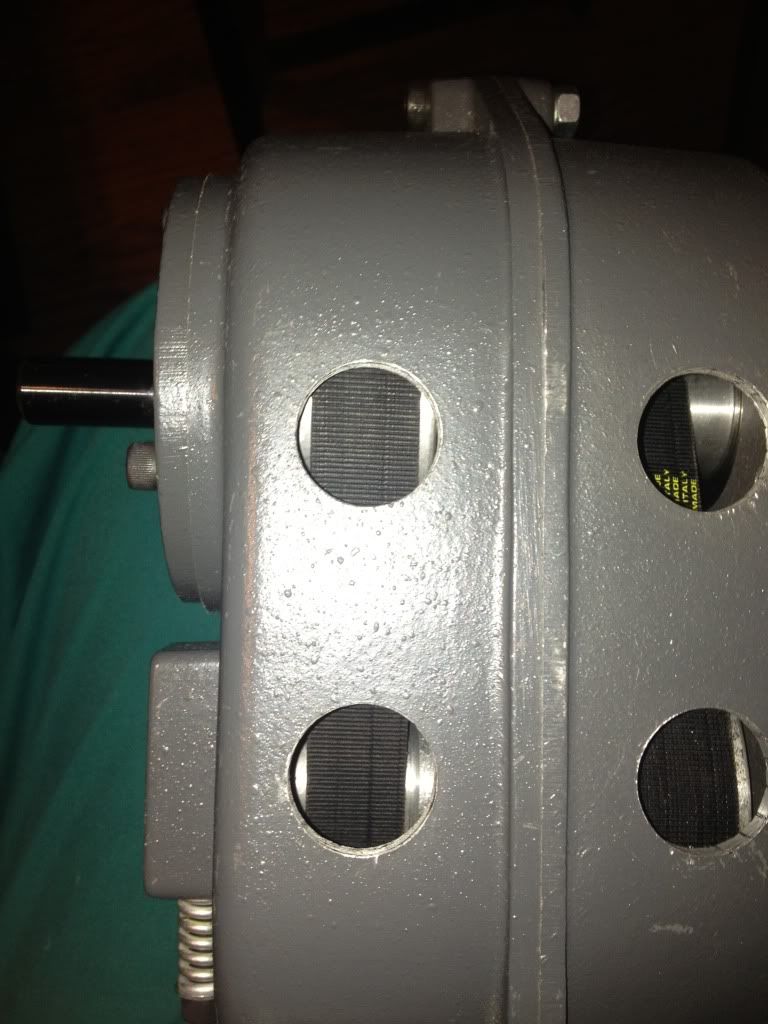
You can inspect the belts by removing the 4 black caps on the rear. Use a flathead screwdriver to carefully pop them off. You may have to caress the teeth/ears outward to have a tight fit when reinstalling.
I used a digital micrometer to adjust them to exactly .844 (close enough to .84375) I found measuring with a ruler to be several turns off.
The output shaft will be all but impossible to turn by hand with the belt tensioned. The input shaft should turn by hand but may be difficult if the belts have taken a set. You will probably feel it change from hard to turn to easy to hard again as the belt rotates off its set then back on.
You may have a seized bearing. I say this since the top shaft spins without the belt tensioned.
You can inspect the belts by removing the 4 black caps on the rear. Use a flathead screwdriver to carefully pop them off. You may have to caress the teeth/ears outward to have a tight fit when reinstalling.
-
joshh
- Platinum Member
- Posts: 723
- Joined: Tue Jan 08, 2013 8:53 pm
- Location: Dallas / Fort Worth, Texas
I haven't had my speed reducer long, so I'm no expert. Maybe someone else may have some ideas as well.
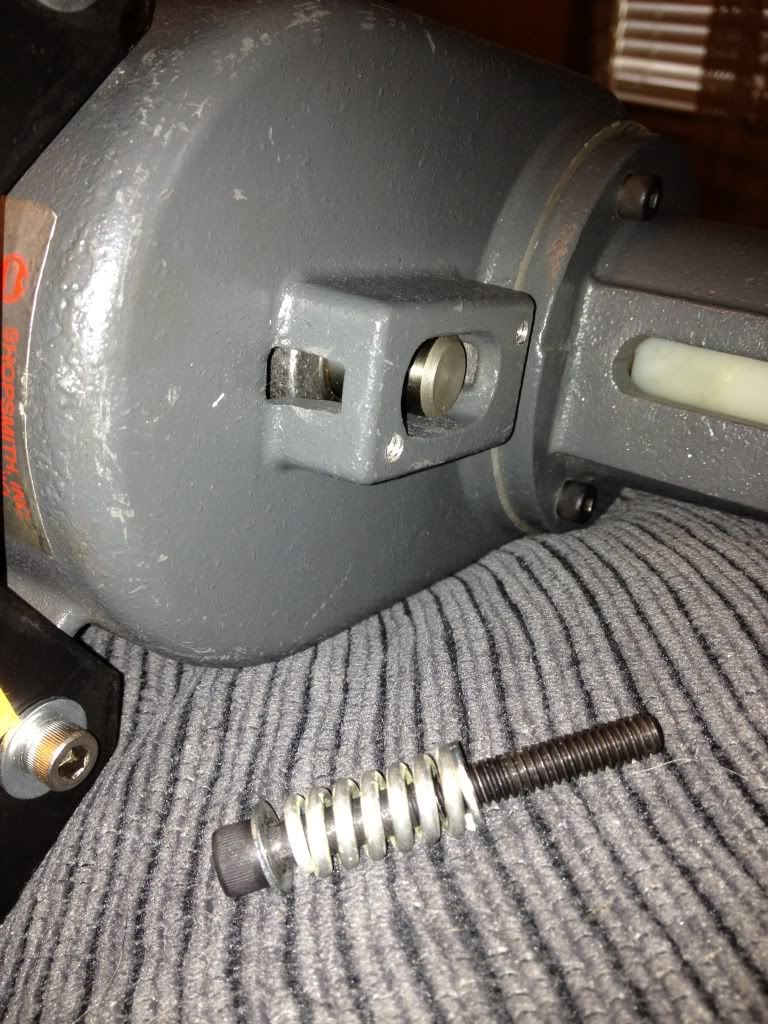
I'll have to check when I get home but I just thought of another possibility. Is it possible that one, or both, of the adjustment bolts was taken all the way out before. If so, would this allow the location of the shaft relative to the bolt to be too high and over tightening when the bolt is reinstalled and screwed in to its proper depth.
You may be able to isolate which side (or both) is the culprit. Loosen both adjustment bolts until the speed reducer spins again. Tighten the input side only and turn the input shaft. If all goes well, tighten the output shaft and try again. If it seizes this time, you know the problem is most likely on the output side.
If you can take a picture with each adjustment cap removed, I'll compare it to mine later tonight. Same thing with the inspection caps on the backside. I will also take pictures of mine later and post so you can compare.
Thanks for your reply.
I'll take a look at it today. It was very difficult to turn the output, drill bit side, I haven't tried to turn the headstock side off of the machine.
Last time I tried to use it, it did not reduce in speed. I looked inside the covers all I see are the belts. Does the socket head cap screw #14 on parts list, fit into #18 idler shaft? The diagram shows a hole on each end. That may be the problem? I may have backed them out to much? Can I separate the housing without to much difficulty to see if the belts are seated properly?
Thanks again!
Heading to my shop, see what I can screw up now :-(
1985 Mark V, "2" Greenies, ShopSmith Bandsaw, jointer, belt sander. 14" Laguna bandsaw, craftsman 12" bandsaw, 12" DeWalt chopsaw,Delta 6" jointer, 12" Delta plainer, 16"-32" Performax sander, Shopsmith Jig Saw,
-
joshh
- Platinum Member
- Posts: 723
- Joined: Tue Jan 08, 2013 8:53 pm
- Location: Dallas / Fort Worth, Texas
joshh wrote:I'll have to check when I get home but I just thought of another possibility. Is it possible that one, or both, of the adjustment bolts was taken all the way out before. If so, would this allow the location of the shaft relative to the bolt to be too high and over tightening when the bolt is reinstalled and screwed in to its proper depth.
Ok I pulled off the caps and realized this is not only possible, but may be your problem after all. Note the output shaft on mine has fewer threads past the bar (#18) than the input side. This would be the first thing I check before pulling anything apart.
Pics coming soon so you can compare yours.
bvrsbro wrote:It was very difficult to turn the output, drill bit side, I haven't tried to turn the headstock side off of the machine.
The output side will be very difficult if not impossible to turn by hand. You Gould always turn from the headstock side.
-
joshh
- Platinum Member
- Posts: 723
- Joined: Tue Jan 08, 2013 8:53 pm
- Location: Dallas / Fort Worth, Texas
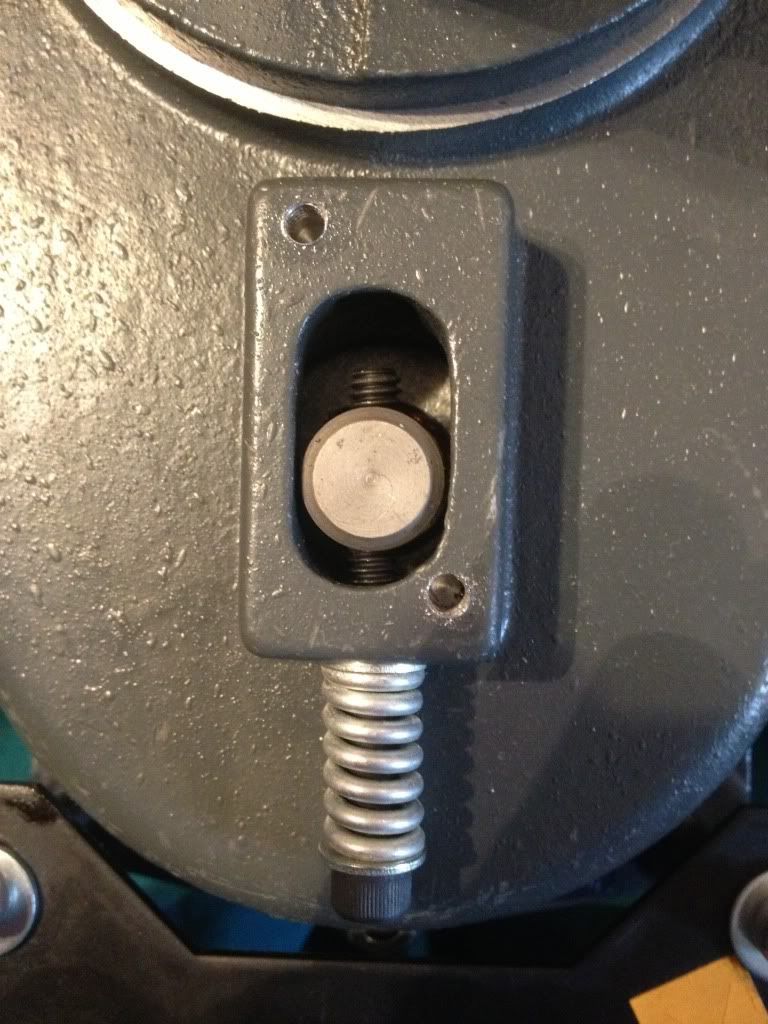
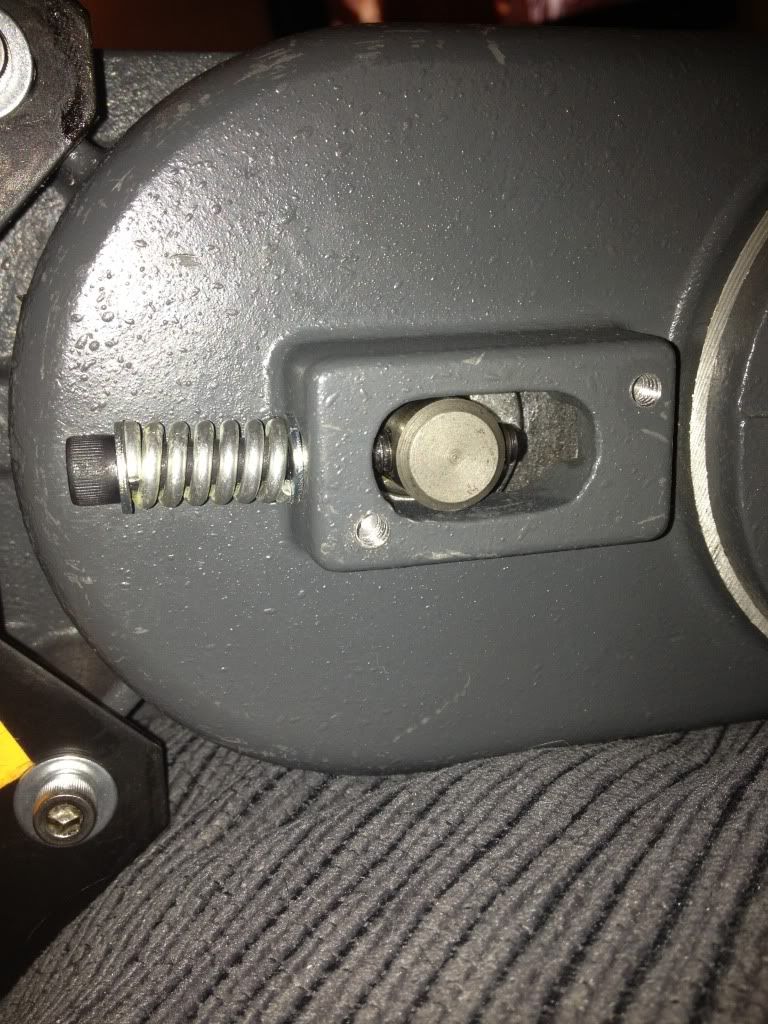
First pic is of the adjustment screw on the headstock side.
Second pic is the output side (notice the fewer threads out of the top)
I wonder if someone from shopsmith can tell us if this is how it is supposed to be. I think it is because the belt deflection feels the same for both belts an mine runs very smooth. Also, the guy I bought it from said it was unused because he couldn't figure out how to mount it (he was missing the bottom bracket). I don't believe I was altered at all from factory.
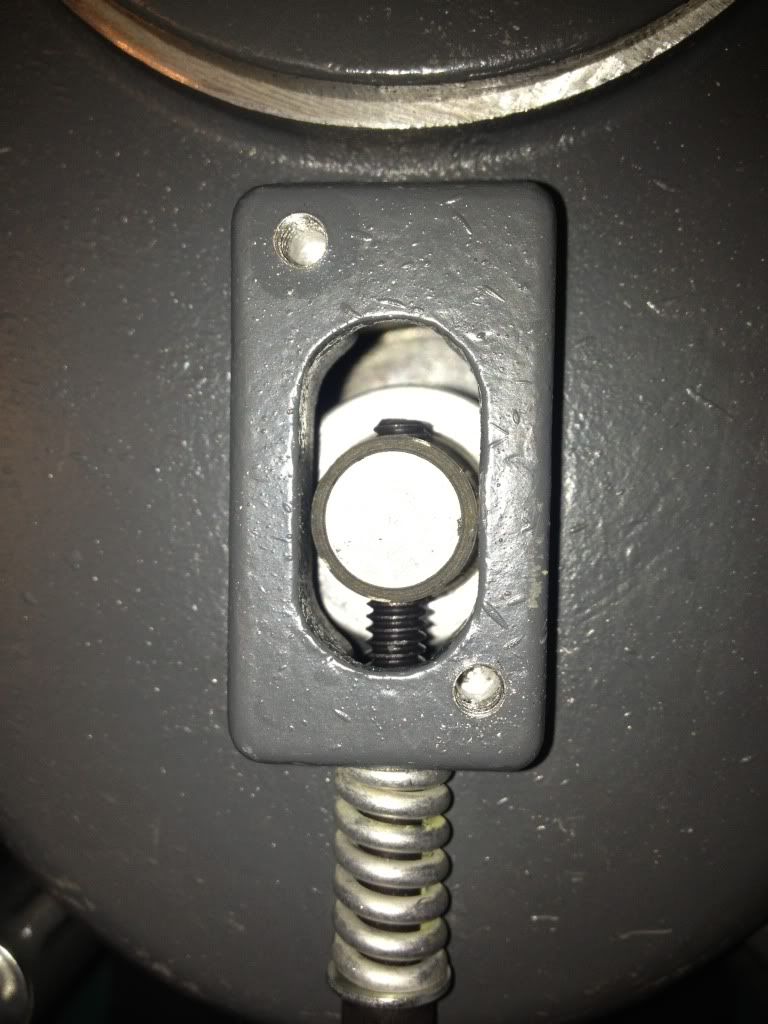
-
joshh
- Platinum Member
- Posts: 723
- Joined: Tue Jan 08, 2013 8:53 pm
- Location: Dallas / Fort Worth, Texas
You should not be able to turn the output side and the manual specifically says not to try.bvrsbro wrote:Thanks for your reply.
I'll take a look at it today. It was very difficult to turn the output, drill bit side, I haven't tried to turn the headstock side off of the machine.
You should be able to rotate the input (headstock) end fairly easily.