First chest 90% done - advice needed.

Forum for people who are new to woodworking. Feel free to ask questions or contribute.

Moderator: admin

jerm
Gold Member
Posts: 46
Joined: Mon Jan 20, 2014 9:56 am
Location: Albuquerque, NM

First chest 90% done - advice needed.

Post by jerm »

Hello everyone! It's been a while since I've posted because I've been busy!

In the meantime, I managed to pick myself up a nice used Jet 6" jointer (finally!) It's the one with the 55" bed or so, pretty nice! That's after losing a sweet buy on a SS 510 with jointer and bandsaw for $550 :(

I just mention that because I wish I'd had a jointer before starting this chest! :D I'll blame my bad joinery on that instead of lack of patience, mixing up pieces, and generally dullish chisels! Anyway, I just have to cut out the drop-in bottom and do the lid and I'm done, but I figured I'd post what I have now.

ImageP4200272_1024px by J L Smith, on Flickr

So here's an overall shot of the chest. I got the design idea from fine woodworking or somewhere, but then just kinda veered off on my own eventually. So, it kinda-sorta looks like the project, but it's also my own - which explains why the joinery is mis-matched, etc. Amazingly, though, it's pretty darn close to being square.

Frame is red oak, the panels are pieces of wormy maple. For finishing, I had just applied linseed oil to everything, then I went back over the oak with "Provincial" stain from Minwax -- basically doing it like this caused the stain to just barely tint the wood and grain (hey I was experimenting!)

Before I bore you to death, here's the real issue:

Image
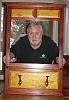
P4200275_1024px by J L Smith, on Flickr

What you're looking at is the front-left corner.
Now, ignoring the scribe lines I forgot to sand away, see the issue?

My left and right top boards are only resting on the rest of the chest - I mean, they're glued, but it's long-grain tenon resting on an end-grain groove - not the strongest joint.

The problem is, I need to attach handles, but I'm very hesitant to lift the chest using only those top rails.

So, how would you solve this? I've thought about maybe driving some very small screws through for support, but I want to avoid this if possible.

Another shot of the bottom joinery - not perfect, but secure
ImageP4200273_1024px by J L Smith, on Flickr

I got lucky and had two boards looking very similar to this (the figured portion), so I put one on each side. Luckily the rot / whatever wasn't all the way through.

ImageP4200276_1024px by J L Smith, on Flickr
User avatar
wa2crk
Platinum Member
Posts: 3080
Joined: Sat Jul 22, 2006 7:37 am
Location: Leesburg, Fl

Post by wa2crk »

Don't know if you have a method of doing this or not but I would drill pocket screw holes on the inside of the rails and use a pocket screw about 1/4 inch longer than normal so it goes into the post sufficiently. Then use some oak dowels to fill the pockets and sand the dowel flush.
It will strengthen the joint and be hidden inside.
Bill V
steve4447
Gold Member
Posts: 179
Joined: Wed Mar 05, 2014 11:30 am

Post by steve4447 »

Very nice...
User avatar
"Wild Bad Bob"
Platinum Member
Posts: 1065
Joined: Fri Mar 28, 2014 2:03 pm
Location: Germantown, Wi

Post by "Wild Bad Bob" »

usually a M&T style joint you will have some end grain to long grain, your glue up strength is where long grain meets long grain and you have that there. I use combo joints allot with M&T joints. I am making a cabinet at the moment that has through M&T joints and for strength and decoration I have a raised dowel joint going through them, or a counter sunk screw with a flush or raised plug in them works too.
Measure once, cut as many times as needed to get it right! Bob
56/57 Greenie with jointer, 85 Mark V with band saw, 63 Goldie with jointer, 3 ER 10s, 1951 vintage, Hernia from the Er 10s, Tool Shop SS clone 6" jointer, and 6" belt sander, Delta 10" TS, Buffalo 6" jointer, Craftsman 12" BS, 10" Ryobi planer. Compound Miter, and misc.
User avatar
"Wild Bad Bob"
Platinum Member
Posts: 1065
Joined: Fri Mar 28, 2014 2:03 pm
Location: Germantown, Wi

Post by "Wild Bad Bob" »

Going to insert/attach a pic here for the first time so forgive me if not there. Here is a pic of a cabinet with M&T that is pinned with a square dowel
Best I can do, you can see the 2 square pegs in the lower M&T joints, may beable to right click on pi and save in your computer and enlarge it. And yes that is the price!!!!! Making one myself for about 100.00$ in quarter sawn WO.
BTW chest looks great, never tell on mistakes, most wont even notice!!!!

http://www.amishalley.com/Wind-River-Li ... 5100.html#
Measure once, cut as many times as needed to get it right! Bob
56/57 Greenie with jointer, 85 Mark V with band saw, 63 Goldie with jointer, 3 ER 10s, 1951 vintage, Hernia from the Er 10s, Tool Shop SS clone 6" jointer, and 6" belt sander, Delta 10" TS, Buffalo 6" jointer, Craftsman 12" BS, 10" Ryobi planer. Compound Miter, and misc.
User avatar
berry
Platinum Member
Posts: 751
Joined: Sun Oct 15, 2006 5:46 pm
Location: St. Paul, MN

Post by berry »

wa2crk wrote:Don't know if you have a method of doing this or not but I would drill pocket screw holes on the inside of the rails and use a pocket screw about 1/4 inch longer than normal so it goes into the post sufficiently. Then use some oak dowels to fill the pockets and sand the dowel flush.
It will strengthen the joint and be hidden inside.
Bill V
A really good idea Bill. That should work great.
New Leaf Custom Woodworking
Berry Conway - Chief Dust Maker
User avatar
berry
Platinum Member
Posts: 751
Joined: Sun Oct 15, 2006 5:46 pm
Location: St. Paul, MN

Post by berry »

Very nice project, the wood on the panels has tons of character.
New Leaf Custom Woodworking
Berry Conway - Chief Dust Maker
charlese
Platinum Member
Posts: 7501
Joined: Fri Dec 08, 2006 10:46 pm
Location: Lancaster, CA

Post by charlese »

Before I bore you to death, here's the real issue:

What you're looking at is the front-left corner.
Now, ignoring the scribe lines I forgot to sand away, see the issue?

My left and right top boards are only resting on the rest of the chest - I mean, they're glued, but it's long-grain tenon resting on an end-grain groove - not the strongest joint.

The problem is, I need to attach handles, but I'm very hesitant to lift the chest using only those top rails.

So, how would you solve this? I've thought about maybe driving some very small screws through for support, but I want to avoid this if possible.

Another shot of the bottom joinery - not perfect, but secure
I like the look of your chest, JL, but had trouble in seeing your "problem". When I look at your upper left corner, I see there is both long grain to end grain AND long grain to long grain. The sides of the long top tenon meet vertical long grain of the stile. If there is a future glue joint issue it would be because the wood movement of the stile. This would be a problem only if there is a large or continuous moisture change.

There is a good method to offset such a problem. Assuming that tenon is 3/4" x 3/4", you can drill two 3/8" holes through the sides of the stile and the tenon and deep enough to pass through the other side of the stile. Then insert and glue a 3/8" peg through the hole. I prefer to call this a peg rather than a dowel.

Yes, it would have been a better joint if the top tenon would have been taller, like 3/4" x 1 1/2" or so. However I believe the pegs will hold the rails secure enough you will not have to worry.
Octogenarian's have an earned right to be a curmudgeon.
Chuck in Lancaster, CA
swampgator
Platinum Member
Posts: 1256
Joined: Fri Nov 27, 2009 9:32 pm
Location: Pensacola, FL

Post by swampgator »

A couple of ways to remove your lines if that is part of the problem.

If knifed in, a little work with a chisel or take it down with some sand paper. It will not be noticable. Then you'll have to restain and finish.

If it is a pencil line, some aggressive sanding with something like 100 to start and as the pencil line diminishes, upgrade to 180-220 and finish it out. Anything finer will basically polish the wood and the stain may not take as well. Again, you'll have to restain and finish.

Otherwise, excellent craftsmanship. Thanks for sharing your talents.:)
User avatar
beeg
Platinum Member
Posts: 4791
Joined: Sun Oct 14, 2007 2:33 pm
Location: St. Louis,Mo.

Post by beeg »

To remove pencil lines I've read to use denatured alcohol in a rag and just wipe em off..
SS 500(09/1980), DC3300, jointer, bandsaw, belt sander, Strip Sander, drum sanders,molder, dado, biscuit joiner, universal lathe tool rest, Oneway talon chuck, router bits & chucks and a De Walt 735 planer,a #5,#6, block planes. ALL in a 100 square foot shop.
.
.

Bob
Post Reply