
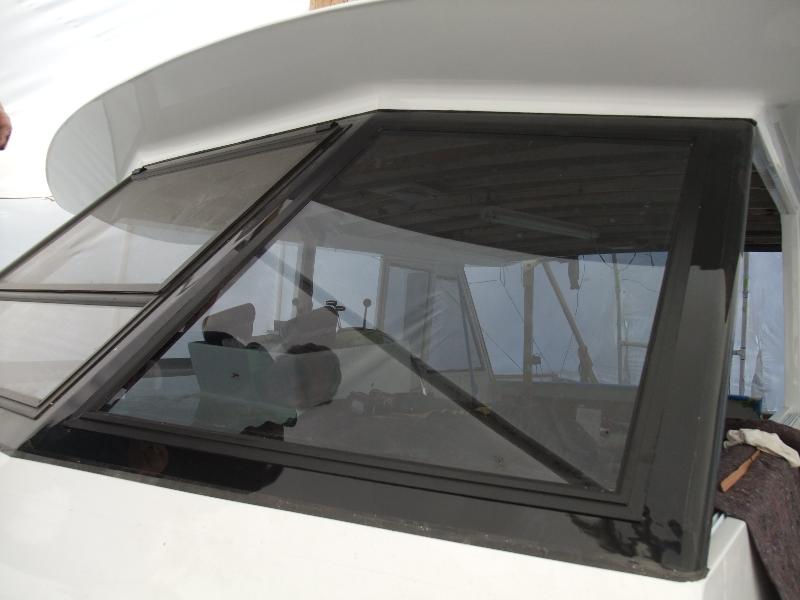
Can't argue with the end result! Looks great!roamer46 wrote:In other news, the window manufacturer out in Vancouver, Wa. finally sent me replacement trim rings so I could install the last helm windshield. The originals were oversized by 3/16", and I only got them to agree to sending the right-sized ones after stopping payment. I hate messing with a man's income stream, but I hate paying big money for expensive stuff that's not made to spec even worse. But wait! There's more! The boneheads oversized the replacements, too! I had to break out the die grinder to knock the weld blobs off the corners before they'd fit. Anyway, the helm windshields are now done and I can move on to other stuff.
1969 Chris Craft Roamer 46 Refit: Helm Windshield is Finally Done
Cheers,
Q
Using a Shop Smith Mark V on a Chris Craft Roamer refit
Moderator: admin
Re: Using a Shop Smith Mark V on a Chris Craft Roamer refit
Gale's Law: The bigger the woodworking project, the less the mistakes show in any photo taken far enough away to show the entire project!
Re: Using a Shop Smith Mark V on a Chris Craft Roamer refit
Thanks, algale!
In other news, I made an expensive mistake with a set of exhaust risers I bought off of ebay. Turns out one was damaged, but they both were the wrong size. To make matters worse, instead of just sending them back, I thought I could make the best of a bad situation without really thinking it through. By the time I'd taken the time to process all of the factors and realize I made a bunch of bad decisions, it was too late--I'd dismantled one of the risers and couldn't return it. This has been one expensive lesson in not making rash decisions.
1969 Chris Craft Roamer 46 Refit: New Exhaust Risers
Cheers,
Q
Re: Using a Shop Smith Mark V on a Chris Craft Roamer refit
The exhaust riser mistake I made (and the eye-popping cost of having a custom set made) has led me to buy the materials and a new welding machine and make a custom set myself. How hard could it possibly be??? My blog article today is on the new stainless tubing that arrived. This looks like it'll be fun.
1969 Chris Craft Roamer 46 Refit: New Riser Materials
Cheers,
Q

1969 Chris Craft Roamer 46 Refit: New Riser Materials
Cheers,
Q
Re: Using a Shop Smith Mark V on a Chris Craft Roamer refit
The turbo flanges I bought for the exhaust risers I'm going to make come pre-drilled for exhaust gas temp probes. Since boost and EGT gauges provide useful information for making sure the engines aren't overloaded when dialing in propellers, and I've got no baseline data to work with, I got myself a set of Isspro Turbocators. I've got an idea for making a gauge pod that will kind of look like the existing tachometer pods. I've never done fiberglass modeling from scratch before, but how hard could it be???
1969 Chris Craft Roamer 46 Refit: Turbocators!
Cheers,
Q

1969 Chris Craft Roamer 46 Refit: Turbocators!
Cheers,
Q
Re: Using a Shop Smith Mark V on a Chris Craft Roamer refit
A pile of parts that needed coating was starting to grow because I'd run out of my favorite epoxy primer--Devoe 235. None of the local suppliers sell it anymore, and when I did find gallon kits in nearby states the shipping charges were 4x the cost of the paint itself. I ended up going up to Baltimore personally to pick up the kits, but what a stupid situation. It all comes down to this: the "nanny state" regulators who are trying to protect the environment and people from hazardous substances have created a situation where it costs so much to put a gallon kit on any one of thousands of trucks moving between big cities that it made sense for me to drive 90 miles round trip to get my paint. The same regulators would agree that one person driving 90 miles to pick up supplies is also bad for the environment and adds incrementally to risk on the road. Add this to the long and growing list of unintended consequences of letting busy regulators solve every problem we face, including completely imaginary ones. The private sector isn't being nationalized in the conventional communist/socialist sense. Instead, it's being nationalized through regulation.
In addition to a rant about this, my blog today shows a bunch of parts that I prepped for paint.
1969 Chris Craft Roamer Refit: Cleaning Up Cummins Parts
Cheers,
Q

In addition to a rant about this, my blog today shows a bunch of parts that I prepped for paint.
1969 Chris Craft Roamer Refit: Cleaning Up Cummins Parts
Cheers,
Q
Re: Using a Shop Smith Mark V on a Chris Craft Roamer refit
I got the Cummins parts and engine room steps painted with Devoe 235 epoxy, then I partially installed the ER steps and got the cooling system parts installed. I'll weld the ER steps in soon. The OE hoses for the cooling system used a straight heater hose even though it had to take a hard 90° corner. That was probably fine when the hose was new, but with repeated heat cycles the hose had collapsed at the bend. I found a molded hose that fit perfectly.
1969 Chris Craft Roamer Refit: Installing Cleaned Up Cummins Parts
Cheers,
Q

1969 Chris Craft Roamer Refit: Installing Cleaned Up Cummins Parts
Cheers,
Q
Re: Using a Shop Smith Mark V on a Chris Craft Roamer refit
Since I found a new supplier for Devoe 235 epoxy, that pile of parts that was awaiting coating is finally getting smaller as parts go back on the boat. I got the aftercoolers reassembled, and saved some money by buying generic o-rings for the end caps instead of going with OE ones...$4.88 for generic vs $77 for Cummins! So now the intake side of the engines are done. All I've got left is to complete the fuel system, hook up the electrics, and finish the exhaust.
1969 Chris Craft Roamer Refit: Reassembling the Aftercoolers
Cheers,
Q

1969 Chris Craft Roamer Refit: Reassembling the Aftercoolers
Cheers,
Q
Re: Using a Shop Smith Mark V on a Chris Craft Roamer refit
To splash in 2016 I need to seal up the exterior, and that means I have to install all the portholes. Before I can do that, I've got to install all of the plywood surrounding each porthole. The aft stateroom should be relatively easy, but the V-berth will be a challenge because of all the curves at the front of the hull. The head in the V-berth will be the most challenging of all, so that's what I decided to tackle first.
1969 Chris Craft Roamer 49 Refit: The V-berth Head
Cheers,
Q
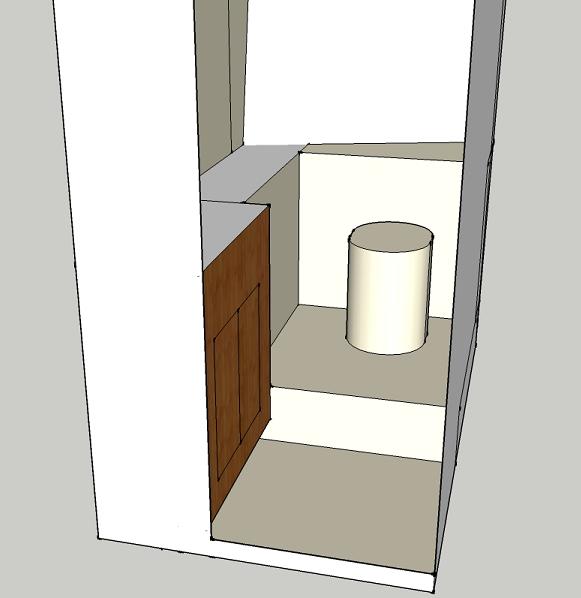
1969 Chris Craft Roamer 49 Refit: The V-berth Head
Cheers,
Q
Re: Using a Shop Smith Mark V on a Chris Craft Roamer refit
I got the ceiling wiring done, then cut and fitted the 1/4" marine ply ceiling panels. I should be able to knock out the rest of the wood work here over the next weekend or two, then we'll move on to fiberglass, fairing, fillets, and paint.
Booya
1969 Chris Craft Roamer 49 Refit: The V-berth Head Ceiling
Cheers,
Q

Booya
1969 Chris Craft Roamer 49 Refit: The V-berth Head Ceiling
Cheers,
Q
-
JPG

- Platinum Member
- Posts: 35600
- Joined: Wed Dec 10, 2008 7:42 pm
- Location: Lexington, Ky (TAMECAT territory)
Re: Using a Shop Smith Mark V on a Chris Craft Roamer refit
Ah yes! The µsoft mess up the internal SD card reader update.  I well remember that!
Fortunately I had a USB/SD card adapter.
P.S. Bet the insulation will help the spring/summer heat buildup.
Fortunately I had a USB/SD card adapter.
P.S. Bet the insulation will help the spring/summer heat buildup.
╔═══╗
╟JPG ╢
╚═══╝
Goldie(Bought New SN 377425)/4" jointer/6" beltsander/12" planer/stripsander/bandsaw/powerstation /Scroll saw/Jig saw /Craftsman 10" ras/Craftsman 6" thicknessplaner/ Dayton10"tablesaw(restoredfromneighborstrashpile)/ Mark VII restoration in 'progress'/ 10E[/size](SN E3779) restoration in progress, a 510 on the back burner and a growing pile of items to be eventually returned to useful life. - aka Red Grange