Using a Shop Smith Mark V on a Chris Craft Roamer refit

Moderator: admin

roamer46
Platinum Member
Posts: 627
Joined: Mon Nov 18, 2013 10:22 am
Contact:

Re: Using a Shop Smith Mark V on a Chris Craft Roamer refit

Post by roamer46 »

I got sick of polishing and needed a distraction. So I installed LED strip lights in the engine room.

1969 Chris Craft Roamer 46 Refit: Engine Room LED Lighting

Cheers,
Q

Image

They really brightened up the place
Image
User avatar
BuckeyeDennis
Platinum Member
Posts: 3802
Joined: Tue Jul 24, 2012 10:03 pm
Location: Central Ohio

Re: Using a Shop Smith Mark V on a Chris Craft Roamer refit

Post by BuckeyeDennis »

Q, you probably already know this, but others might not. You shouldn't use ordinary silicone sealer on electrical connections. It typically contains acetic acid, which likes to eat conductors. What you want for applications like this is electronics-grade RTV silicone.
User avatar
rcplaneguy
Platinum Member
Posts: 549
Joined: Mon Sep 23, 2013 6:33 pm
Location: Chapel Hill, NC

Re: Using a Shop Smith Mark V on a Chris Craft Roamer refit

Post by rcplaneguy »

"liquid electrical tape" works good, also. Comes in different colors, pretty handy to have around.
roamer46
Platinum Member
Posts: 627
Joined: Mon Nov 18, 2013 10:22 am
Contact:

Re: Using a Shop Smith Mark V on a Chris Craft Roamer refit

Post by roamer46 »

Good points guys! A buddy of mine was a big fan of liquid electrical tape, until the day he dropped the bottle with the cap off. That stuff came out of the bottle with purpose and went everywhere. He's no longer a fan.

I got another box full of stuff back from the chrome shop. The coolest thing in the box was a nautical themed ashtray that was on the boat when we found it. It's been a long time since I smoked, but this thing's so cool I decided to have it repaired and rechromed. It turned out pretty nice. I also got back the last of the chromed bronze stanchion bases and door hardware. That's it for the chrome work...my wallet can't take anymore!

1969 Chris Craft Roamer 46 Refit: Still More Chrome!

Cheers,
Q

Before
Image

After
Image
roamer46
Platinum Member
Posts: 627
Joined: Mon Nov 18, 2013 10:22 am
Contact:

Re: Using a Shop Smith Mark V on a Chris Craft Roamer refit

Post by roamer46 »

I took advantage of the great weather and got back to polishing stainless. The bow rub rail was challenging because of the v-shape and because the scratches there were pretty bad. The anchor rode (line) was a combination braided nylon with 6' of chain at the anchor. That anchor chain ripped up the stainless pretty good, but it all sanded and polished out.

1969 Chris Craft Roamer 46 Refit: Polishing the Bow Rub Rail

Cheers,
Q

Before
Image

After
Image
roamer46
Platinum Member
Posts: 627
Joined: Mon Nov 18, 2013 10:22 am
Contact:

Re: Using a Shop Smith Mark V on a Chris Craft Roamer refit

Post by roamer46 »

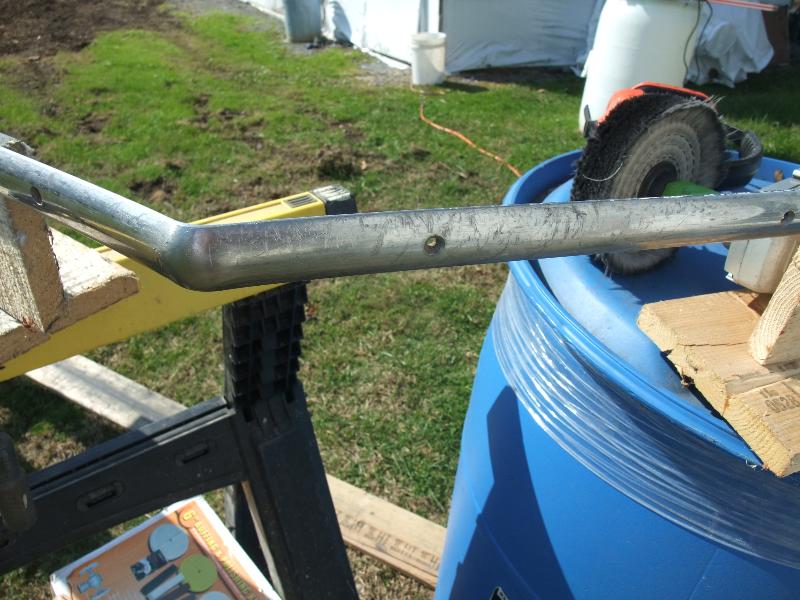
This is definitely the season of stainless. But I shifted from rub rail and stanchion polishing back to engine room stuff. I tacked the exhaust risers together a few months ago, then went to work on the CAD programs I use to try and make electronic files that could be used to cut the showerhead parts on a water or laser jet. Car radiators are cooled by air, but on boats the heat exchanger is cooled by river or ocean water, which is called raw water. After the raw water cools the heat exchanger, it needs to go out of the boat. But the exhaust is hot, too, so the showerhead on marine exhaust is a tube around the end of the exhaust pipe that fills with raw water. Holes on one end of the showerhead spray the raw water into the exhaust, cooling the gases and the exhaust hoses that route the exhaust, water, and steam to the muffler, then it dumps out of the boat. WeldingWeb member WheaticusRex, who works at a fab shop in North Carolina, cut the parts for a very good price, and they fit perfectly. I still need to fab the raw water inlets, but the basic parts are ready to be welded.

1969 Chris Craft Roamer 46 Refit: Exhaust Showerhead Parts
Cheers,
Q

The Plan
Image

The Parts
Image

The Showerhead On the Exhaust Riser
Image
roamer46
Platinum Member
Posts: 627
Joined: Mon Nov 18, 2013 10:22 am
Contact:

Re: Using a Shop Smith Mark V on a Chris Craft Roamer refit

Post by roamer46 »

Thanks!

I finally got the last of the hardware for my transom door, so I dry-fitted it, and trimmed a bit here and there to get the gaps right. Then I fired up my AlphaTIG and drizzled some 4043 on the transom door seams, which the guy who fabricated the aft deck enclosure had only tacked. I was concerned about heat warping the door, so I just stitched it by doing 1" welds in the four different spots and then repeating until the weld was continuous. I'm don't have anywhere near the smooth hand of a professional weldor, but I'm sure they'll be fine for this application.

1969 Chris Craft Roamer 46 Refit: Fitting the Transom Door

Cheers,
Q

Image

Image
roamer46
Platinum Member
Posts: 627
Joined: Mon Nov 18, 2013 10:22 am
Contact:

Re: Using a Shop Smith Mark V on a Chris Craft Roamer refit

Post by roamer46 »

I installed the mahogany moldings for the v-berth head cabinets. With that done, the bathroom is just about ready for the final primer application followed by paint. Now if only the painter would show up...

1969 Chris Craft Roamer 46 Refit: Installing V-berth Head Moldings

Cheers,
Q

Image
roamer46
Platinum Member
Posts: 627
Joined: Mon Nov 18, 2013 10:22 am
Contact:

Re: Using a Shop Smith Mark V on a Chris Craft Roamer refit

Post by roamer46 »

My painter is still not feeling well. He's got some kind of infection the doctors have been chasing for a while, plus Type 2 diabetes just got him. So I switched gears and did the final fit of the exhaust parts. I also bought a Zeny plasma cutter for a scorching good deal -- $230 -- but then learned that the same unit is on ebay for $188 delivered. It's definitely hobbyist-grade, but it worked like a champ. Now I'm just waiting on two more mandrel bent stainless tubes for the exhaust showerhead raw water inlets, and I'll finally weld them all together.

1969 Chris Craft Roamer 46 Refit: Final Exhaust Riser Fit-up

Cheers,
Q

Image

Image
roamer46
Platinum Member
Posts: 627
Joined: Mon Nov 18, 2013 10:22 am
Contact:

Re: Using a Shop Smith Mark V on a Chris Craft Roamer refit

Post by roamer46 »

I'm still waiting for the last pieces of stainless tubing for the exhaust risers, so I shifted gears topside and started installing the bow safety rail. This is a big deal because my insurance company won't let me splash the boat and go without a safety rail installed. I also want to drill all of the holes in the mahogany toe rail and seal the wood with epoxy before we do the final coats of MS1 clear coat. It was harder than I thought getting the bow pieces fitted, but with that done it should be much easier getting the mahogany safety rails on both sides installed this weekend.

1969 Chris Craft Roamer 46 Refit: Dry Fitting the Stainless Bow Safety Rail

Cheers
Q

Image

Image
Post Reply