Pictures of projects
Moderator: admin
-
kd6vpe
- Platinum Member
- Posts: 585
- Joined: Mon Jun 11, 2007 8:53 pm
- Location: Owasso, Oklahoma
- Contact:
twisted candle holders
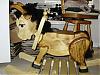
These candle holders have been a favorite for friends and family lately. Shown are two still in the chuck one finished on the chest I made last year. All made with a Shopsmith. The utube link shows how I did the candle holders.
- Attachments
-
- PA220001.JPG (80.04 KiB) Viewed 6257 times
SS 500 upgraded to 510; SS bandsaw; SS jointer
SS Oscillating Drum Sander; Universal Lathe Rest;
lathe duplicatior, shaper fence and shapers; SS Belt
Sander
Jim
www.youtube.com/kd6vpe
SS Oscillating Drum Sander; Universal Lathe Rest;
lathe duplicatior, shaper fence and shapers; SS Belt
Sander
Jim
www.youtube.com/kd6vpe
I really want to try and do the twist thing,,,,I have a Sears router crafter and thought that was the only way they could be made for the most part. How did you do that? Very nice work, the youtube flick did'nt really go into the detail of how the flutes were cut.
Mike, Northern Ca.
 Just an old logger trying to keep his feet covered in wood chips
-
kd6vpe
- Platinum Member
- Posts: 585
- Joined: Mon Jun 11, 2007 8:53 pm
- Location: Owasso, Oklahoma
- Contact:
part 4 is where I talked about drawing the grid lines sorry it was my first attempt with video and I did not have my ducks in order. I will see if I can write up some instructions on the process I used.
SS 500 upgraded to 510; SS bandsaw; SS jointer
SS Oscillating Drum Sander; Universal Lathe Rest;
lathe duplicatior, shaper fence and shapers; SS Belt
Sander
Jim
www.youtube.com/kd6vpe
SS Oscillating Drum Sander; Universal Lathe Rest;
lathe duplicatior, shaper fence and shapers; SS Belt
Sander
Jim
www.youtube.com/kd6vpe

I'm interested in the instructions to Jim.
SS 500(09/1980), DC3300, jointer, bandsaw, belt sander, Strip Sander, drum sanders,molder, dado, biscuit joiner, universal lathe tool rest, Oneway talon chuck, router bits & chucks and a De Walt 735 planer,a #5,#6, block planes. ALL in a 100 square foot shop.
.
.
Bob
.
.
Bob
Hi Jim! I really enjoyed all 5 of your videos on making these twisted candle holders. Good job, my friend! Very interesting project and wonderful gifts! You do good things in your little shop on the prairie! You have a certain way of working with wood that the wood seems to like.
Although I didn't have the audio on (wife was watching T.V.) I thought the series of videos were pretty explanatory. Your use of a Forster bit is unique! At least to me. Have you thought of using a router bit to remove the core of the holder rather than a drill bit?
P.S. Noticed you have shaved - was that your choice?
Octogenarian's have an earned right to be a curmudgeon.
Chuck in Lancaster, CA
Chuck in Lancaster, CA
Dog gone it,,,I 'm sorry,,,, I did'nt even know there were more video there to watch.kd6vpe wrote:part 4 is where I talked about drawing the grid lines sorry it was my first attempt with video and I did not have my ducks in order. I will see if I can write up some instructions on the process I used.
Mike, Northern Ca.
Just an old logger trying to keep his feet covered in wood chips
Hey Jim,
I just got finished watching all the other video you had on the twisted candle sticks and I must say you nearly could say you free handed those babies!!!! Very creative work and great results. Thanks for sharing,,,,
I just got finished watching all the other video you had on the twisted candle sticks and I must say you nearly could say you free handed those babies!!!! Very creative work and great results. Thanks for sharing,,,,
Mike, Northern Ca.
Just an old logger trying to keep his feet covered in wood chips
Hi again, Jim! Just watched your videos again - this time with sound! Gotta say you are a natural talent to make and narrate these short videos. Very Good work! Thanks for showing us! Your style is easy to follow and understand.
Really appreciated your use of the "Anti Gravity Jig". I could have recently used that when sawing the segments for the sides of my curved top. Good work, Jim!
Although you call yourself a novice - I believe you are quickly losing that connotation.!
Really appreciated your use of the "Anti Gravity Jig". I could have recently used that when sawing the segments for the sides of my curved top. Good work, Jim!
Although you call yourself a novice - I believe you are quickly losing that connotation.!
Octogenarian's have an earned right to be a curmudgeon.
Chuck in Lancaster, CA
Chuck in Lancaster, CA
From what I have read in various publications there are a couple of ways to make these barley twist types of things. In all the cases I have read, one needs to do a lot of hand control of the workpiece. After turning a cylinder, one method starts by drawing the spirals with pencil and hand sawing the edges of the spirals, then hogging out with gouges. In this procedure a lathe is used to support the workpiece while hands hold and wok it.grouser wrote:I really want to try and do the twist thing,,,,I have a Sears router crafter and thought that was the only way they could be made for the most part. How did you do that? Very nice work, the youtube flick did'nt really go into the detail of how the flutes were cut.
In another method, a jig is erected that will hold a cylindrical workpiece above a table router. Then the jig is moved while the router is run to form the barley shafts.
If you are interested, I'll try to find the magazine references. I think Jim's (kd6vpe's) videos give an excellent alternative method.
Octogenarian's have an earned right to be a curmudgeon.
Chuck in Lancaster, CA
Chuck in Lancaster, CA