Create a review for a woodworking tool that you are familiar with (Shopsmith brand or Non-Shopsmith) or just post your opinion on a specific tool. Head to head comparisons welcome too.
curiousgeorge wrote:I used the alum. spacers that came with my 510 to 520 upgrade.
If I understand correctly, the aluminum spacers move the rails laterally a fixed distance off the edge of the table.
If your router table was designed to be used on the Shopsmith - I have no question. But I thought you were building your table from scratch and I was asking how you positioned the table with respect to the tables' top surface.
"Making Sawdust Safely" Dusty
Sent from my Dell XPS using Firefox.
courious george has a very good looking table.
My table was for a 510. I found a couple of members that upgraded to the 520 and they let me have the rails from their 510 for shipping. The SS group is really a family and there is none finer. I used alumium angle which is very easy to use. The hardest was aligning the holes in the angle to make sure the table was level with the regular SS table. Use the holes and measurement in the SS table to make sure they lined up. Then where the bolts when through the angle I drilled out the wood in the table for clearance. I attached the angle to the wood with long screws and it seems to have good support.
This weekend I will try and get some pictures under the table so you can see. Worked pretty easy. Took only a couple of hours to put together. The hardest was routing out the table to be a tight fit for the router insert.
Bill
Broken Arrow OK
MKV, 510, MKVll, 50th Anniversary 520 with Jointech saw train, Bandsaw, scroll saw, joiner, 6" Sander,Stand Alone Pin Router and Router Table, Strip Sander, Jigsaw & (4) ER's plus Jigsaw for ER. DC SS RAS
dusty wrote:If I understand correctly, the aluminum spacers move the rails laterally a fixed distance off the edge of the table.
If your router table was designed to be used on the Shopsmith - I have no question. But I thought you were building your table from scratch and I was asking how you positioned the table with respect to the tables' top surface.
Dusty,
I did not build the table. It came with the Jointech system and had the aluminum bars with it. All I had to do was attach the rails to it.
I do have a suggestion if you use the aluminum angle. Make the mounting holes elongated vertically to allow for easier height adjustment.
Great pictures George, Thank you. That was exactly what I was inquiring about.
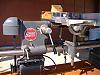
curiousgeorge wrote:John,
Yes, you will have to provide something to mount the rails to. In the attached pics of my Jointech router table you will see that mine have aluminum bars that came with the table. You can use what ever you want, but aluminum is readily available and easy to work with.
Thanks Wilhayesmfs! Once again giving me the answers that I needed.
courious george has a very good looking table.
My table was for a 510. I found a couple of members that upgraded to the 520 and they let me have the rails from their 510 for shipping. The SS group is really a family and there is none finer. I used alumium angle which is very easy to use. The hardest was aligning the holes in the angle to make sure the table was level with the regular SS table. Use the holes and measurement in the SS table to make sure they lined up. Then where the bolts when through the angle I drilled out the wood in the table for clearance. I attached the angle to the wood with long screws and it seems to have good support.
This weekend I will try and get some pictures under the table so you can see. Worked pretty easy. Took only a couple of hours to put together. The hardest was routing out the table to be a tight fit for the router insert.
Mounting the different materials (MDF, Phenolic, etc...) would be tricky without these tips.
You guys are awesome.
John, aka. Pinkie. 1-520, 1-510 & a Shorty, OPR. 520 upgrade, Band Saw, Jig Saw, scroll saw, Jointer, Jointech Saw Train. Delta Benchtop planer, Makita LS1016L 10" sliding compound miter saw, Trojan manf. (US Made)Miter saw work center, MiniMax MM16 bandsaw.
Squire of the Shopsmith. ...hmmmm, maybe knave, pawn, or wretch would be more appropriate for me.