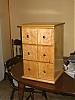
...cove molding for a walnut dresser. Followed Nick's advice and bought that table stop thingie. Set the guides @ 60* and lowered the table in 1/16th increments. Worked like a charm and, all this time I've dreaded the process.
Only made one mistake. The plans from Woodsmith called for running double coves in wider boards then splitting the coves apart. But, I cut wide lengths for the sides and front as if each was a single cove. Now, I guess I'll have to build another dresser...NOT!
Once again, that table stop is a wonderful thing!
Gene
'The true soldier fights not because he hates what is in front of him, but because he loves what is behind him.' G. K. Chesterton
[quote="pkni"]Ha ha. I just learned what it meant yesterday and I was showing off my new teckkie speak. Hey, at 67, I have limited stuff to show off.]Good Show!:D
Tim
Buying US made products will help keep YOUR job or retirement funds safer.
Good job, pkni! cove making on the tablesaw is a fun operation. And that's another thing for you to show off. BTW cove cutting is covered in chapter 4 of the PTWFE. (now under discussion) See this thread in "Beginning Woodworking" PTWFE Chapter Table Saw Special Opts CH4
Octogenarian's have an earned right to be a curmudgeon.
Chuck in Lancaster, CA
I have made wide cove moulding on the Shopsmith for the top of cabinets. Two of the most important things are to have a good, sharp carbide blade and take small cuts at a time. I clap two pieces of wood to the table to run the stock between.
qtndas01 wrote:I have made wide cove moulding on the Shopsmith for the top of cabinets. Two of the most important things are to have a good, sharp carbide blade and take small cuts at a time. I clap two pieces of wood to the table to run the stock between.
That's exactly what I did when I made the Greek Revival bookshelf for my daughter. It was pretty cool - except for cleaning up the saw marks when it was done.
timster68 wrote:That's exactly what I did when I made the Greek Revival bookshelf for my daughter. It was pretty cool - except for cleaning up the saw marks when it was done.
I used a flap sander in an electric drill. I angled the opposite direction of the cut angle. In my case, 60*. Followed that with hand sanding with a 3" soft foam sander that goes on my oscillating drum sander. Took about 10 minutes for 6" of molding. If I had much more to do I might try to put the flap sander in the SS and run it across at the opposite 60* angle.
Gene
'The true soldier fights not because he hates what is in front of him, but because he loves what is behind him.' G. K. Chesterton