Painting Goldie / Brownie

Forum for Maintenance and Repair topics. Feel free to ask questions or contribute.

Moderator: admin

User avatar
JPG
Platinum Member
Posts: 35600
Joined: Wed Dec 10, 2008 7:42 pm
Location: Lexington, Ky (TAMECAT territory)

Post by JPG »

a1gutterman wrote:Nice looking machine you got there farmer Francis! :D
AWFUL SHINEY though!:D Looks Great!

BTW What is a 'Gray' that you buy feed for?:rolleyes:
╔═══╗
╟JPG ╢
╚═══╝

Goldie(Bought New SN 377425)/4" jointer/6" beltsander/12" planer/stripsander/bandsaw/powerstation /Scroll saw/Jig saw /Craftsman 10" ras/Craftsman 6" thicknessplaner/ Dayton10"tablesaw(restoredfromneighborstrashpile)/ Mark VII restoration in 'progress'/ 10
E[/size](SN E3779) restoration in progress, a 510 on the back burner and a growing pile of items to be eventually returned to useful life. - aka Red Grange
User avatar
reible
Platinum Member
Posts: 11283
Joined: Thu Jul 20, 2006 12:08 pm
Location: Aurora, IL

Post by reible »

Hi,

Welcome to this forum!

There is a legend amist in shopsmith lore of a brave soul who took in many many lost shopsmiths... would you be he? The location and name farmer seems to fit what I remember of this person.

Either way we are glad you are here.

Ed

robinson46176 wrote:Thanks.
If I did this right here are two pictures of one of my off-color restored Shopsmiths.
{Knight of the Shopsmith} [Hero's don't wear capes, they wear dog tags]
charlese
Platinum Member
Posts: 7501
Joined: Fri Dec 08, 2006 10:46 pm
Location: Lancaster, CA

Post by charlese »

Great looking macine, Francis!
Octogenarian's have an earned right to be a curmudgeon.
Chuck in Lancaster, CA
User avatar
billmayo
Platinum Member
Posts: 2342
Joined: Fri Jul 21, 2006 3:31 pm
Location: Plant City, FL

Painting Goldie / Brownie

Post by billmayo »

etc92guy wrote:I've had the pin holes show up on the first coat on the cabinets I built. The paint seems to pull from the center of the dimple it creates. A second coat, done within an hour of the first seems to solve it. But I still have trouble with a consistent texture.

And if I remember right, if you don't recoat within 4 hours you have to wait 7 days. Also, full cure doesn't happen for 6 weeks according to a Shopnotes article.

Several years ago, someone stated you could harden the Rustoleum spray can paint by baking it at 200 degrees for 2 hours. I have a modified 30" stove oven that I use for Power Coating. I have been doing this for many headstocks and other parts that fit in the oven. It works well for me. The Rustoleum Hammered spray can paint also accepts this treatment. Other brands of spray can paint does not accept this treatment, only the Rustoleum brand. Of course, only try this at your own risk with a small item first.
Bill Mayo bill.mayo@verizon.net
Shopsmith owner since 73. Sell, repair and rebuild Shopsmith, Total Shop & Wood Master headstocks, SPTs, attachments, accessories and parts. US Navy 1955-1975 (FTCS/E-8)
User avatar
robinson46176
Platinum Member
Posts: 4182
Joined: Mon Mar 09, 2009 9:00 pm
Location: Central Indiana (Shelbyville)

Post by robinson46176 »

reible wrote:Hi,

Welcome to this forum!

There is a legend amist in shopsmith lore of a brave soul who took in many many lost shopsmiths... would you be he? The location and name farmer seems to fit what I remember of this person.

Either way we are glad you are here.

Ed
I did buy 14 in 2006 (I think that was the year) but I think that my total is still well under 30. I sort of lost count in the buying, selling and parting out. I've quit cold turkey now. :D Well, I would maybe like to pick up a parts machine cheap for my lone 10-ER just in case I do something stupid (common) and break something hard to repair or make. And... even though I have heard bad things about them I do sort of lust after a Mark II just to have one but I would have to find an absolute steal on it. Then there are those old SS RAS's... And the Sawsmith 2000...
I did manage to pick up 3 Mark VII's. One nice, one mostly there and one hulk but good for some parts.
In the shop I have a 510, a 10-ER, a Mark VII, 4 Mark V's, a mini and a Frankensmith (part Mark VII and part greenie). That is in addition to a big tablesaw, jointer, planer/molder/ripsaw and a bunch of typical smaller woodshop stuff. I also have a small Wood-mizer bandsaw sawmill but it will not live in the shop. Due to the buying of old SSs I also have a very nice collection of of SPTs and lots of extra accessory items like arbors, sanding disk etc. BTW, I have currently quit selling or parting even though I get regular request.
We have 2 dogs, one was unwanted by owner and the other was a dump out.
We have 3 cats, one from the shelter and the other 2 were dump outs.
We have 3 horses, all adopted rescues.
I also have 9 old Gravely garden tractors and 15 old farm tractors.
Are you seeing a dangerous pattern here? :D
I also own a dozen email lists on Yahoo including one called SS_Owners and one called Frugal Fun Woodworking.
I also keep a farm shop which is larger than the woodshop where I do tractor and vehicle work etc. that has a tire shop area, blacksmith and welding shop area and some machine shop equipment.
Did I mention that I am retired? :)
--
farmer
Francis Robinson
I did not equip with Shopsmiths in spite of the setups but because of them.
1 1988 - Mark V 510 (bought new), 4 Poly vee 1 1/8th HP Mark V's, Mark VII, 1 Mark V Mini, 1 Frankensmith, 1 10-ER, 1 Mark V Push-me-Pull-me Drillpress, SS bandsaw, belt sander, jointer, jigsaw, shaper attach, mortising attach, TS-3650 Rigid tablesaw, RAS, 6" long bed jointer, Foley/Belsaw Planer/molder/ripsaw, 1" sander, oscillating spindle/belt sander, Scroll saw, Woodmizer sawmill
User avatar
JPG
Platinum Member
Posts: 35600
Joined: Wed Dec 10, 2008 7:42 pm
Location: Lexington, Ky (TAMECAT territory)

Post by JPG »

The Hammered Copper arrived Fri. I quickly produced the following sample. [ATTACH]3538[/ATTACH]

This was painted with NO prep(other than dusting it off). It went on very thick. Even so scratches do show through. I do NOT know if left side is 'original' paint but it appears so(I purchased it used). Later painting will be done with lighter coat(s) and proper prep(light sanding at least).

Sorry! No Sunlight today.:( Taken under fluorescent lighting.
Attachments
copper1.jpg
copper1.jpg (393.38 KiB) Viewed 6036 times
╔═══╗
╟JPG ╢
╚═══╝

Goldie(Bought New SN 377425)/4" jointer/6" beltsander/12" planer/stripsander/bandsaw/powerstation /Scroll saw/Jig saw /Craftsman 10" ras/Craftsman 6" thicknessplaner/ Dayton10"tablesaw(restoredfromneighborstrashpile)/ Mark VII restoration in 'progress'/ 10
E[/size](SN E3779) restoration in progress, a 510 on the back burner and a growing pile of items to be eventually returned to useful life. - aka Red Grange
User avatar
robinson46176
Platinum Member
Posts: 4182
Joined: Mon Mar 09, 2009 9:00 pm
Location: Central Indiana (Shelbyville)

Post by robinson46176 »

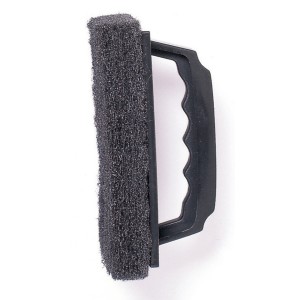
I have done very little sanding on SS stuff except in problem areas. I use "very coarse" steel wool for most of it. On big areas like the legs etc. I tend to use those BBQ grill scouring pads with an attached handle from Wally World. Cheap and effective. They also make great push blocks and often grip better than the foam rubber especially on dusty wood.
https://www.poolandspa.com/catalog/images/thumbs/69-P%5B1%5D.jpg
--
farmer
Francis Robinson
I did not equip with Shopsmiths in spite of the setups but because of them.
1 1988 - Mark V 510 (bought new), 4 Poly vee 1 1/8th HP Mark V's, Mark VII, 1 Mark V Mini, 1 Frankensmith, 1 10-ER, 1 Mark V Push-me-Pull-me Drillpress, SS bandsaw, belt sander, jointer, jigsaw, shaper attach, mortising attach, TS-3650 Rigid tablesaw, RAS, 6" long bed jointer, Foley/Belsaw Planer/molder/ripsaw, 1" sander, oscillating spindle/belt sander, Scroll saw, Woodmizer sawmill
User avatar
mickyd
Platinum Member
Posts: 2999
Joined: Mon Feb 09, 2009 1:18 pm
Location: San Diego, CA
Contact:

Post by mickyd »

JPG40504 wrote:The Hammered Copper arrived Fri. I quickly produced the following sample.

This was painted with NO prep(other than dusting it off). It went on very thick. Even so scratches do show through. I do NOT know if left side is 'original' paint but it appears so(I purchased it used). Later painting will be done with lighter coat(s) and proper prep(light sanding at least).
After you sand, a wipe with either acetone or MEK does a nice job at prepping the surface for the new paint.

Decent color match you have there. I think you'll be happy with it.

Gotta go. I am painting today too.
Mike
Sunny San Diego
User avatar
JPG
Platinum Member
Posts: 35600
Joined: Wed Dec 10, 2008 7:42 pm
Location: Lexington, Ky (TAMECAT territory)

Priming interior(s)

Post by JPG »

After seeing mickyd's pix of the INSIDE of his Greenie, I decided that was a GOOD thing to do. The primer used was Rustoleum self etching primer. Here are some B4 and after pix.

[ATTACH]4509[/ATTACH]

Tall end casting B4

[ATTACH]4510[/ATTACH]

Tall end casting primed

[ATTACH]4511[/ATTACH]

Short end casting B4

[ATTACH]4512[/ATTACH]

Short end casting primed
Attachments
b4 1.jpg
b4 1.jpg (388.97 KiB) Viewed 5921 times
prime 1.jpg
prime 1.jpg (324.5 KiB) Viewed 5915 times
b4 2.jpg
b4 2.jpg (381.88 KiB) Viewed 5912 times
prime 2.jpg
prime 2.jpg (392.26 KiB) Viewed 5911 times
╔═══╗
╟JPG ╢
╚═══╝

Goldie(Bought New SN 377425)/4" jointer/6" beltsander/12" planer/stripsander/bandsaw/powerstation /Scroll saw/Jig saw /Craftsman 10" ras/Craftsman 6" thicknessplaner/ Dayton10"tablesaw(restoredfromneighborstrashpile)/ Mark VII restoration in 'progress'/ 10
E[/size](SN E3779) restoration in progress, a 510 on the back burner and a growing pile of items to be eventually returned to useful life. - aka Red Grange
User avatar
JPG
Platinum Member
Posts: 35600
Joined: Wed Dec 10, 2008 7:42 pm
Location: Lexington, Ky (TAMECAT territory)

Priming BARE aluminum

Post by JPG »

The pix below are of a belt sander trunion and a tie bar. Both were stripped of the original gray paint and buffed with a wire brush(almost polished).

[ATTACH]4514[/ATTACH]

Tie Bar B4

[ATTACH]4515[/ATTACH]

Tie bar primed(other side:rolleyes: )

[ATTACH]4516[/ATTACH]

Belt sander trunion B4

[ATTACH]4517[/ATTACH]

Belt sander trunion primed(other side AGAIN:rolleyes: :rolleyes: )
Attachments
b4 4.jpg
b4 4.jpg (375.18 KiB) Viewed 5921 times
tie bar prime.jpg
tie bar prime.jpg (334.91 KiB) Viewed 5903 times
b4 bs.jpg
b4 bs.jpg (357.29 KiB) Viewed 5903 times
prime bs.jpg
prime bs.jpg (339.98 KiB) Viewed 5904 times
╔═══╗
╟JPG ╢
╚═══╝

Goldie(Bought New SN 377425)/4" jointer/6" beltsander/12" planer/stripsander/bandsaw/powerstation /Scroll saw/Jig saw /Craftsman 10" ras/Craftsman 6" thicknessplaner/ Dayton10"tablesaw(restoredfromneighborstrashpile)/ Mark VII restoration in 'progress'/ 10
E[/size](SN E3779) restoration in progress, a 510 on the back burner and a growing pile of items to be eventually returned to useful life. - aka Red Grange
Post Reply