
Sort of a mixed week. I spent a fair amount of time on the harvest bin and have it almost finished. Just need to put a back on it and complete the third coat of finish. Of course it was not without a few problems.
The first being that after rescuing the pieces for the bottom facing, and routing a decorative top edge. I found out that the front piece was too small. This confused me as the plans called for a piece that was 19.5" and mine was 20.25". After checking the plans and measuring my bin, I determined that the plans were wrong. the bin front measures 19" and the base pieces need to be mitered 45 degrees. so the length has to be at least 20.5". Fortunately I had some scrap that I was able to cut to size and use
The biggest problem is that now that the bin is assembled, it is not flat on the floor so it wobbles. One back corner seems to be about 1/8" off the floor when the other three are touching. I don't want to be like the guy who keeps cutting the uneven chair legs until none of them are good, so any advice from the forum would be appriciated. I had thought of sanding down the other back corner. The bin might tilt back slightly if I do this but as I said, I am reluctant to do anything at this point.
The jointer is functioning. I tried working with some scrap to remove the "cup" from a six inch piece, and did some test edging. I must admit it is a pleasure to have nice glue edges that are barely noticable. I have started machining the wood for a doll cradle so I guess that is the next project. The end pannels are glued up and now I will plane all the pieces down to thickness.
I also bought some cedar planks and intend to cut them into sizes that can be used for plank cooking on the BBQ. Too bad the only recipies I have are from the booklet that came with my BBQ, and are copyrighted. Otherwise I could included a good one for Brie cheese and fruit, as well as a great salmon recipe.
Have a Safe and Fun week!
John
Weekly Blog - November 22nd
Moderator: admin
-
a1gutterman

- Platinum Member
- Posts: 3653
- Joined: Tue Jan 09, 2007 12:45 am
- Location: "close to" Seattle
Hi John,john wrote:...The biggest problem is that now that the bin is assembled, it is not flat on the floor so it wobbles. One back corner seems to be about 1/8" off the floor when the other three are touching. I don't want to be like the guy who keeps cutting the uneven chair legs until none of them are good, so any advice from the forum would be appriciated. I had thought of sanding down the other back corner. The bin might tilt back slightly if I do this but as I said, I am reluctant to do anything at this point...
Does this harvest bin have actual legs, like a chair, or does it have solid sides that should be touching the ground all the way around? Can you provide a picture?
Tim
Buying US made products will help keep YOUR job or retirement funds safer.
Buying US made products will help keep YOUR job or retirement funds safer.
-
robinson46176

- Platinum Member
- Posts: 4182
- Joined: Mon Mar 09, 2009 9:00 pm
- Location: Central Indiana (Shelbyville)
a1gutterman wrote:Hi John,
Does this harvest bin have actual legs, like a chair, or does it have solid sides that should be touching the ground all the way around? Can you provide a picture?
I assume that when it is on the floor that you have turned it around to a bunch of different positions to be sure that it isn't the floor.
What if you load it heavily and let it sit overnight?
A picture may bring the answer as Tim suggest.
Make another one and use three legs...
--
farmer
Francis Robinson
I did not equip with Shopsmiths in spite of the setups but because of them.
1 1988 - Mark V 510 (bought new), 4 Poly vee 1 1/8th HP Mark V's, Mark VII, 1 Mark V Mini, 1 Frankensmith, 1 10-ER, 1 Mark V Push-me-Pull-me Drillpress, SS bandsaw, belt sander, jointer, jigsaw, shaper attach, mortising attach, TS-3650 Rigid tablesaw, RAS, 6" long bed jointer, Foley/Belsaw Planer/molder/ripsaw, 1" sander, oscillating spindle/belt sander, Scroll saw, Woodmizer sawmill
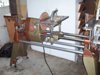
I am attaching a pictutre of the previous one I had made (didn't have this problem with that one). The picture shows the front with a decorative cut-out. The two sides have the same cut-out so that at the front corners there is 4.5" x 2.5" touching the floor, and at the back corner only 2.5" on the side as there is no back base panel.
I hope this helps. I had a better close-up picture but it was too large to post.
Farmer:
Your tag line states the reason I am hesitant to correct this problem.
John
I hope this helps. I had a better close-up picture but it was too large to post.
Farmer:
Your tag line states the reason I am hesitant to correct this problem.
John
- Attachments
-
- DSC00785.JPG (132.66 KiB) Viewed 2896 times
Do you still have the back to put on? If so, maybe this will help - -
You can test to see if the back of the case is square by measuring corner to corner. Actually a story stick will work more accurately. If not square, tighten a clamp across the two back opposite corners (the long leg to the upper side opposite the long leg) If the clamp will square it up. Then place a square panel onto or into the back.
If the back is already square, Make your back panel so it is a parallelogram. All you need is 1/16" down on one back leg and the other 1/16" up.
Best wishes!
Octogenarian's have an earned right to be a curmudgeon.
Chuck in Lancaster, CA
Chuck in Lancaster, CA
-
a1gutterman
- Platinum Member
- Posts: 3653
- Joined: Tue Jan 09, 2007 12:45 am
- Location: "close to" Seattle
Hi John,john wrote:I am attaching a pictutre of the previous one I had made (didn't have this problem with that one). The picture shows the front with a decorative cut-out. The two sides have the same cut-out so that at the front corners there is 4.5" x 2.5" touching the floor, and at the back corner only 2.5" on the side as there is no back base panel.
I hope this helps. I had a better close-up picture but it was too large to post.
Farmer:
Your tag line states the reason I am hesitant to correct this problem.
John
If the cabinet is knot fully assembled, Chuck has your solution]this[/URL] might be your solution. Here is another site.
Tim
Buying US made products will help keep YOUR job or retirement funds safer.
Buying US made products will help keep YOUR job or retirement funds safer.
Chuck:
I really hadn't thought of measuring to see if is square, but I'm not sure I could square it up at this point since there are so many glued and screwed components. The whole thing (carcass) rests on the three base panels and I think my problem is that one of the side panels might be slightly off. I should have dry assembled it first, and adjusted if off, but since my front corner miters were so good, I figured it was OK and the three base panels are now glued on and tacked on with finishing nails on the back side. I think any adjustments will have to be to the areas touching the floor or go with Tim's idea.
Tim:
Thanks for the suggestion. My wife and I already discussed attaching a feet, but this would raise the bin off the floor a bit and I was trying to avoid that. I used something similar on a wine rack I made last year and on that project it looked good and kept the rack steady. In the end, this may be the only solution.
Thanks Guys.
John
-
johnmccrossen
- Gold Member
- Posts: 173
- Joined: Wed Feb 21, 2007 8:09 pm
- Location: Washington
Hello John from another John, If only one back corner leg is above the floor with the other three touching pretty evenly, you may want to glue a thin (@ 1/8"?) shim of same material onto the legs of the short corner and then sand down a little at a time until it sets level. Another option is to level the unit and then scribe all four corners using a guide spacer and then belt sanding to the scribed lines. This works well on chair legs, but might be more difficult on your base corners. Good Luck, John McCrossen
John McCrossen
Everett, Wa.
1954 Mk 5 SN 269454, 1955 Mk 5 SN 316013, 1960 Mk 5 SN 360792, 1962 Mk 5 SN 380102, Magna band saw, (2) jointers, (1) belt sander, (1) air compressor, (1) jig saw, (1) strip sander, (1) 20" scroll saw, DC 3300 dust collector, Sawsmith RAS, Craftsman table saw, 13" DeWalt planer, Triton 3 1/4 HP plunge router & table
-
cocacola1012
- Gold Member
- Posts: 106
- Joined: Tue Nov 24, 2009 8:19 am
- Location: Virginia Beach, VA