As most of you know, I just bought a 1955 Greenie a couple of weeks ago, and this past week I stumbled upon a really nice 1980 Gray. The Gray has a complete set of manuals, and I tried to lubricate the headstock following the manual instructions. Everything went fine until "oiling the motor shaft."
I turned the speed dial to "Route Shape" as directed by the manual, and then "...pry off the plug bottom. Hand turn the spindle until hole in sleeve hub can be seen. This hole is about 1/2" from the sheave casting and can be difficult to find because of the spring. A flashlight and a small mirror is sometimes helpful ..."
I did not have a small mirror and maybe that is why I could not find that hole. I saw the spring on the shaft and rotated the shaft completely around several times. Is the hole underneath the spring?
On my Greenie I could not remove the nameplate on the back of the headstock. Does it pry off the same way as on newer machines. I got three screwdrivers underneath it, and pried so hard I was afraid the nameplate might bend. The screwdrivers were flexing. Is there any special trick to removing the nameplate on the Greenie, or should I just use brute force?
Of course, the Greenie does not have a plug bottom cap to pry off on the headstock end. Do any of you have a Greenie manual? Are you supposed to take it apart so this area can be oiled?
Thanks,
Jerry Floren
St. Peter, MN
Lubricating the Headstock
Moderator: admin

To lube my 1980, I take the 2 screws out and move the shroud to the left end. Once ya find the hole, mark the location on sheeve with a magic marker.
SS 500(09/1980), DC3300, jointer, bandsaw, belt sander, Strip Sander, drum sanders,molder, dado, biscuit joiner, universal lathe tool rest, Oneway talon chuck, router bits & chucks and a De Walt 735 planer,a #5,#6, block planes. ALL in a 100 square foot shop.
.
.
Bob
.
.
Bob
-
RobertTaylor
- Platinum Member
- Posts: 569
- Joined: Mon Sep 03, 2007 9:28 am
- Location: North Canton, Ohio
on your greenie there is no hole behind the nameplate. to remove it there are two pushnuts inside. i reccommend a onetime disasembly of the headstock to put a hole there. there will also not be any holes in the floating sheave or motor sheave. this would also be the best time to add them. after this onetime improvement regular maintenence will be a breeze. a search for posts by Bill Mayo will yeild his advice on this subject. of course specific questions can be addressed here also.
Bob
1954 greenie, 1963 anniversary edition now a mini,
1984 500, 1985 510, 1987 510, pro-planer, bandsaw, dust collector
1954 greenie, 1963 anniversary edition now a mini,
1984 500, 1985 510, 1987 510, pro-planer, bandsaw, dust collector
-
JPG

- Platinum Member
- Posts: 35600
- Joined: Wed Dec 10, 2008 7:42 pm
- Location: Lexington, Ky (TAMECAT territory)
Yeah! That 'addition' of a hole plug to allow lubrication of the motor sheave was at best good intentions. My Goldie's manual procedure calls for running an 'oil stick' through the hole in the cover (after magically locating the oil hole).bluekayak wrote:Thank you very much Bob.
Jerry
Common sense(experience) says to remove the belt cover so as to 1)be able to see what you need to see 2)access that which you need to access. Today's extendable spout oiler 'bottle' is much handier than an oil stick.
The medallion cover over the 'access hole' from your description indicates an older sand cast version of the greenies that do NOT have an access hole!!! Neither is the medallion removable from the outside!!! I suggest dropping the motor etc and accessing the sheave etc. from the bottom. It helps to raise the way tubes so the open 'bottom' becomes 'a side'. From there you can see why the medallion is quite stubborn resisting removal by prying from the outside.
BTW the greenie has more than 2 screws holding the belt cover on.(5?)
P.S. "Betty" is correct, The older Greenies did not have the oil holes either! I overlooked that! SAT!! Adding the holes involves disassembly of the motor shaft spring/retainer(beware! Spring loading(big time)) so as to enable removal of the motor sheave. To remove the control sheave requires removal of the speed control(dial and mechanism) which is not difficult(once the set screw is loosened). If it has the 'anti rattle' spring, do not lose it!
Have you seen the sawdust sessions in which nick performs this disassembling/reassembling?
╔═══╗
╟JPG ╢
╚═══╝
Goldie(Bought New SN 377425)/4" jointer/6" beltsander/12" planer/stripsander/bandsaw/powerstation /Scroll saw/Jig saw /Craftsman 10" ras/Craftsman 6" thicknessplaner/ Dayton10"tablesaw(restoredfromneighborstrashpile)/ Mark VII restoration in 'progress'/ 10E[/size](SN E3779) restoration in progress, a 510 on the back burner and a growing pile of items to be eventually returned to useful life. - aka Red Grange
Hope I oiled the Gray correctly
Boy am I every glad I asked you all for help. I almost took a pry bar to my Greenie's nameplate. I took some pictures of the Gray in case anyone else is wondering how this is done. Make sure your machine is unplugged before doing this.
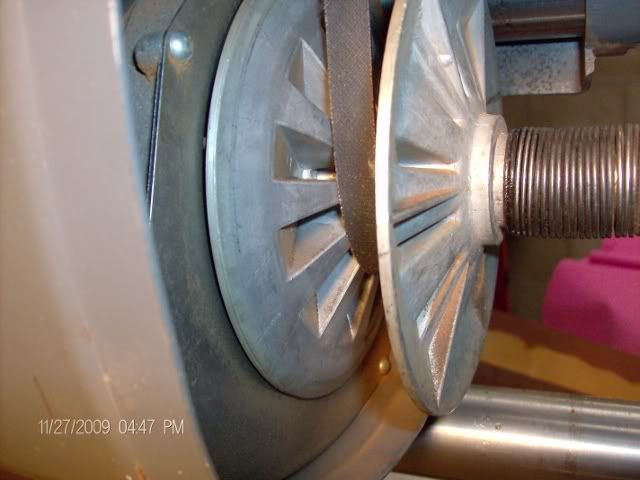
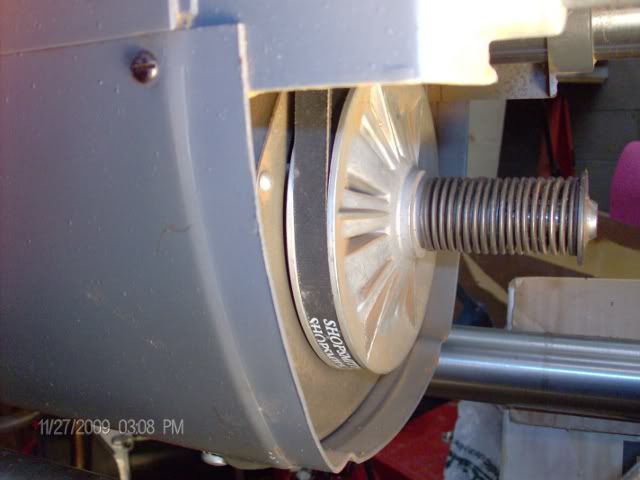
The hole behind the Shopsmith nameplate is easy to find. Putting three drops of oil in that hole, using a stick (the manual's method) is not so easy.
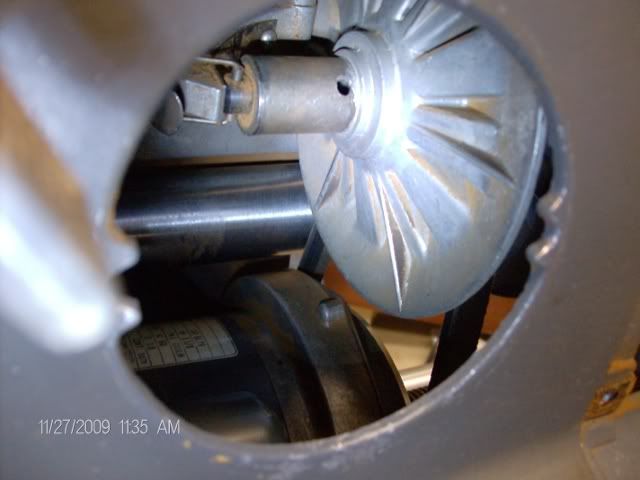
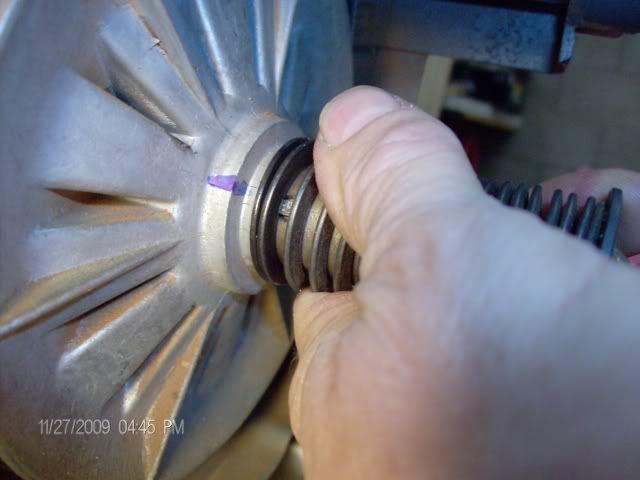
Finding the hole on the motor's shaft is much more difficult (impossible if you follow the manual's instructions). Here the sheave is spread wide apart -- set at the slowest speed setting. This will never work. The hole is under the spring, which is very tight at the slow speed setting. In fact, the hole may be under the sheave.
To access the hole, you have to set the headstock at the highest speed. This compresses the sheave and makes the spring as loose as possible.
I think this is the hole and hope one of you can confirm. I was expecting it to be about 1/2 inch away from the sheave as the manual states. If this is not the hole, I oiled the wrong thing. Once you find it, mark it with a permanent marker.
One thing you have to watch out for is restarting your machine after it is set at the highest possible setting. I'd recommend putting on a sanding wheel and turning the machine while you lower the speed setting before starting it up.
Jerry Floren
St. Peter, MN
The hole behind the Shopsmith nameplate is easy to find. Putting three drops of oil in that hole, using a stick (the manual's method) is not so easy.
Finding the hole on the motor's shaft is much more difficult (impossible if you follow the manual's instructions). Here the sheave is spread wide apart -- set at the slowest speed setting. This will never work. The hole is under the spring, which is very tight at the slow speed setting. In fact, the hole may be under the sheave.
To access the hole, you have to set the headstock at the highest speed. This compresses the sheave and makes the spring as loose as possible.
I think this is the hole and hope one of you can confirm. I was expecting it to be about 1/2 inch away from the sheave as the manual states. If this is not the hole, I oiled the wrong thing. Once you find it, mark it with a permanent marker.
One thing you have to watch out for is restarting your machine after it is set at the highest possible setting. I'd recommend putting on a sanding wheel and turning the machine while you lower the speed setting before starting it up.
Jerry Floren
St. Peter, MN
-
JPG
- Platinum Member
- Posts: 35600
- Joined: Wed Dec 10, 2008 7:42 pm
- Location: Lexington, Ky (TAMECAT territory)
bluekayak wrote:Boy am I every glad I asked you all for help. I almost took a pry bar to my Greenie's nameplate. I took some pictures of the Gray in case anyone else is wondering how this is done. Make sure your machine is unplugged before doing this.
The hole behind the Shopsmith nameplate is easy to find. Putting three drops of oil in that hole, using a stick (the manual's method) is not so easy.
Finding the hole on the motor's shaft is much more difficult (impossible if you follow the manual's instructions). Here the sheave is spread wide apart -- set at the slowest speed setting. This will never work. The hole is under the spring, which is very tight at the slow speed setting. In fact, the hole may be under the sheave.
To access the hole, you have to set the headstock at the highest speed. This compresses the sheave and makes the spring as loose as possible.
I think this is the hole and hope one of you can confirm. I was expecting it to be about 1/2 inch away from the sheave as the manual states. If this is not the hole, I oiled the wrong thing. Once you find it, mark it with a permanent marker.
One thing you have to watch out for is restarting your machine after it is set at the highest possible setting. I'd recommend putting on a sanding wheel and turning the machine while you lower the speed setting before starting it up.
Jerry Floren
St. Peter, MN
Re: Motor oil hole - Yep you found it. Notice the key way 'key' under the hole. This is what transfers the rotary motion from the motor shaft to the sheave. Do not be bashful oiling it. Up to 10 drops is not a bad idea! work the sheave in and out by hand(pulling it out and allowing it to return(DO NOT LET IT GO).
Re: Control sheave oil hole - 3 drops is too skimpy! Put up to 10 drops in it, move it in & out also then raise to vertical and let it sit overnight(lets the oil migrate to the small bearing in the end of the snout).[Courtesy of Bill Mayo]
All this 'in and out' movement of the movable sheaves is easier if the motor belt is removed.
╔═══╗
╟JPG ╢
╚═══╝
Goldie(Bought New SN 377425)/4" jointer/6" beltsander/12" planer/stripsander/bandsaw/powerstation /Scroll saw/Jig saw /Craftsman 10" ras/Craftsman 6" thicknessplaner/ Dayton10"tablesaw(restoredfromneighborstrashpile)/ Mark VII restoration in 'progress'/ 10E[/size](SN E3779) restoration in progress, a 510 on the back burner and a growing pile of items to be eventually returned to useful life. - aka Red Grange
╟JPG ╢
╚═══╝
Goldie(Bought New SN 377425)/4" jointer/6" beltsander/12" planer/stripsander/bandsaw/powerstation /Scroll saw/Jig saw /Craftsman 10" ras/Craftsman 6" thicknessplaner/ Dayton10"tablesaw(restoredfromneighborstrashpile)/ Mark VII restoration in 'progress'/ 10E[/size](SN E3779) restoration in progress, a 510 on the back burner and a growing pile of items to be eventually returned to useful life. - aka Red Grange
JPG is right on that 3 drops is too skimpy! Since you just got this machine a good coat of oil on the two shafts will help assure they slide easily.
When lubricating my motor shaft, I always drop some oil on the outside of the motor shaft as well as in the hole. Then hand slide the sheave (as recommended above) a few times to make sure the shaft is covered.
On the control shaft a little extra oil will not hurt. If too much oil is in the shaft you can see is ooze out of the end bearing when you hand slide that shaft back and forth. In order to hand slide this shaft you first need to disconnect the ring from the pork chop, and remove the drive belt. (not necessarily in that order) Hand sliding this shaft is a good thing every once and a while to make sure it slides smooth and easily.
Octogenarian's have an earned right to be a curmudgeon.
Chuck in Lancaster, CA
Chuck in Lancaster, CA
-
dusty

- Platinum Member
- Posts: 21530
- Joined: Wed Nov 22, 2006 6:52 am
- Location: Tucson (Wildcat Country), Arizona
Lubricating the Headstock
charlese wrote:JPG is right on that 3 drops is too skimpy! Since you just got this machine a good coat of oil on the two shafts will help assure they slide easily.
When lubricating my motor shaft, I always drop some oil on the outside of the motor shaft as well as in the hole. Then hand slide the sheave (as recommended above) a few times to make sure the shaft is covered.
On the control shaft a little extra oil will not hurt. If too much oil is in the shaft you can see is ooze out of the end bearing when you hand slide that shaft back and forth. In order to hand slide this shaft you first need to disconnect the ring from the pork chop, and remove the drive belt. (not necessarily in that order) Hand sliding this shaft is a good thing every once and a while to make sure it slides smooth and easily.
I would have to agree with everything said. All I would add is lubricate, lubricate, lubricate. I deposit four to six drops of oil in these oiling ports every time I get close enough to be able to see them. I do not believe that you can over oil this machine.
"Making Sawdust Safely"
Dusty
Sent from my Dell XPS using Firefox.
Dusty
Sent from my Dell XPS using Firefox.
-
JPG
- Platinum Member
- Posts: 35600
- Joined: Wed Dec 10, 2008 7:42 pm
- Location: Lexington, Ky (TAMECAT territory)
I neglected to mention that in order to allow complete movement of the control sheave while hand moving it, the pork chop needs to be moved as far away from the control sheave as possible(set at hi speed). That is the same setting for doing the same thing with the floating sheave!(set to high!)
╔═══╗
╟JPG ╢
╚═══╝
Goldie(Bought New SN 377425)/4" jointer/6" beltsander/12" planer/stripsander/bandsaw/powerstation /Scroll saw/Jig saw /Craftsman 10" ras/Craftsman 6" thicknessplaner/ Dayton10"tablesaw(restoredfromneighborstrashpile)/ Mark VII restoration in 'progress'/ 10E[/size](SN E3779) restoration in progress, a 510 on the back burner and a growing pile of items to be eventually returned to useful life. - aka Red Grange
╟JPG ╢
╚═══╝
Goldie(Bought New SN 377425)/4" jointer/6" beltsander/12" planer/stripsander/bandsaw/powerstation /Scroll saw/Jig saw /Craftsman 10" ras/Craftsman 6" thicknessplaner/ Dayton10"tablesaw(restoredfromneighborstrashpile)/ Mark VII restoration in 'progress'/ 10E[/size](SN E3779) restoration in progress, a 510 on the back burner and a growing pile of items to be eventually returned to useful life. - aka Red Grange