Jim - The embroidery machine is a Brother PR-620.
Ed - I'll post a short review in the "Woodworking Tool Review" after supper tonight.
My Projects since Jan. 1st.
Moderator: admin

Here are a couple of photos of the grooves, dadoes and rabbet milled on the inside of the box. The till box grooves and dadoes are 3/8" X 3/8" - the rabbets and the chest bottom are 3/4" X 3/8". They will hold the till box, chest bottom and drawer frame. All grooves were cut on the OPR. The OPR made it easy to align the grooves from the ends to the back, without making a right angle jig like the guys in the magazine.
I managed to break out one of the lower tails at the end of the lower rabbet, while re-assembling the chest. I knew this area was going to be brittle as it is now only 3/8" thick, but managed to break it anyway. No problem - I made a plug for the hole that is not really needed, as that area will also be covered by molding.
Next - making the till box and the bottoms. The lid of the chest is already made, but not shown, as it only looks like a rectangular large board.
[ATTACH]7683[/ATTACH]
[ATTACH]7685[/ATTACH]
- Attachments
-
- HPIM2254.jpg (119.43 KiB) Viewed 2543 times
-
- HPIM2256.jpg (117.88 KiB) Viewed 2541 times
Octogenarian's have an earned right to be a curmudgeon.
Chuck in Lancaster, CA
Chuck in Lancaster, CA
A little progress
Here's the progress since the end of January - made the two bottoms of the till box, the top of the till box and the side of the till, and just finished the chest bottom.
In the first photo, the bottom is sitting in its grooves and the top and the side are leaning against the chest bottom (poplar). The chest is glued together on the back sides. The second photo shows the lonesome chest front.
The till top is on the left and the side on the right. All of the till pieces are 3/8" thick. The top fits into the vertical dadoes and the narrow part fits the width of the chest. The side can slide up to reveal the second bottom. This is supposed to be a small secret shelf to hold valuables. (Not so secret any more)
The top looks like it has two dowels, but these are really ears of the solid top. Since the pivot holes for the top are 3/8" the only way to make hinge pins was to use the top itself. This brings me to two mistakes made earlier. 1) I glued the sides of the chest to the back before drilling a hole for the top hinge. This caused me to drill a hole through the back, which I will have to plug later. The hinge hole in the front is only 3/8" deep from the inside. (the correct way) 2) In making the top I sawed the first piece to the width of the chest. This left nothing for the hinges. I now have a new piece of scrap.
Also the first till box side was fitted so it was a bit short (1/16") of reaching both the front and back. The second piece fits better. This piece was made from 3/4" cutoffs that I just couldn't throw away. I had intended to make both the top and side from these glued up boards, but such is life in my shop.
At about 3 to 4 hours per day of undisturbed shop time the till and the bottom took me 10 days. Good thing I don't have a schedule!
The making and fitting of the till box parts required putting the chest front on and off of the chest many - many times. Lucky that the dovetails fit tight enough for till adjustments but not to tight to break anything.
I'm now puzzling whether to put a finish on the inside of the chest, or to leave it bare.
[ATTACH]7897[/ATTACH]
[ATTACH]7898[/ATTACH]
- Attachments
-
- HPIM2258.jpg (126.23 KiB) Viewed 2492 times
-
- HPIM2259.jpg (117.88 KiB) Viewed 2489 times
Octogenarian's have an earned right to be a curmudgeon.
Chuck in Lancaster, CA
Chuck in Lancaster, CA
After the chest was glued together the next step was to make the drawer frame. It's going to be poplar, with an oak front and is nothing more than a rectangular frame assembled with tenons.
Got started on that then got sidetracked by trimming off the protruding tails and pins. Used a flush cutting pull saw to remove them. The saw worked very well, only a few light scratches in the faces. They can be easily sanded off. The saw is very sharp and the small slice between my thumb and index finger attests to that. Should have been wearing my protective carving glove.
First photo is sawing off a tail. -- The hole is for the till lid hinge and will be plugged.
[ATTACH]7914[/ATTACH]
Next is a close-up of two pin excesses removed. They look thin and are! The thickness measures 0.019" This also happens to be the thickness of the saw blade.
[ATTACH]7916[/ATTACH]
Mentioned earlier I broke off the end of a rabbet which would have made a hole in the side of the case. The next photo shows the plug on the ind of that tail. Although the grain slopes opposite, I don't think it will be noticeable. In this pic, you can see a scratch on the face of the pin top. Also note that pin has been sawn level.
[ATTACH]7915[/ATTACH]
- Attachments
-
- HPIM2261.jpg (111.63 KiB) Viewed 2452 times
-
- HPIM2262.jpg (109.39 KiB) Viewed 2448 times
-
- HPIM2263.jpg (123.31 KiB) Viewed 2449 times
Octogenarian's have an earned right to be a curmudgeon.
Chuck in Lancaster, CA
Chuck in Lancaster, CA
-
a1gutterman

- Platinum Member
- Posts: 3653
- Joined: Tue Jan 09, 2007 12:45 am
- Location: "close to" Seattle

Thanks for the positive feedback, guys. Today, got the drawer frame made up and affixed into place. The front bottoms of the sides protruded from the case front (± 1/16") (the same amount as the dovetail pins). Since these areas will become the drawer side frames they had to be flush with the case front.
After thinking of sawing - same as the tails & pins, or sanding, I chose to plane them using the little block plane. That choice was a good one!
I really puzzled over whether or not to put any finish on the interior of the chest. It was almost a coin toss! Finally I chose to give the interior only one coat of water based polyurethane before assembly. This brought up any whiskers and allowed me to lightly sand them off with 220 grit.
Octogenarian's have an earned right to be a curmudgeon.
Chuck in Lancaster, CA
Chuck in Lancaster, CA
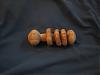
Now close to finishing up the feet - changed to a 7º by 5/8" bit to do the dovetails in the feet. After gluing the dovetails, routed a rabbet on their top to hold a 1/4" triangular poplar plate. The plate will be screwed to the bottom of the chest. There will also be a 3/4" X 3/4" oak block fastened to the inside corner of each foot. The block will be 1/16" proud of the foot bottoms to take the wear off of the decorative oak, and it will present end grain to a floor rather than edge grain.
Next step will be using the Shopsmith shaper to make molding.
[ATTACH]7981[/ATTACH]
[ATTACH]7982[/ATTACH]
Next step will be using the Shopsmith shaper to make molding.
[ATTACH]7981[/ATTACH]
[ATTACH]7982[/ATTACH]
- Attachments
-
- HPIM2265.jpg (124.87 KiB) Viewed 2330 times
-
- HPIM2266.jpg (114.64 KiB) Viewed 2329 times
Octogenarian's have an earned right to be a curmudgeon.
Chuck in Lancaster, CA
Chuck in Lancaster, CA