http://sn140w.snt140.mail.live.com/default.aspx?wa=wsignin1.0Shopsmith is offering the Sharpening Guide in an email special.
In the advertisement, it is shown mounted directly to an extension table. To do this, does the extension table not have to be drilled for a mounting bolt(s)? If so, do the instructions detail how to do this?
Shopsmith Sharpening Jig
Moderator: admin
-
dusty

- Platinum Member
- Posts: 21530
- Joined: Wed Nov 22, 2006 6:52 am
- Location: Tucson (Wildcat Country), Arizona
Shopsmith Sharpening Guide
"Making Sawdust Safely"
Dusty
Sent from my Dell XPS using Firefox.
Dusty
Sent from my Dell XPS using Firefox.
-
johnmccrossen
- Gold Member
- Posts: 173
- Joined: Wed Feb 21, 2007 8:09 pm
- Location: Washington
Dusty, The answer to your question is yes. However you don't have to drill any holes if you do not want to. This thread shows a good way to do this. There have been other threads on mounting the sharpening jig, but I couldn't find them this am. John McCrossen
http://www.shopsmith.net/forums/showthr ... g+mounting
http://www.shopsmith.net/forums/showthr ... g+mounting
John McCrossen
Everett, Wa.
1954 Mk 5 SN 269454, 1955 Mk 5 SN 316013, 1960 Mk 5 SN 360792, 1962 Mk 5 SN 380102, Magna band saw, (2) jointers, (1) belt sander, (1) air compressor, (1) jig saw, (1) strip sander, (1) 20" scroll saw, DC 3300 dust collector, Sawsmith RAS, Craftsman table saw, 13" DeWalt planer, Triton 3 1/4 HP plunge router & table

Mine came with a template to use to drill the holes.dusty wrote:http://sn140w.snt140.mail.live.com/default.aspx?wa=wsignin1.0Shopsmith is offering the Sharpening Guide in an email special.
In the advertisement, it is shown mounted directly to an extension table. To do this, does the extension table not have to be drilled for a mounting bolt(s)? If so, do the instructions detail how to do this?
Joe
520, Bandsaw, Beltsander, Delta Drill Press, Delta Lathe, Craftsman Planner/Jointer, Delta Planner, Mini "Greenie" Shorty 500
Being a VETERAN is an honor
Being a GRANDPA is priceless
520, Bandsaw, Beltsander, Delta Drill Press, Delta Lathe, Craftsman Planner/Jointer, Delta Planner, Mini "Greenie" Shorty 500
Being a VETERAN is an honor
Being a GRANDPA is priceless

-
dusty
- Platinum Member
- Posts: 21530
- Joined: Wed Nov 22, 2006 6:52 am
- Location: Tucson (Wildcat Country), Arizona
Thanks for the inputs. I have always had the sharpening guide but I have always used it on the main table.
I'm going to experiment with the Crafter's Station and and extension table. I have to assemble it to be able to envision it but I think it'll work. In the back of my mind is the thought of using the Crafter'[s Station with direction reversed. Don't know, won't know til I try it.
I'm going to experiment with the Crafter's Station and and extension table. I have to assemble it to be able to envision it but I think it'll work. In the back of my mind is the thought of using the Crafter'[s Station with direction reversed. Don't know, won't know til I try it.
"Making Sawdust Safely"
Dusty
Sent from my Dell XPS using Firefox.
Dusty
Sent from my Dell XPS using Firefox.
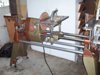
Shopsmith lathe tool sharpening guide
If I was going to use the sharpening guide on an aux table I would cut a dado in the board the same size as the miter slot and clamp it to the aux table. I would never drill holes in the table. You need to be able to set the angle for various tools so you need the miter gauge.
I use the sharpening guide on the main table but it is nice to be able to touch up a tool for final cuts. That is a great advantage of having the sharpening guide on an aux table. The angles I use are 13 degrees left for the large gouge, 5 degrees left for the 3/8 spindle gouge, 4 degrees left for a bowl gouge, 8 degrees left for the diamond parting tool.
For the 1 inch skew according to people who claim to know, the preferred skew angle is 70 degrees. To get that angle on your 1 inch Shopsmith skew, set the sharpening guide to 6 degrees left.
For the round nose, or the wider flat scraper, set the guide to zero degrees. Take that fourth station assembly doodad to hold the round nose scraper and throw it away so you can use that angle of the fourth station for your wide, flat scraper. Free hand sharpen the round nose scraper.
If you want a really sharp edge on the skew after you sharpen it with the sharpening guide make a strop from an old wide leather belt. Take a few inches of it and glue the finished side to a flat board. Rough up the back side of the belt a little bit with some 60 or 80 grit sand paper. Then rub a Tripoli stick on part of the leather. Take your skew and put the angle flat on the leather and pull it away from the skew edge about 3 times on each side. You will be able to shave the hair on your arm if you do it properly.
Shopsmith Sharpening Guide User Guide
I just bought a used Shopsmith sharpening guide that didn't have a user guide or instructions. I looked on the SS site and couldn't find the instructions. I have the general sharpening section from the Power Tool book but am looking for the specific user guide. Can someone tell me a source for it? Or can someone provide me a copy of one? Thanks in advance.
Have a safe day!
Oddie
510(upgraded 500), 500, 10ER, power station, belt sander, bandsaw, jointer, SS compressor, jigsaw, dust collector
Oddie
510(upgraded 500), 500, 10ER, power station, belt sander, bandsaw, jointer, SS compressor, jigsaw, dust collector