mickyd wrote:Didn't those aircrafts carry the dreaded p-ØØP bombs?
The B-1RD's aren't too bad but the GU-11's seem to be using the lovely tile accent on our west facing gable end for some sort of targeting exercise.
[ATTACH]9311[/ATTACH]
Paul M
Moderator: admin

mickyd wrote:Didn't those aircrafts carry the dreaded p-ØØP bombs?

mickyd wrote:Probably a long lost memory for you 'seasoned' guys but there is nothing that puts a frown on your face faster that a botched up finish.
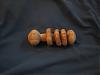
Spent a good amount of time finish sanding the project today, using 100, 150, 180 grits. Used a random orbital for the 100 then a finish sander for the others. It looked great. Broke all the sharp corners also.
To seal the surface, treated the wood with Minwax Pre-stain Wood Conditioner, using 2 coats on the cross cuts. Then applied Minwax Polyshade combo stain and poly. It was left over from a previous door project. Here's were it went to pot.
.
.
[ATTACH]9312[/ATTACH]
.
.
Here's what I think went wrong:Now I know it's only a tool storage rack but....I just can't leave it like this. Since I'll be applying another coat of finish tomorrow, I'll first try to slice off the runs with a razor, then use a narrower 1" brush, and also apply the finish going around each component to keep the 'wet edge' vs. going around the entire perimeter for each surface.
- Brush was too wide for the job. Smallest 'quality' brush I had was 2". Wood was 1-1/2" to 2". Narrower brush would have let me spread the finish toward the edges vs. the brush having a tendency to overhang (run) unless it was tilted at about 45 degree.
- Didn't maintain the 'wet edge'. I probably should have applied the finish going around the uprights and stretcher vs. doing one entire surface along the entire perimeter at once time since when I would get back around to do an adjacent surface, the finish (and runs) were already too tacky to spread. I did applied the finish going around each of the the stiles and rails on the 2 doors and they came out much better.
- Too heavy application??? Maybe. Would have helped if I wiped more finish off in the can before bringing it over to the wood but had I kept a wet edge going around, I would have been able to spread it out.
Sound like a plan or might there be another trick? Don't be afraid to chime in.
Inside of leg??....if you mean the vertical 'arm' on the right or the 'stretcher' on the right going front to back, they actually do have finish on them. It's a reflection of the white towel that makes them look 'naked'. The front upright to the right the the nasty run also looks funky but again here, it's a reflection. After I looked at my photo last night, I actually went out to take a look at it thinking the same thing.JPG40504 wrote:b4 shaving it, try dissolving the runs with(whatever works). Ya might also get the inside of that leg!:D
Do not despair!
mickyd wrote:UNBELIEVABLE WORK!!!!! You are a pro!!
So must the finish be specifically formulated to use the wipe on method?
I re-'thunk' what you suggested and wanted to get clarification. When you say to dissolve it, do you mean to wipe with a chemical that would put it back up into suspension, spread it out, and allow the solvent to then evaporate leaving a more uniform layer of the poly? (or am I getting too techy??) It's a good idea if it's doable.....JPG40504 wrote:b4 shaving it, try dissolving the runs with(whatever works). Ya might also get the inside of that leg!:D
Do not despair!