3D Star Christmas tree ornament

This is a forum for intermediate to advanced woodworkers. Show off your projects or share your ideas.

Moderator: admin

Post Reply
dasgud
Gold Member
Posts: 202
Joined: Wed Nov 25, 2009 6:32 am
Location: central Fla
Contact:

3D Star Christmas tree ornament

Post by dasgud »

I was going to wait to post this, but since I'm at the computer anyway enjoying a cup of coffee I figured to post it now. I had these plans for a very long time and made a template of it. Made many through the years so my template was worn out. So yesterday I struggled all day with Google Sketchup to make a new pattern. Took me all day because after 3 hours of drawing all the parts I stopped for breakfast and my computer crashed while I was gone. Never thought to save it before I got up :(. After virtual assembly and some tweaking I printed the pattern and cut it last night. Glued it to 3/4 inch MDF and let that dry all night.
This morning I cut the template pieces out on the jigsaw and now I'm sanding them with the drum sander in drill press mode. I wish I had a drum sander/router insert for my 510 table. I miss that from my 500 system and I don't have enough stock to make a new cutout right now. Oh well, I'll make due.

[ATTACH]10959[/ATTACH]

I do believe I'll have my first one done today (except for painting) so I'll post more pics tonight or tomorrow. I'm taping the steps too so I can post a vid on my website. I'll also have the .skp file available for download. I won't post that until I ensure everything fits right though.

stay safe everyone :)
Attachments
3dstar.JPG
3dstar.JPG (23.88 KiB) Viewed 1794 times
lv2wdwrk
Gold Member
Posts: 406
Joined: Thu Jul 20, 2006 9:40 am
Location: SWMO

Post by lv2wdwrk »

That is a nice looking ornament. Thanks for your willingness to share your plans with the group.
Bob

Don't try to make sense out of nonsense!
User avatar
ddvann79
Gold Member
Posts: 403
Joined: Wed Oct 20, 2010 10:34 am
Location: Fort Worth, Texas

X-Mas Ornament

Post by ddvann79 »

VERY COOL. I can't wait to see the finished product! I'm almost as excited to see the SketchUp file. That's some serious CAD skill! Every year we get a new ornament. Maybe this year I'll make it. Inspiring!
Dalton
Fort Worth, Texas
1962 MK 5 #373733 Goldie
dasgud
Gold Member
Posts: 202
Joined: Wed Nov 25, 2009 6:32 am
Location: central Fla
Contact:

update

Post by dasgud »

I cut the templates yesterday and cleaned them up. Recorded the steps I took too, and downloading that to the computer now. I have some cedar that I wanted to use for the star because it's so lightweight, but it was too weak and I didn't want to use a lot of CA to strengthen it or try to resaw thin plies to build them up for strength, so I went to some 1/4" plywood that I had as scrap.
today I'll cut the pieces out again, and then assemble it.
After assembly I'll make the .skp file available. I want to make sure there's no hidden bugs and the scale pattern will work without modification.

stay safe everyone :)
dasgud
Gold Member
Posts: 202
Joined: Wed Nov 25, 2009 6:32 am
Location: central Fla
Contact:

Post by dasgud »

Well, it took me all day today because I had some distractions and sunday meal to work around, but I finally got the 3D Star glued up tonight.
[ATTACH]10975[/ATTACH]

This is with the dry fit. The template I drew with sketchup worked fine and all the parts fit together well with some extra work to loosen tight fits (but that was because I didn't cut close enough to the pattern line).
I didn't rubber band clamp it together this time. Instead, I used yellow glue and "clamped" with a bead of hot melt. I think paint will cover the hot melt nicely. We'll see in a couple of days.
I did post the .skp file on my site, but right now you can only get it from a direct link. http://www.myhomeweb.dyn-o-saur.com/downloadserver/3dstar.skp
I have to do some reconfiguring to set up links to my downloads section on the site. I'll do that tomorrow.

Oh, I forgot to say how it will be mounted on the tree. I will turn a bell shaped cone to glue to the flattened point with a bore in the center. Then it will just slip over the top branch. (I don't pick up my 24 year old daughter to place it anymore ;) )
I also had the thought to figure out how to use LEDs for some more lighting effect.

stay safe everyone and pls let me know if you will decide to make this
Attachments
3dStarImage.JPG
3dStarImage.JPG (193.06 KiB) Viewed 1715 times
User avatar
matajugador
Silver Member
Posts: 14
Joined: Mon Apr 07, 2008 2:29 pm
Location: Santa Clarita, Sunny Southern California

Post by matajugador »

Cant Wait to see the finished product!
------<>--< Sawdust :confused: Noob >--<>-----

---) Santa Clarita:cool:Southern California (---
dasgud
Gold Member
Posts: 202
Joined: Wed Nov 25, 2009 6:32 am
Location: central Fla
Contact:

Post by dasgud »

Yayyy :) I finally finished it. I had the base and the star ready to glue together almost a week ago, but painting took forever. I'm glad its done in time for me to mail to a friend in Europe. I just hope she gets it in time. (She's in Eastern Europe so I really hope she even just gets it...)

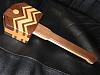
[ATTACH]11137[/ATTACH]

I should know better than to try hand painting, but I do like how that gold metallic paint looks. In fact from far enough away (like across the street) and with my eyes squinted just right (like closed) it looks pretty good.

The star was cut from 1/4" birch plywood. I turned the base from glued up cedar because it's light weight. Then I drilled a 5/8" hole from the bottom so it can be mounted on top of a Christmas tree. It can sit on a shelf too.

Painting took forever because I sprayed several base coats of white enamel with light sanding between coats, several coats of the gold, then the trim was hand painted (mistake, covered up, another mistake, covered up... :) )

Finally I drilled out a 1/4" mortise into the top of the base to set the flat bottom of the star into. It's held with titebond, I filled the gaps with hotmelt glue and hand painted over that. can hardly see that a gap was filled. The angle of the snapshot makes the star look a little crooked, but it isn't.
Attachments
3dStarFinished.JPG
3dStarFinished.JPG (86.58 KiB) Viewed 1598 times
Post Reply