[ATTACH]12069[/ATTACH]
Fireplace mantle completed last fall
Gallery of completed woodworking projects
Moderator: admin
Fireplace mantle
- Attachments
-
[The extension bmp has been deactivated and can no longer be displayed.]
Bob
LTC, US Army
Ft. Leonard Wood, MO
Hoo-ah !
LTC, US Army
Ft. Leonard Wood, MO
Hoo-ah !
Table Saw Gauge
I finished turning the knob for this yesterday, so now I feel ok about posting the project. I found plans for this gauge in an old issue of Woodworker's Journal. The wood is all from a dead oak tree that I cut down last month, except for the bar, because I wanted to ensure stability, and two thin walnut strips in the knob. The guide base is finished with 6 coats of Minwax Wipe on Poly and the knob was finished on the lathe with Shellawax Cream.
I'll use the extra block of wood on the table with the dado cut to zero the blade. Uses for the gauge will be to ensure the table is square to the blade, the fence is parallel and as a stop if I need to cut multiple thin strips and want to move the fence after every cut.
I used the band saw to mill the logs, table saw, dado blade, jig saw, drum sander, disk sander, drill press and lathe. The only non-SS tools I used are a bow saw and chain saw for the initial cutting and to make one flat side for the bandsaw.
[ATTACH]12100[/ATTACH]
The wild grain on the main body of the gauge came from a crotch area. The camera didn't catch any of the highlights.
[ATTACH]12101[/ATTACH]
[ATTACH]12102[/ATTACH]
- Attachments
-
- TableSawGauge01.JPG (234.82 KiB) Viewed 8524 times
-
- TableSawGauge02.JPG (221.34 KiB) Viewed 8459 times
-
- TableSawGauge03.JPG (222.18 KiB) Viewed 8454 times
-
mbcabinetmaker
- Platinum Member
- Posts: 1627
- Joined: Thu Jul 20, 2006 6:18 am
- Location: Greer SC
-
shipwright

- Platinum Member
- Posts: 1165
- Joined: Tue Dec 15, 2009 7:28 pm
- Location: Vancouver Island, Canada
- Contact:
Chevalet de Marqueterie
This is my latest baby. She cut her first veneers today and I am way more than impressed. Almost immediately I was making far more precise cuts than I could ever have hoped to cut with my DeWalt scroll saw. It's a copy of a machine introduced in Paris about 200 years ago that at the time revolutionized the art of marquetry. Mine is self designed after looking at photos on the web. It's not far off the original except for the fact that I have access to better bushings. She's a joy to operate.
[ATTACH]12106[/ATTACH]
Almost all operations were done on my 510 here in Green Valley. It took about 40 hours and cost me under $100. Thanks to Gene Howe for the Bois d'Arc used in the saw frame and the mesquite in the knob and rocker rack. The rest of the wood was salvaged from an old beam I had to replace because one foot of it was rotten.
[ATTACH]12107[/ATTACH]
This is the mesquite knob. You don't actually hold it by this strangely. It's use is in springing the blade.
[ATTACH]12108[/ATTACH]
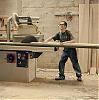
This is the operator's position. very relaxed and comfortable. You could do it for hours.
[ATTACH]12110[/ATTACH]
This is a little marquetry border I chose to try her out. The white bits are pattern paper stuck to some of the dark green veneers. It will come off after final glue-up.
[ATTACH]12109[/ATTACH]
For a full blow by blow construction tour here's the album:https://picasaweb.google.com/paulm549/C ... directlink
Paul M
[ATTACH]12106[/ATTACH]
Almost all operations were done on my 510 here in Green Valley. It took about 40 hours and cost me under $100. Thanks to Gene Howe for the Bois d'Arc used in the saw frame and the mesquite in the knob and rocker rack. The rest of the wood was salvaged from an old beam I had to replace because one foot of it was rotten.
[ATTACH]12107[/ATTACH]
This is the mesquite knob. You don't actually hold it by this strangely. It's use is in springing the blade.
[ATTACH]12108[/ATTACH]
This is the operator's position. very relaxed and comfortable. You could do it for hours.
[ATTACH]12110[/ATTACH]
This is a little marquetry border I chose to try her out. The white bits are pattern paper stuck to some of the dark green veneers. It will come off after final glue-up.
[ATTACH]12109[/ATTACH]
For a full blow by blow construction tour here's the album:https://picasaweb.google.com/paulm549/C ... directlink
Paul M
- Attachments
-
- DSC01000.JPG (32.97 KiB) Viewed 8863 times
-
- DSC00912.JPG (51.64 KiB) Viewed 8855 times
-
- DSC00957.JPG (44.06 KiB) Viewed 8844 times
-
- DSC00998.JPG (40.09 KiB) Viewed 8847 times
-
- DSC00990.JPG (51.17 KiB) Viewed 8857 times
Paul M ........ The early bird gets the worm but the second mouse gets the cheese

Looks IMPRESSIVE. I'd LOVE to see how it works. Is that a coping saw like blade that does the cutting?
SS 500(09/1980), DC3300, jointer, bandsaw, belt sander, Strip Sander, drum sanders,molder, dado, biscuit joiner, universal lathe tool rest, Oneway talon chuck, router bits & chucks and a De Walt 735 planer,a #5,#6, block planes. ALL in a 100 square foot shop.
.
.
Bob
.
.
Bob
-
JPG

- Platinum Member
- Posts: 35598
- Joined: Wed Dec 10, 2008 7:42 pm
- Location: Lexington, Ky (TAMECAT territory)
I had it figgered wrong! The arm with the 'skate' wheels is to apply clamping pressure by way of the foot platform. I assume only enough pressure is applied to briefly hold the workpiece on each stroke. The pressure is released to allow movement between strokes?
Very Interesting device! Thanks for the education!
P.S. Cut on the pull stroke?(while pushing with feet???)
Very Interesting device! Thanks for the education!
P.S. Cut on the pull stroke?(while pushing with feet???)
╔═══╗
╟JPG ╢
╚═══╝
Goldie(Bought New SN 377425)/4" jointer/6" beltsander/12" planer/stripsander/bandsaw/powerstation /Scroll saw/Jig saw /Craftsman 10" ras/Craftsman 6" thicknessplaner/ Dayton10"tablesaw(restoredfromneighborstrashpile)/ Mark VII restoration in 'progress'/ 10E[/size](SN E3779) restoration in progress, a 510 on the back burner and a growing pile of items to be eventually returned to useful life. - aka Red Grange
-
shipwright
- Platinum Member
- Posts: 1165
- Joined: Tue Dec 15, 2009 7:28 pm
- Location: Vancouver Island, Canada
- Contact:
JPG, Release foot pressure, adjust packet position, re-clamp with feet, cut on push stroke, repeat. The control is amazing.JPG40504 wrote:P.S. Cut on the pull stroke?(while pushing with feet???)
camerio, I'm not much on videos but maybe I can talk Dusty into helping produce one.
Beeg, It's a 2/0 marquetry blade.(Jeweller's blades) The numbers work opposite to scroll saw blades so higher # means smaller blade. However this is smaller than any scroll saw blades.
Paul M
Paul M ........ The early bird gets the worm but the second mouse gets the cheese
-
bikermike81
- Silver Member
- Posts: 9
- Joined: Tue Mar 08, 2011 1:09 pm
- Location: Spring Valley CA.
dasgud wrote:I finished this mail box post about a year ago and thought to post it here. Don't know why I didn't think to post it earlier.
[ATTACH]10785[/ATTACH]
Also, just recently a friend asked me to replace two water damaged cabinets in her kitchen. She is financially challenged, so couldn't replace more than that. I also replaced her counter top because it was damaged. She is very happy with these so far, and wants the other two base cabinets replaced soon. If she can ever afford it, she wants me to finish the kitchen for her with 42" upper cabinets.
[ATTACH]10786[/ATTACH]
The face frames and doors are Western Red Cedar because I happened to have it already. The boxes are 1/2" birch ply spray finished with clear poly.
The dishwasher was to the left of the sink originally. When I saw that, years ago, I told her it was definitely the wrong place for it. You should have seen her eyes after I said that because she thought so too, but that was the original plan and she just figured it was a personal issue for her. With the DW door open she couldn't stand in front of the sink. It didn't really matter then because it hasn't worked for years, so she replaced it.
One thing I'm really happy about is the fact that the seam in the counter top is virtually invisible. I can only see it when I'm directly above it. One step to the right and it disappears. Nice to know I didn't lose the skill to seam plastic laminate after 10 years.
I wanted to take some before pics, but she wasn't happy about that. It did look crappy so I understand.
I'm glad I made her happy with these.
I think that I will take some more pics of furniture I've made through the years too and post them here. I don't have many pieces with me anymore because I made a lot of things for others and there were no digital cameras then.
Stay safe everyone
how do you make the twist? im new to the whole lathe thing and id really like to know how to do that-mike