drill press tool sharpener
Moderator: admin
-
Ed in Tampa

- Platinum Member
- Posts: 5834
- Joined: Fri Jul 21, 2006 12:45 am
- Location: North Tampa Bay area Florida
I was having the same thought last night after doing the Mark VII sketch and then realizing we only grind on half the disk, could a 1/2" rod, say a bit longer than 8", be cantilevered out from a post mounted in the lathe tool rest to serve as the guide rod (ie, shaped like an inverted letter L)? I am going to give that a try soon. It would be a lot easier to store when not in use.
Peter
a 510,a Mini, dedicated SS drillpress, SS spt's, home made SS belt grinder, SS piston air system, Southbend 10k lathe, mill/drill, Taig
a 510,a Mini, dedicated SS drillpress, SS spt's, home made SS belt grinder, SS piston air system, Southbend 10k lathe, mill/drill, Taig
-
JPG

- Platinum Member
- Posts: 35598
- Joined: Wed Dec 10, 2008 7:42 pm
- Location: Lexington, Ky (TAMECAT territory)
I think something mounted to the table(and miter gauge slot) would be 'simpler'(steadier?).prmindartmouth wrote:I was having the same thought last night after doing the Mark VII sketch and then realizing we only grind on half the disk, could a 1/2" rod, say a bit longer than 8", be cantilevered out from a post mounted in the lathe tool rest to serve as the guide rod (ie, shaped like an inverted letter L)? I am going to give that a try soon. It would be a lot easier to store when not in use.
╔═══╗
╟JPG ╢
╚═══╝
Goldie(Bought New SN 377425)/4" jointer/6" beltsander/12" planer/stripsander/bandsaw/powerstation /Scroll saw/Jig saw /Craftsman 10" ras/Craftsman 6" thicknessplaner/ Dayton10"tablesaw(restoredfromneighborstrashpile)/ Mark VII restoration in 'progress'/ 10E[/size](SN E3779) restoration in progress, a 510 on the back burner and a growing pile of items to be eventually returned to useful life. - aka Red Grange
Regarding mounting a rod in the lathe toolrest, I've take a piece of iron/steel 1/2" pipe (actually a 6" nipple) and turned it down on a metal lathe to fit into the toolrest and that together with a pipe flange makes for a good platform for mounting just about anything else on the toolrest.
Art in Western Pennsylvania
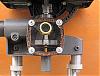
If you have a 510 it is fairly easy to follow up on Ed and JPG's comments. I have a couple of scarred up extension tubes that I did not mind drilling holes in. I drilled a 1/2" hole about 1 1/4" back from the ends to mount the 1/2" guide rod as seen here:
[ATTACH]12515[/ATTACH]
[ATTACH]12516[/ATTACH]
The guide rod is just a snug fit in the tubes. To set it up, I extended the quill an inch or so and locked it. I then installed the two tubes with the guide rod and brought the rod against the sanding disk to ensure the rod is parallel the face of the disk. The tubes were then locked in position and the quill taken back 1/4" and locked as well. It makes a pretty ridgid assembly. You have to be careful not to sand your knuckles, but this setup is simple, easy to store and works just fine. I would recommend it over the drill press version. Evolution of design..........thanks for the ideas guys!
[ATTACH]12517[/ATTACH]
You will still need the bevel gauge and tool clamp from the Shopnotes article, to set the 20 or 25 or 30 degree bevels on your chisel or plane iron.
- Attachments
-
- IMG_1582.JPG (62.67 KiB) Viewed 5339 times
-
- IMG_1588.JPG (77.92 KiB) Viewed 5338 times
-
- IMG_1584.JPG (74.79 KiB) Viewed 5339 times
Peter
a 510,a Mini, dedicated SS drillpress, SS spt's, home made SS belt grinder, SS piston air system, Southbend 10k lathe, mill/drill, Taig
a 510,a Mini, dedicated SS drillpress, SS spt's, home made SS belt grinder, SS piston air system, Southbend 10k lathe, mill/drill, Taig
-
JPG
- Platinum Member
- Posts: 35598
- Joined: Wed Dec 10, 2008 7:42 pm
- Location: Lexington, Ky (TAMECAT territory)
prmindartmouth wrote:If you have a 510 it is fairly easy to follow up on Ed and JPG's comments. I have a couple of scarred up extension tubes that I did not mind drilling holes in. I drilled a 1/2" hole about 1 1/4" back from the ends to mount the 1/2" guide rod as seen here:
[ATTACH]12515[/ATTACH]
[ATTACH]12516[/ATTACH]
The guide rod is just a snug fit in the tubes. To set it up, I extended the quill an inch or so and locked it. I then installed the two tubes with the guide rod and brought the rod against the sanding disk to ensure the rod is parallel the face of the disk. The tubes were then locked in position and the quill taken back 1/4" and locked as well. It makes a pretty ridgid assembly. You have to be careful not to sand your knuckles, but this setup is simple, easy to store and works just fine. I would recommend it over the drill press version. Evolution of design..........thanks for the ideas guys!
[ATTACH]12517[/ATTACH]
You will still need the bevel gauge and tool clamp from the Shopnotes article, to set the 20 or 25 or 30 degree bevels on your chisel or plane iron.
What/Why makes the 3/4" spacing of the rod 'above' the disk important? Could not positioning the chisel in the holder control the angle? The angle depends upon both!
╔═══╗
╟JPG ╢
╚═══╝
Goldie(Bought New SN 377425)/4" jointer/6" beltsander/12" planer/stripsander/bandsaw/powerstation /Scroll saw/Jig saw /Craftsman 10" ras/Craftsman 6" thicknessplaner/ Dayton10"tablesaw(restoredfromneighborstrashpile)/ Mark VII restoration in 'progress'/ 10E[/size](SN E3779) restoration in progress, a 510 on the back burner and a growing pile of items to be eventually returned to useful life. - aka Red Grange
╟JPG ╢
╚═══╝
Goldie(Bought New SN 377425)/4" jointer/6" beltsander/12" planer/stripsander/bandsaw/powerstation /Scroll saw/Jig saw /Craftsman 10" ras/Craftsman 6" thicknessplaner/ Dayton10"tablesaw(restoredfromneighborstrashpile)/ Mark VII restoration in 'progress'/ 10E[/size](SN E3779) restoration in progress, a 510 on the back burner and a growing pile of items to be eventually returned to useful life. - aka Red Grange
-
dusty

- Platinum Member
- Posts: 21530
- Joined: Wed Nov 22, 2006 6:52 am
- Location: Tucson (Wildcat Country), Arizona
Neat solution! I have to rethink my approach. I made some clamps and blocks that get secured to the Main Table (at the left edge) and worked off the table edge.prmindartmouth wrote:If you have a 510 it is fairly easy to follow up on Ed and JPG's comments. I have a couple of scarred up extension tubes that I did not mind drilling holes in. I drilled a 1/2" hole about 1 1/4" back from the ends to mount the 1/2" guide rod as seen here:
[ATTACH]12515[/ATTACH]
[ATTACH]12516[/ATTACH]
The guide rod is just a snug fit in the tubes. To set it up, I extended the quill an inch or so and locked it. I then installed the two tubes with the guide rod and brought the rod against the sanding disk to ensure the rod is parallel the face of the disk. The tubes were then locked in position and the quill taken back 1/4" and locked as well. It makes a pretty ridgid assembly. You have to be careful not to sand your knuckles, but this setup is simple, easy to store and works just fine. I would recommend it over the drill press version. Evolution of design..........thanks for the ideas guys!
[ATTACH]12517[/ATTACH]
You will still need the bevel gauge and tool clamp from the Shopnotes article, to set the 20 or 25 or 30 degree bevels on your chisel or plane iron.
Gotta think about this. I have a piece of stainless steel rod that has been kicking around the shop for years. It might be time to put it to use - if I can find it now.
"Making Sawdust Safely"
Dusty
Sent from my Dell XPS using Firefox.
Dusty
Sent from my Dell XPS using Firefox.
JPG, you are right but if you want to use the bevel gauge from the article, you have to stick to the author's geometry. He matches the top of the bevel on the chisel with the line on the guide.
[ATTACH]12524[/ATTACH]
edited to correct a typo
[ATTACH]12524[/ATTACH]
edited to correct a typo
- Attachments
-
- 0014.jpg (51.88 KiB) Viewed 5307 times
Peter
a 510,a Mini, dedicated SS drillpress, SS spt's, home made SS belt grinder, SS piston air system, Southbend 10k lathe, mill/drill, Taig
a 510,a Mini, dedicated SS drillpress, SS spt's, home made SS belt grinder, SS piston air system, Southbend 10k lathe, mill/drill, Taig
Just to beat this item totally to death, here is the above bevel gauge mounted on a little board that is clamped to a table slot using a SS t nut:
[ATTACH]12623[/ATTACH]
This view shows the nut:
[ATTACH]12624[/ATTACH]
The rather poor chisel is clamped up with the top of its bevel even with the degree line as seen here. Please ignore the parallax in the photo:
[ATTACH]12625[/ATTACH]
[ATTACH]12623[/ATTACH]
This view shows the nut:
[ATTACH]12624[/ATTACH]
The rather poor chisel is clamped up with the top of its bevel even with the degree line as seen here. Please ignore the parallax in the photo:
[ATTACH]12625[/ATTACH]
- Attachments
-
- IMG_1650.JPG (60.68 KiB) Viewed 5284 times
-
- IMG_1644.JPG (56.7 KiB) Viewed 5283 times
-
- IMG_1639.JPG (84.28 KiB) Viewed 5284 times
Peter
a 510,a Mini, dedicated SS drillpress, SS spt's, home made SS belt grinder, SS piston air system, Southbend 10k lathe, mill/drill, Taig
a 510,a Mini, dedicated SS drillpress, SS spt's, home made SS belt grinder, SS piston air system, Southbend 10k lathe, mill/drill, Taig