a1gutterman wrote:Do not use the velcro system for any sharpening operations (some velcro backed disks are garnet sandpaper [knot recommended for ferrous metals] and some are aluminum oxide). You can easily damage your paper disks in the process. Probably wood knot use the regular aluminum oxide disks, but rather the cloth backed aluminum oxide disks (in 100 gritor 150 grit) wood be best.
I'm going to assume that Shopsmith made a typo in the line on that page that says:
"• Heat the Disc in an oven at about 2000 for 10 to 20 minutes then remove with an old kitchen knife."
I figure that 20 minutes at 2,000 degrees would pretty much be a melt-down.
On the other hand it should remove the sandpaper...
--
farmer
Francis Robinson
I did not equip with Shopsmiths in spite of the setups but because of them.
1 1988 - Mark V 510 (bought new), 4 Poly vee 1 1/8th HP Mark V's, Mark VII, 1 Mark V Mini, 1 Frankensmith, 1 10-ER, 1 Mark V Push-me-Pull-me Drillpress, SS bandsaw, belt sander, jointer, jigsaw, shaper attach, mortising attach, TS-3650 Rigid tablesaw, RAS, 6" long bed jointer, Foley/Belsaw Planer/molder/ripsaw, 1" sander, oscillating spindle/belt sander, Scroll saw, Woodmizer sawmill
osx-addict wrote:What is on the sanding disc -- (assuming that's the regular flat disc) -- is it just regular sand paper or something else? Just curious!
Adhesive backed sandpaper. I have 3 different disks set up with three different grits, 120, 150 and 220. From 220 on down is more what I consider to be "honing" and is done off the SS with finer grits, usually down to 600 or 800, using the Veritas guide. I have a nice flat piece of granite that I mount the paper on while honing. If the chisel/plane edge is nicked, I will set up the SS grinding wheel to grind it back into shape before "going through the grits."
Ed
Idaho Panhandle
Mark 5 of various vintages, Mini with reversing motor, bs, dc3300, jointer, increaser, decreaser
I picked up a sharpening jig at a consignment auction at an antique tractor show today. It is a Craftsman jig but I had not seen one just like it. Then again I have not shopped Sears for a long time. Here is a link to a picture, as you can see I have not cleaned it up yet. http://picasaweb.google.com/robinson46176/Woodshop02#5349562155167345042
Does anyone have one of these?
I hope it works well, I had to cough up big bucks for this jig. Two of them.
The space between the two clamp studs is 3 1/4". Below the jig is an arm that will attach it to most regular grinders. The clamp jaw flips over to switch from flat stuff (like plane irons) to different shapes. The clamp plate has a rubber pad on both the top and bottom. The crank on the front operates a gear in a rack that slides the tool clamp back and forth with 4" of travel. The small knob to the right and below the crank advances the tool being sharpened into the abrasive by what ever amount you turn the screw in. The light coil springs under the two top knobs just hold the clamp plate down a little while you insert the tool to be sharpened. When you tighten the two top knobs on down they lock the clamp plate down solidly.
I will clean it up and try it...
I have several different sharpening jigs of different types. I don't believe you can have too many.
-
I have not looked at it from the perspective of using it on a Shopsmith yet.
--
farmer
Francis Robinson
I did not equip with Shopsmiths in spite of the setups but because of them.
1 1988 - Mark V 510 (bought new), 4 Poly vee 1 1/8th HP Mark V's, Mark VII, 1 Mark V Mini, 1 Frankensmith, 1 10-ER, 1 Mark V Push-me-Pull-me Drillpress, SS bandsaw, belt sander, jointer, jigsaw, shaper attach, mortising attach, TS-3650 Rigid tablesaw, RAS, 6" long bed jointer, Foley/Belsaw Planer/molder/ripsaw, 1" sander, oscillating spindle/belt sander, Scroll saw, Woodmizer sawmill
robinson46176 wrote:I'm going to assume that Shopsmith made a typo in the line on that page that says:
"• Heat the Disc in an oven at about 2000 for 10 to 20 minutes then remove with an old kitchen knife."
I figure that 20 minutes at 2,000 degrees would pretty much be a melt-down.
On the other hand it should remove the sandpaper...
I wood have to agree with you, farmer! I do knot even own an oven that wood heat to 2000 degrees! I wood bet that it is 200 degrees and the final "0" is supposed to indicate "degrees".
Tim
Buying US made products will help keep YOUR job or retirement funds safer.
I used the posting by judaspre1982 to draw up a pattern for the [ATTACH]5089[/ATTACH] because I thought it was simple and straight forward.
I think that the current Sharpening section(s) of PTWFE have migrated to the SS Sharpening jig?
Any opinion on adding a cleat to the edge, sliding the fence, and protractor down the thickness of the cleat attached to the bottom? Seems that there is enough length and it may stay on the table better?
A [ATTACH]5089[/ATTACH] was uploaded to allow printing of the protractor and using it on the surface of the base as a guide for drilling the pivot hole. It was drawn close together and should print actual size on an 8 1/2 x 11 page. Toggle print to fit option off.
Addendum:
The dimensions on the drawing for the adjustable fence are correct. the drawing shows it as 3 5/8. Wnen I cut my fences. I made them alot longer. Edflorence's fence looks alot bigger than the 1 " high PTWFE plan. When I drilled the screw holes, I made sure the distance between the screws were the same on each of the fences. I assume that an arc of screw holes will develop as the jig is used. A third screw hole through the fence would allow a second arc of holes to position the adjustable fence.
I made printouts to attach to the base. Providing I get it on the base SQUARE, I'll have a starting point for setting the fence or to drill registration divots.
allsas wrote:The dimensions on the drawing for the adjustable fence are correct. the drawing shows it as 3 5/8. Wnen I cut my fences. I made them alot longer. Edflorence's fence looks alot bigger than the 1 " high PTWFE plan. ... I assume that an arc of screw holes will develop as the jig is used. .
Allsas...Very nice plan sheet. Thanks for sharing it. I would like to see the finished jig...post some pix if you get a chance...
You got me wondering, so I checked the dimensions on my jig...the adjustable fence is 3 3/8 long, 3/4 wide and 1 inch tall. I have established screw holes in the base at 15, 30 and 45, but the fence for the most part stays parked at 30.
One of these days maybe I will work on modifying the base to accomodate the ferrules and handles of even shorter chisels. That would be handy.
Ed
Idaho Panhandle
Mark 5 of various vintages, Mini with reversing motor, bs, dc3300, jointer, increaser, decreaser
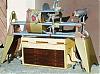
The Jigs from the PDFhad the miter slot bars and protractors glued and clamped last night. This morning, the fences were modified with a centerline rabbet to point to the marks [ATTACH]5144[/ATTACH]
on the protractor. The fence screw holes were counter sunk on both sides to allow the fence to be used on both edges and to provide space for the material pulled out by the screw entering the base.
The rabbet on the fence can be used to make an offset fence, left, or a full length front face, right. . [ATTACH]5145[/ATTACH]
Two fence heights were made 1 " and 1 1/2 ", two lengths were made 3 3/8 and 5 3/4 " . The distance between the holes were the same on all fences. Plated drywall screws were used to attach the fences to the bases. I assume that the holes in the base will need to be reinforced with glue and longer screws used when these lose their grip. The 1 1/2 inch fence had to be adjusted to make it square to the base.
Two other jigs set with long fences surfaces for aligning stock and set at 30 degrees because edflorence uses that position most. The offset fence position may allow positioning a chisel closer to the sanding disk.
[ATTACH]5146[/ATTACH]
Attachments
ShopSmith Bench Chisel Sharpening Jig - alignment at 30 degrees.jpg (46.09 KiB) Viewed 5733 times
ShopSmith Bench Chisel Sharpening Jig - both fence positions.jpg (24.5 KiB) Viewed 5761 times
ShopSmith Bench Chisel Sharpening Jigs w Disk.jpg (29.16 KiB) Viewed 5751 times
MK V 520; MK V 510 w/PP DIY Upgrade; MK 5 500; Jointer; Bandsaw; Sliding Table; Conical Sanding Disk; Sharpening Guide, Lathe Duplicator, Jigsaw, Scrollsaw, Beltsander, Ring Master, Biscuit Joiner.