Project Help
Moderator: admin


This WoodWhisperer video shows him making and installing the square plugs (from 9:05 to 12:01 http://thewoodwhisperer.com/68-gadget-station-pt-11/). In an earlier episode, he made the holes using a hollow chisel mortiser - something I don't have. I think I can handle making square plugs, it's the square holes that intimidate me.
Just had a thought... Couldn't I skip the hole and just glue the fake "plug" to the face of the sides?
Just had a thought... Couldn't I skip the hole and just glue the fake "plug" to the face of the sides?
Heath
Central Louisiana
-10ER - SN 13927, Born 1949, Acquired October 2008, Restored November, 2008
-10ER - SN 35630, Born 1950, Acquired April 2009, Restored May 2009, A34 Jigsaw
-Mark V - SN 212052, Born 1986, Acquired Sept 2009, Restored March 2010, Bandsaw
-10ER - SN 39722, Born 1950, Acquired March 2011, awaiting restoration
Central Louisiana
-10ER - SN 13927, Born 1949, Acquired October 2008, Restored November, 2008
-10ER - SN 35630, Born 1950, Acquired April 2009, Restored May 2009, A34 Jigsaw
-Mark V - SN 212052, Born 1986, Acquired Sept 2009, Restored March 2010, Bandsaw
-10ER - SN 39722, Born 1950, Acquired March 2011, awaiting restoration
-
mickyd

- Platinum Member
- Posts: 2999
- Joined: Mon Feb 09, 2009 1:18 pm
- Location: San Diego, CA
- Contact:
A video watching tip if you don't know......instead of waiting for the video to play OR even buffer to reach 9:05, as soon as the video begins, just hover your cursor over the play bar area (or whatever it's called) and you'll notice a timer pop up. Slide to the right while hovering and when you see 9:00 appear, just click on the bar and the video will go to that point without waiting for it to either buffer or play to get there.heathicus wrote:This WoodWhisperer video shows him making and installing the square plugs (from 9:05 to 12:01 http://thewoodwhisperer.com/68-gadget-station-pt-11/).......
This doesn't work on all video formats but it does for this one.
Mike
Sunny San Diego
Sunny San Diego
-
mickyd
- Platinum Member
- Posts: 2999
- Joined: Mon Feb 09, 2009 1:18 pm
- Location: San Diego, CA
- Contact:
Clear coat (lacquer or enamel) prevents oxidation /tarnish. (Guess heath didn't want to listen to ya gutterman!!:D )heathicus wrote:I've watched that .....
But bluekayak brings up a good question about how the metal would age. Would it tarnish (relatively) quickly? What could be done to prevent that?
Mike
Sunny San Diego
Sunny San Diego
-
mickyd
- Platinum Member
- Posts: 2999
- Joined: Mon Feb 09, 2009 1:18 pm
- Location: San Diego, CA
- Contact:
This link gets out to raised panels when I go to it, not square plugsheathicus wrote:This WoodWhisperer video shows him making and installing the square plugs (from 9:05 to 12:01 http://thewoodwhisperer.com/68-gadget-station-pt-11/). In an earlier episode, he made the holes using a hollow chisel mortiser - something I don't have. I think I can handle making square plugs, it's the square holes that intimidate me.
Just had a thought... Couldn't I skip the hole and just glue the fake "plug" to the face of the sides?
 . It brings me to http://thewoodwhisperer.com/episode-29-raising-arizona/
Mike
Sunny San Diego
Sunny San Diego
Weird. The link looks right, but it happens for me too... I navigated to the video and double checked the address, and I don't see a problem. Let's try it again:mickyd wrote:This link gets out to raised panels when I go to it, not square plugs
http://thewoodwhisperer.com/68-gadget-station-pt-11/
If that still goes to the wrong video, as you might can guess from the link, it's episode #68, and is Part 11 of the "Gadget Station" series.
Heath
Central Louisiana
-10ER - SN 13927, Born 1949, Acquired October 2008, Restored November, 2008
-10ER - SN 35630, Born 1950, Acquired April 2009, Restored May 2009, A34 Jigsaw
-Mark V - SN 212052, Born 1986, Acquired Sept 2009, Restored March 2010, Bandsaw
-10ER - SN 39722, Born 1950, Acquired March 2011, awaiting restoration
Central Louisiana
-10ER - SN 13927, Born 1949, Acquired October 2008, Restored November, 2008
-10ER - SN 35630, Born 1950, Acquired April 2009, Restored May 2009, A34 Jigsaw
-Mark V - SN 212052, Born 1986, Acquired Sept 2009, Restored March 2010, Bandsaw
-10ER - SN 39722, Born 1950, Acquired March 2011, awaiting restoration

Hi,
How about this, you put it together with dowels that you put "hats" on. See sketch below:
[ATTACH]6919[/ATTACH]
You can make the top square or buy square dowels to cut to length. Drill them to match the dowel size you plan to use. Glue them together if you wish or put the round dowel in place and glue them on after. Lots of glue surface and the placement is taken care of, thus a little easier then just trying to glue to a flat surface... If you put the tops on first you then have a holder in the round dowel to shape the tops as bevels or rounds on the sander.
Ed
Edit:
Added a couple more sketches below
[ATTACH]6920[/ATTACH]
[ATTACH]6921[/ATTACH]
How about this, you put it together with dowels that you put "hats" on. See sketch below:
[ATTACH]6919[/ATTACH]
You can make the top square or buy square dowels to cut to length. Drill them to match the dowel size you plan to use. Glue them together if you wish or put the round dowel in place and glue them on after. Lots of glue surface and the placement is taken care of, thus a little easier then just trying to glue to a flat surface... If you put the tops on first you then have a holder in the round dowel to shape the tops as bevels or rounds on the sander.
Ed
Edit:
Added a couple more sketches below
[ATTACH]6920[/ATTACH]
[ATTACH]6921[/ATTACH]
- Attachments
-
- ScreenHunter_003.jpg (21.54 KiB) Viewed 4441 times
-
- ScreenHunter_004.jpg (17.5 KiB) Viewed 4436 times
-
- ScreenHunter_005.jpg (22.04 KiB) Viewed 4430 times
{Knight of the Shopsmith} [Hero's don't wear capes, they wear dog tags]
Dowel Steady Rest
Using brass will look really nice.
I was curious about the dowel steady rest, so I built one this morning and tried it out. This is a really simple way to turn a small item starting from a dowel.
Just screw a short 2 X 3 or 2 X4 to some plywood or other wood scrap. I used a 2 X 3. Then drill through the 2 X 3 with a drill bit having a slightly larger diameter than the dowel you want to turn.

Add a rest for the chisel. The book recommends a bolt, which I did not have. I just screwed in the leftover from a hole saw. Something longer would be better. Wax the dowel and put it in the drill chuck. Use the quill to extend the dowel an inch or so past the 2 X 3.
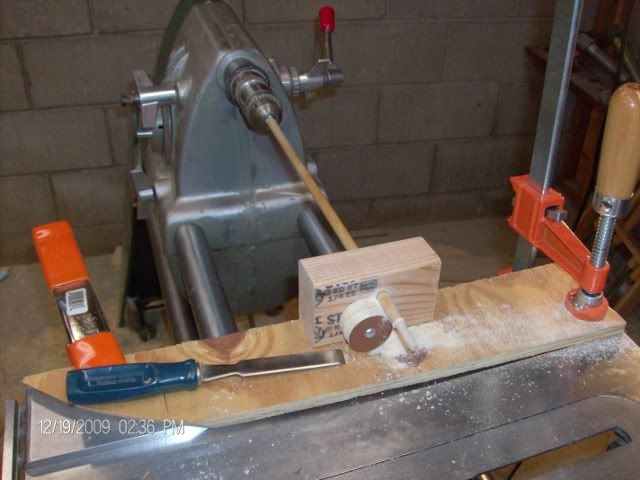
I just used a regular wood chisel for this peg. BTW, this chisel was a rusty and chipped mess just a couple of days ago. I certainly learned about rust removal on this forum.

Now I need to go back down and turn that peg into a locomotive smokestack.
Jerry Floren
St. Peter, MN
I was curious about the dowel steady rest, so I built one this morning and tried it out. This is a really simple way to turn a small item starting from a dowel.
Just screw a short 2 X 3 or 2 X4 to some plywood or other wood scrap. I used a 2 X 3. Then drill through the 2 X 3 with a drill bit having a slightly larger diameter than the dowel you want to turn.
Add a rest for the chisel. The book recommends a bolt, which I did not have. I just screwed in the leftover from a hole saw. Something longer would be better. Wax the dowel and put it in the drill chuck. Use the quill to extend the dowel an inch or so past the 2 X 3.
I just used a regular wood chisel for this peg. BTW, this chisel was a rusty and chipped mess just a couple of days ago. I certainly learned about rust removal on this forum.
Now I need to go back down and turn that peg into a locomotive smokestack.
Jerry Floren
St. Peter, MN
-
mickyd
- Platinum Member
- Posts: 2999
- Joined: Mon Feb 09, 2009 1:18 pm
- Location: San Diego, CA
- Contact:
More gooder!!heathicus wrote:Weird. The link looks right, but it happens for me too... I navigated to the video and double checked the address, and I don't see a problem. Let's try it again:
http://thewoodwhisperer.com/68-gadget-station-pt-11/
If that still goes to the wrong video, as you might can guess from the link, it's episode #68, and is Part 11 of the "Gadget Station" series.
Mike
Sunny San Diego
Sunny San Diego