mtobey wrote:The Penn State SS 5/8th mandrel will also accept the "B" rod which is used for larger pens. All of the pens I have done were the larger series. There are some things that PS may not do best, but many other vendors are selling PS from their catalogue, including these mandrels, Craft Supply.
I've been thinking about buying a second SS 1/4-inch Router Chuck and seeing if I can bore it out so a B mandrel will fit in it. A friend of mine has a full metal working shop and said he could probably do it for me.
So far, I have only used the Woodcraft mandrel which is 7mm. Woodcraft has made all of their bushings so they fit on the 7mm mandrel and thus, you don't need to have the B mandrel for Woodcraft pen kits. I haven't purchased anything from any other vendor as yet. I most likely will as I learn more and gain some experience.
My new Beall wood buff system is supposed to arrive tomorrow so I'll be playing with that, for sure. Am planning on mounting all three wheels on the SS with some kind of a threaded mandrel but I need to figure out a way to drill or ream out the tailstock end of the mandrel so a live center will fit correctly.
Don - W3DRM - Minden, Nevada --- SS 510 (new 2005), Bandsaw, Jointer, Conical & Standard sanding disks, & DC3300 Carson Valley Weather - http://www.carsonvalleyweather.com
I am blessed with having a Woodcraft store in my area (my 3rd home away from home). You can download their instructions off of their website as pdf file. Remove the morse taper and tighten the mandel into the drill chuck and you're good to go! When I make pens, I prefer using the smaller pen making gouge set. I think you have better control. FYI- I have two of the sets in order to avoid having to take less time out of production to sharpen. I think kits are the way to go in order to experiment with the various styles. If you are starting out I would also recommend the drill press vise sold by Shopsmith. Not only can you use it to drill the blanks for tube insertion, but you can also use it to press the parts together. It has worked for every kit I have worked with so far.
Hi there... never posted on the Shopsmith forum before.. I do have a shopsmith though and I'm hooked. To get back to the post, I found a great place with a good video demonstration to boot. The mandrel recommended and sold is at this link :
p.s. I've been reading your posts on and off for the past couple of years. Got my 510 about 2 yrs ago from a retired engineer who kept it mint and have since bought numerous accessories from ebay and the national supplier here in Canada. Thank you for the great feedback and comments on this forum.
I'm from Sudbury ... about 3 1/2 hrs north of Toronto. I don't do much woowworking in the cold months as my shop is at the cottage a few hours from here ... but I do manage to go a few times with my snowshoes, fire up the stove and just relax out in the wilderness. Sitting in my chair, I'm just dreaming of fresh cuts on the TS (sigh), the smell of sawdust and the sound of my Stanley 604 ... Just equiped myself with pen-making hardware from Pennstate and woodsmith-store. Looks like everyone at the office is going to get some pens and pencils as gifts
This forum looks "alive" and full of nice helping people... I may need some help from time to time. See you soon.
Mart
(SS510, lathe acc., jointer, jigsaw, scrollsaw, bandsaw, speed increaser and decreaser, biscuit joiner, and much more... new to shopsmith as of Jan2005)
Thanks for updating your profile. This is a friendly bunch for the most part, and I am sure that you will not only get answers to your questions, but will be able to offer help in return .
Tim
Buying US made products will help keep YOUR job or retirement funds safer.
when i bought my ss, the guy gave me everything to turn pens. mandrels, blanks, drill bits, new pen kits and chisels. the thing is that i have no experience with the lathe. ive turned a couple pieces of scrap just to see what its like, but i have no idea how to get started on pens. could someone please give me some tips ? videos online are not an option, as i cant get high speed and its not logical to try to watch them. the video that mugwamp posted above said it would take 4 hours to download !!
Woodisgood,
Seeing that you have a problem with downloading videos, here is a possible solution to your situation. Penn State Industries has a free DVD called Hand-Crafted Pens - The Basics, which is a beginners guide to pen turning. They also sell all kinds of pen blanks, kits, etc. I am attaching the link to their home page. this DVD may be helpful to you. Also, if you have any Woodcraft stores nearby, they offer excellent pen turning classes. You may want to check out if there are any turning clubs in your area. Pen turning in my opinion is probably the easiest turning to learn. Hope this info helps.
My local library has books on pen turning. You could try yours.
Don't fret though, it's really simple. Here is my attempt to document the process. If I've left anything out, hopefully others on the forum will help us out.
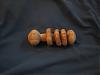
1. Cut two blanks, one for the top of the pen and one for the bottom. They should be about 3/4 x 3/4 and about 1/4" longer than the length of the brass inserts from the kit plus. Careful, some kits have two different lengths of brass tubes.
2. Drill a hole lengthwise in the blanks the size of brass tubes. They are usually 7mm, 8mm or 10mm.
3. Glue the tubes into the blanks. Most folks use CA, but I have better luck with Gorilla glue. If you use Gorilla glue, let them set over night. Trim the ends square and even with the brass tubes. Generally a tool called a barrel trimmer is used. I have actually done it on the lathe with a skew, but you've got to be sure get the end flat and square. Also, cutting right to the brass tube without hitting it is tricky. A barrel trimmer is easier and gives a better result. Just be sure to use the right size. Mine came in a kit with a variety of inserts.
4. Stack the blanks and bushings on the mandrel following the directions in the pen kit. You will need to add extra spacers to fill out the mandrel.
5. Mount the mandrel on the shopsmith with a live center in the tail stock. The point of the live center fits in the end of mandrel.
6. Run the lathe at a fairly fast speed, say 2800 rpms.
7. Turn the blank round. I use a skew for the entire operation, but it's best to start with a roughing gouge (big gouge with square across end) or a spindle gouge (shallow flute). If you are just beginning, I'm assuming you aren't comfortable with a skew yet. The size of the gouge isn't important. I find bigger ones easier to control. The important thing here is to "keep the bevel rubbing". The easiest way to start is to lay the bevel edge of the gouge on the work with the cutting edge not touching the work. Slowly drop the tool so the cutting edge begins to cut while still rubbing the bevel.
8. Shape the blanks. Cut the blanks down to the size of the bushings. For most kits, this is very straight forward. There is one kit (designer) that requires a tenon be cut, but that's the exception.
9. Sand and finish the blanks. I start at 220 and sand down to 600 on pens. The skew creates a smooth finish right off of the tool, but with a gouge you may need to start with 100. As you get more proficient, the amount of sanding required demises.
I finish with Behlen woodturners finish, but there are lots of choices.
10. Take the blanks off of the mandrel and press the pen parts together. They sell pen presses to do this, but I just use a hand screw or my bench vise (it has wooded faced jaws).
That's it! A completed pen in just a few minutes! I now make them in batches of a dozen or so at once. I keep a supply to give away as gifts and somehow they supply gets depleted often.
One word of caution -- turning is additive. Turning pens may lead to bottle stoppers, tops, boxes, weed pots and even bowls!
thanks rkh2. the dvd is on the way. and to greenvilleguy. i will be in the shop getting set up. some of the blanks are already cut and drilled, i guess its just a matter of trying. thanks again.


 .
.