Page 2 of 3
Posted: Fri Feb 04, 2011 8:42 pm
by robinson46176
I suppose that if the bottom is out of sight (not an antique type repair) that you could use pocket screws in from each side to pull it together with glue in the crack.
You can plug pocket holes too.
.
Hey ED! Sounds like you been doing this awhile!
Posted: Fri Feb 04, 2011 8:53 pm
by jimsjinx
Ed, it's a pleasure to read your repair methods. I can tell you know this stuff! It takes alot of skill to make these repairs, and keep them invisible, or near to it. I forgot about the "burn in"! Duh! Most folks look at me like I'm from Mars when I mention this method. Another is a "slip" repair. You hand make a sliver that closely matches the wood and grain, and taper of the crack. Just apply glue and slip it into the void. When it's dry, sand it flush. I forgot to mention, to remove epoxy, I use denatured alcohol. Not compatible with a finished repair, but if you intend on a refinish, alcohol will get the epoxy off the wood and outa the grain. I sometimes stare at a piece of furniture for days till I come up with a plan! I try to approach it so I can use a backup plan if I need to. (rotten wood, dry-rot,etc.) Sometimes you don't know till you get into it. I enjoy the freedom of repairs, cause you can "outsmart" most of them, if you think it out, and customers are so greatful that you got it darned close. Nice post, Ed! jimsjinx
Posted: Fri Feb 04, 2011 10:48 pm
by pennview
If you're not familiar with burn-in sticks or lacquer sticks or shellac sticks, here is an assortment of some of the colors that are available for repairing.
[ATTACH]11783[/ATTACH]
Posted: Sat Feb 05, 2011 5:41 pm
by heathicus
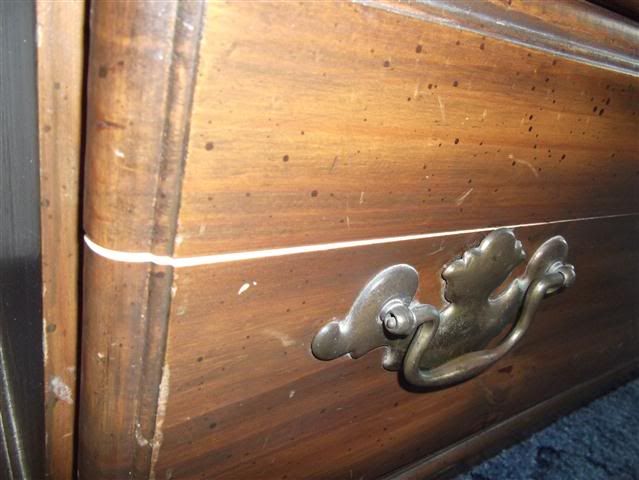
Upon further investigation, this thing is full of splits - old and new. It had split several other places on the top that were previously repaired. There's a split on the side. And two of the drawer faces are splitting.
I asked my wife if it had ever been stored outside or anything, and she said not as long as her family has had it. It was given to them when she was a little girl (maybe 20 years ago?). She doesn't know its history before that.
Here are some pics.
Top of the dresser:
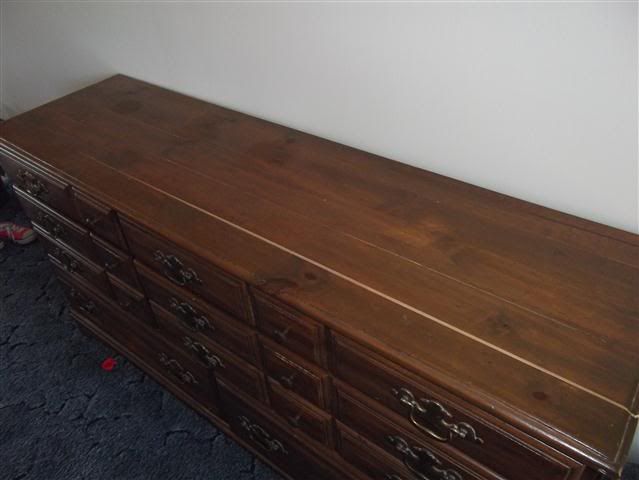
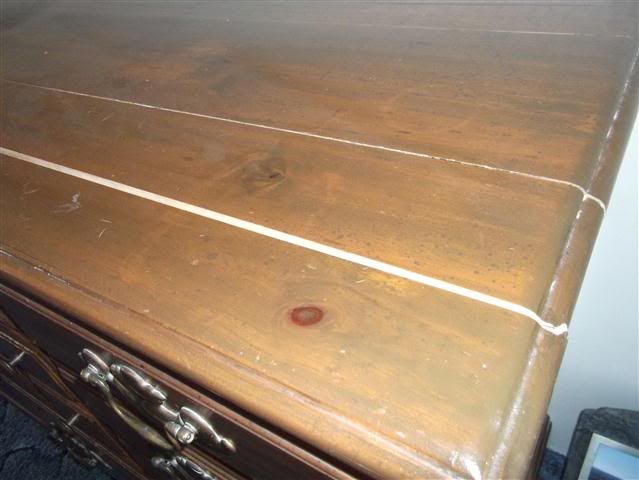
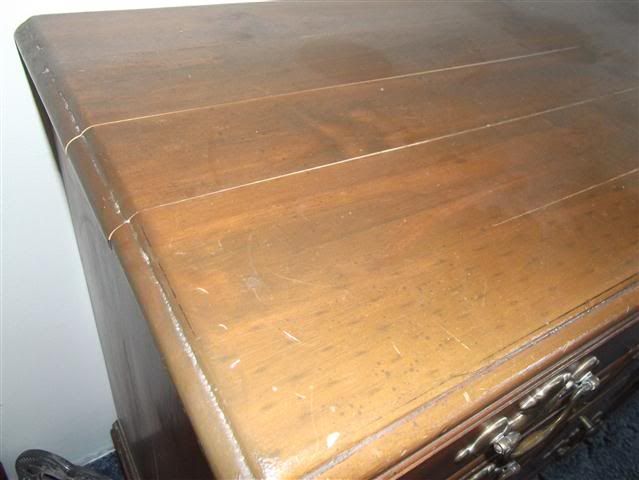
One drawer face:
Posted: Sat Feb 05, 2011 5:45 pm
by heathicus
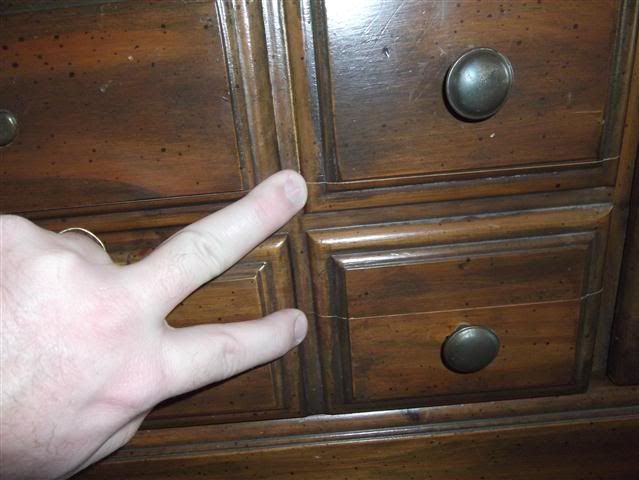
Another drawer face (two splits - each finger pointing to one):
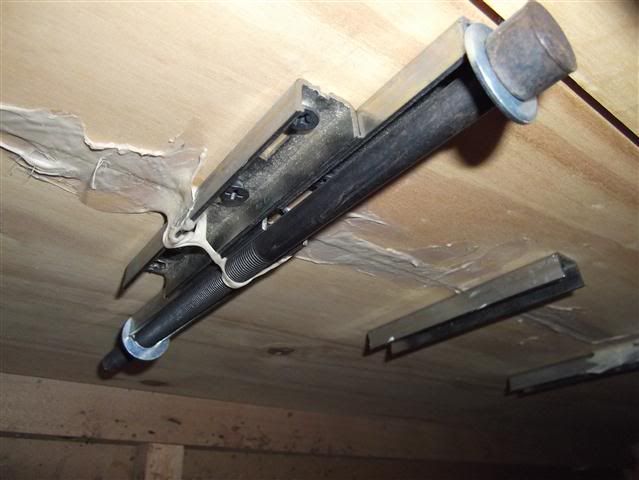
Previous repair attempts - this is the underside of the top:
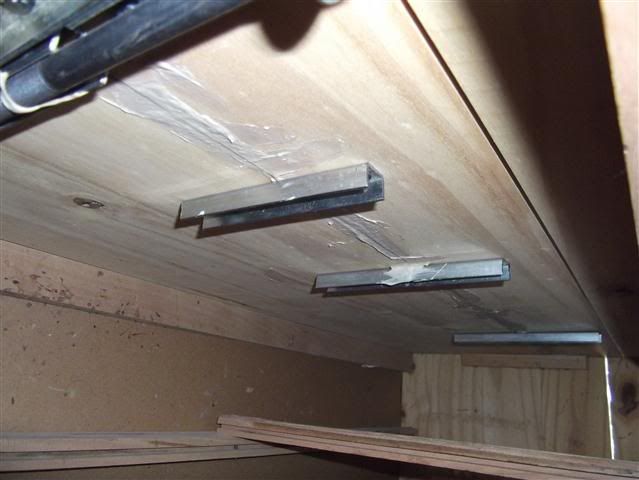
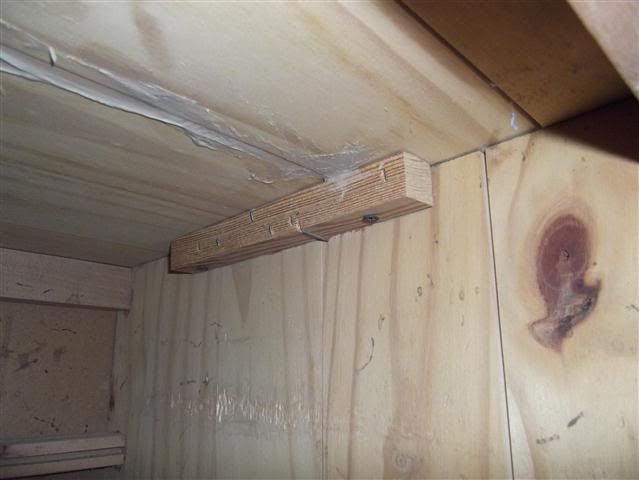
Underside of right end. You can see a previous split repair, the new split in the top, and a new split in the side.
Posted: Sat Feb 05, 2011 11:48 pm
by pennview
It looks to me that you've had a bunch of glue joints fail on that chest and that someone used mastic/construction adhesive to attempt that one repair shown in the photos. And it looks like you've got quite the repair job ahead of you.
If you can clean all of those joints adequately, perhaps epoxy and clamps will put it all back together. Also, someone earlier mentioned the pocket hole screws and this likely would help pull together those open joints without the need for clamps if you can figure out a way to hold the jig in place while drilling the holes on the inside surfaces of the carcase. Alternatively, if you can remove the top, you can still clean up those joints for regluing with a jointer or table saw, and then add a filler strip at the back of the top to make up for what was removed.
Good luck.
Posted: Sun Feb 06, 2011 1:43 am
by Ed in Tampa
These are glue joint splits or failures. I would remove the top. Remove all the patch work from the bottom side. I would insure I had all the metal off the wood.
I would then rip the boards down the glue joint, joint the edges and reglue using a good quality wood glue.
On the drawer fronts I would first try to remove the fronts. If that can be easily done I would treat them the same as the top. If they can't be easily removed I would try my hand with burn in lacquer sticks.
If you try anything else you will have a failure. The existing joints are filled with crud that you will never get out, just rip them, joint them and reglue. If you do it careful you fix will be permanent and invisible.
Posted: Sun Feb 06, 2011 1:50 am
by charlese
I agree with Art. What I see are failures of glue joints. Have no idea of the white substance in several of those old separations. I call them separations rather than cracks, as the wood, both in the top and drawer faces look intact. You can even see length separations along the short edges of the top.
My suggestions to repair this dearly held piece of furniture would be to disassemble the broken parts - clean out the white stuff - re-joint the edges and re-glue and re-assemble. At this time I can't tell how the top was fastened to the chest, but I would bet all four sides were firmly fastened. (see P.S.) This would have not allowed for any wood movement front to back and the stress caused the joints to fail, rather than splitting the wood.
There are several methods to attach a top which will allow wood movement.
There are also several reasons why glue joints would fail, but that no longer matters. What remains is to re-join them.
I don't have a good idea why the joinery on the drawer fronts failed, but they can be repaired by the same methods used on the top. Maybe you can remove the drawer fronts.
As for color - I will be very happy do defer to jimsjinx and Ed for their expertise. It's my simple thought that the top can be re surfaced and re stained as one piece. The drawer fronts may need more exacting coloring methods.
P.S. Now I see the top was fastened by using blocks (without slots) both on the side and long edge. This is the culprit that caused the failures.
Not a good sign
Posted: Sun Feb 06, 2011 2:13 am
by jimsjinx
I have done work repairing stuff like that, and to be honest, it sucks. I would put a high price on that resto job, if it came into the shop. There is most definately a failure in every glue joint on that piece. Probly clamped too hard and starving the joint. (automated clamping at the factory) I'd bet every piece made on that run, fell apart! You're lookin at getting REAL intimate with that one! Just remember what material ends up as sawdust on the floor. I try to keep the shortage to the rear,so I can add a strip to the top so it is to the back edge. I'll promise you this.. it's gonna be a strong dresser when you get done. More good news is the cracks are straight down the joints, and look fairly clean. With exeption of the "counter top " hack job done in the past. What a mess! I use a die grinder to remove that liquid nails crap. I get the majority of it off, and avoid grinding the wood as much as possible, then clean up with 80 grit on an orbital sander. If you get it all apart, then it's like putting together a kit! Good luck with it, and if I was charging for a resto and refinish, you'd be looking at about $1200.00. So your wife is gonna owe you bigtime! Be cautious of the pine. If it is a veneer top, it's gonna be very thin. Not much room to sand without going through, as I noticed it is a poplar substrate. That thing would be beautiful if you stripped it and went natural pine. The wood has aged, and I'd bet it is a real mellow gold color. Just a thought. I wish I could strip it for you, I can get it spotless in about an hour! The "flow over" strip system I use is a huge timesaver! Problem is, the stripper is 70 bux for 5 gallons, and it takes 5 gallons just to charge the system! jimsjinx
Posted: Sun Feb 06, 2011 2:54 am
by heathicus
If I tackle a full resto job on this, it will just be for the experience and the self education. It's actually not a dearly held piece of furniture. My wife really isn't even that fond of it. So there would be no pressure and I bet I would learn a lot. There's also the challenge of perhaps turning it into something she is fond of.
I've got to get my workshop built first, though. But do I try to "patch" it in the meantime or just leave it alone until I'm ready to take on the full restoration? I guess that's the question right now.