Inherited SS, not sure if it works
Moderator: admin
-
JPG

- Platinum Member
- Posts: 35600
- Joined: Wed Dec 10, 2008 7:42 pm
- Location: Lexington, Ky (TAMECAT territory)
FYI:
http://www.shopsmith.com/ownersite/partscat/couplerexpview.htm
http://www.shopsmith.com/ownersite/partscat/couplerpartslist.htm
You only need the coupler. You already have the hubs.
http://www.shopsmith.com/ownersite/partscat/couplerexpview.htm
http://www.shopsmith.com/ownersite/partscat/couplerpartslist.htm
You only need the coupler. You already have the hubs.
╔═══╗
╟JPG ╢
╚═══╝
Goldie(Bought New SN 377425)/4" jointer/6" beltsander/12" planer/stripsander/bandsaw/powerstation /Scroll saw/Jig saw /Craftsman 10" ras/Craftsman 6" thicknessplaner/ Dayton10"tablesaw(restoredfromneighborstrashpile)/ Mark VII restoration in 'progress'/ 10E[/size](SN E3779) restoration in progress, a 510 on the back burner and a growing pile of items to be eventually returned to useful life. - aka Red Grange

Welcome, Morgan.
First, use an air compressor (or even leaf blower) to blow out the headstock, especially the motor. Second, lubricate everything. Use Kroil, Zoom Spout, 3-in-1, turbine oil or other machine oil to lubricate the shafts and sheaves. Use graphite to lubricate the speed changer.
Power up the machine briefly and see if she runs. If not, I would say the best place to start troubleshooting the motor is by removing the belt from the motor to see if the motor turns.
1. UNPLUG THE MACHINE.
2. Remove the rear cover (belt cover). It's just sheet metal held on with screws. Slide it back on the tubes.
3. Attach the sanding disc to the main spindle to make it easier for you to turn the shaft by hand.
4. ONLY WHILE ROTATING THE SPINDLE, turn the control handle up to "fast." DO NOT FORCE IT.
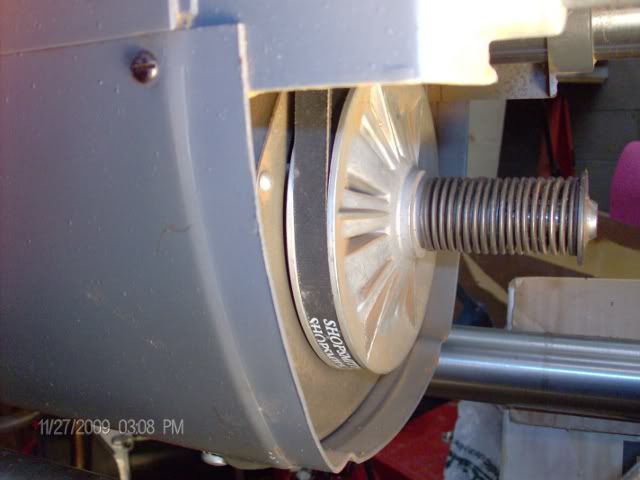
5. With the belt cover off, you will see two sets of 'pulleys' called sheaves and two belts. The belt on the lower sheaves should now be near the edge and will look like this.
6. Grab one side of the belt with one hand and while rotating the sanding disc (spindle) with the other, pull the belt toward the rear and over the sheave. The belt should walk off.
7. Push that belt up and wedge it over the top of the motor so its out of the way.
8. Now power up the machine and see what happens. This procedure should isolate whether the issue is a mechanical freeze or an electrical problem. You stated the motor hummed so it could be a couple of things but we'll start here.
Let us know from there. Good luck!
Edit: Don't power up the machine with the sanding disc on when the speedial is set to high (and the belts are on). It's like a helicopter.
First, use an air compressor (or even leaf blower) to blow out the headstock, especially the motor. Second, lubricate everything. Use Kroil, Zoom Spout, 3-in-1, turbine oil or other machine oil to lubricate the shafts and sheaves. Use graphite to lubricate the speed changer.
Power up the machine briefly and see if she runs. If not, I would say the best place to start troubleshooting the motor is by removing the belt from the motor to see if the motor turns.
1. UNPLUG THE MACHINE.
2. Remove the rear cover (belt cover). It's just sheet metal held on with screws. Slide it back on the tubes.
3. Attach the sanding disc to the main spindle to make it easier for you to turn the shaft by hand.
4. ONLY WHILE ROTATING THE SPINDLE, turn the control handle up to "fast." DO NOT FORCE IT.
5. With the belt cover off, you will see two sets of 'pulleys' called sheaves and two belts. The belt on the lower sheaves should now be near the edge and will look like this.
6. Grab one side of the belt with one hand and while rotating the sanding disc (spindle) with the other, pull the belt toward the rear and over the sheave. The belt should walk off.
7. Push that belt up and wedge it over the top of the motor so its out of the way.
8. Now power up the machine and see what happens. This procedure should isolate whether the issue is a mechanical freeze or an electrical problem. You stated the motor hummed so it could be a couple of things but we'll start here.
Let us know from there. Good luck!
Edit: Don't power up the machine with the sanding disc on when the speedial is set to high (and the belts are on). It's like a helicopter.

Ok. I got it to run. I manually turned the spindle a few times and tried the power switch again. Success!
My SN is SS-108328.
I'm attaching photos of the bandsaw on the correct side (thanks!) but notice the coupler does not line up right...Band saw does not drop into the frame far enough. I'll try again tomorrow.
I've found lots of papers about the tool, but NO OWNER'S MANUAL. Ugh!
I'll keep looking because I REALLY want to get this going. My wife really wants some shelves!
- Attachments
-
- IMAG0155.jpg (93.41 KiB) Viewed 2938 times
-
- IMAG0156.jpg (84.61 KiB) Viewed 2938 times
-
- IMAG0157.jpg (108.14 KiB) Viewed 2933 times

See those collars on the bandsaw tubes? Loosen the set screws. That should allow ya to adjust the BS for height and align it to the hub. MIGHT take 2 people to do it, one to adjust, the other to tighten the screws..
SS 500(09/1980), DC3300, jointer, bandsaw, belt sander, Strip Sander, drum sanders,molder, dado, biscuit joiner, universal lathe tool rest, Oneway talon chuck, router bits & chucks and a De Walt 735 planer,a #5,#6, block planes. ALL in a 100 square foot shop.
.
.
Bob
.
.
Bob
-
JPG
- Platinum Member
- Posts: 35600
- Joined: Wed Dec 10, 2008 7:42 pm
- Location: Lexington, Ky (TAMECAT territory)
in/out positioning is a little trickier.
First determine if bench tube/way tubes are aligned correctly. It is possible for the tubes to be twisted relative to each other. Raise the bench tubes up onto a horse(or other support) and level the bench tubes at the 4 contact points both front to back and left to right. It may require loosening the bolts/clamps in the end castings to achieve that. When all level, retighten the clamps securely.
Next check the way tubes to also be level front to rear an both ends and both tubes left to right. The large set screw is adjusted to remove any twist. The tie bar clamp must be adjusted to just secure the tie bar to the end casting and both 'sides'. Again loosen the way tube set screws to allow movement, then tighten them securely when done.
If the shafts still do not line up, the end casting can be moved(rotated so as to line them up). The tie bar may need to be repositioned after 'rotation'.
Later spt mounting posts have an offset that allows front/rear alignment.
IMHO the 'twist' needs to be eliminated regardless of whether your 'tubes' are offset!
╔═══╗
╟JPG ╢
╚═══╝
Goldie(Bought New SN 377425)/4" jointer/6" beltsander/12" planer/stripsander/bandsaw/powerstation /Scroll saw/Jig saw /Craftsman 10" ras/Craftsman 6" thicknessplaner/ Dayton10"tablesaw(restoredfromneighborstrashpile)/ Mark VII restoration in 'progress'/ 10E[/size](SN E3779) restoration in progress, a 510 on the back burner and a growing pile of items to be eventually returned to useful life. - aka Red Grange
╟JPG ╢
╚═══╝
Goldie(Bought New SN 377425)/4" jointer/6" beltsander/12" planer/stripsander/bandsaw/powerstation /Scroll saw/Jig saw /Craftsman 10" ras/Craftsman 6" thicknessplaner/ Dayton10"tablesaw(restoredfromneighborstrashpile)/ Mark VII restoration in 'progress'/ 10E[/size](SN E3779) restoration in progress, a 510 on the back burner and a growing pile of items to be eventually returned to useful life. - aka Red Grange
-
judaspre1982
- Platinum Member
- Posts: 1237
- Joined: Tue Jul 08, 2008 10:10 pm
=============================
Last edited by judaspre1982 on Wed May 10, 2017 5:00 pm, edited 1 time in total.
Old Manual
Here's a manual from 1956. It will get you started until you purchase a new one, available from SS here. They systems between then and now are basically the same.
The link judaspre sent you will help. I highly recommend you get a hard copy.
The link judaspre sent you will help. I highly recommend you get a hard copy.