Page 4 of 6
Re: Crafter's Station - Request Wiring Advice
Posted: Wed Sep 11, 2024 5:51 am
by Chad
DLB wrote: ↑Tue Sep 10, 2024 6:21 pm
Chad wrote: ↑Tue Sep 10, 2024 1:14 pm
I've been trying to wire a Power Station to the way a Crafter's Station is wired to run the motor in either direction.
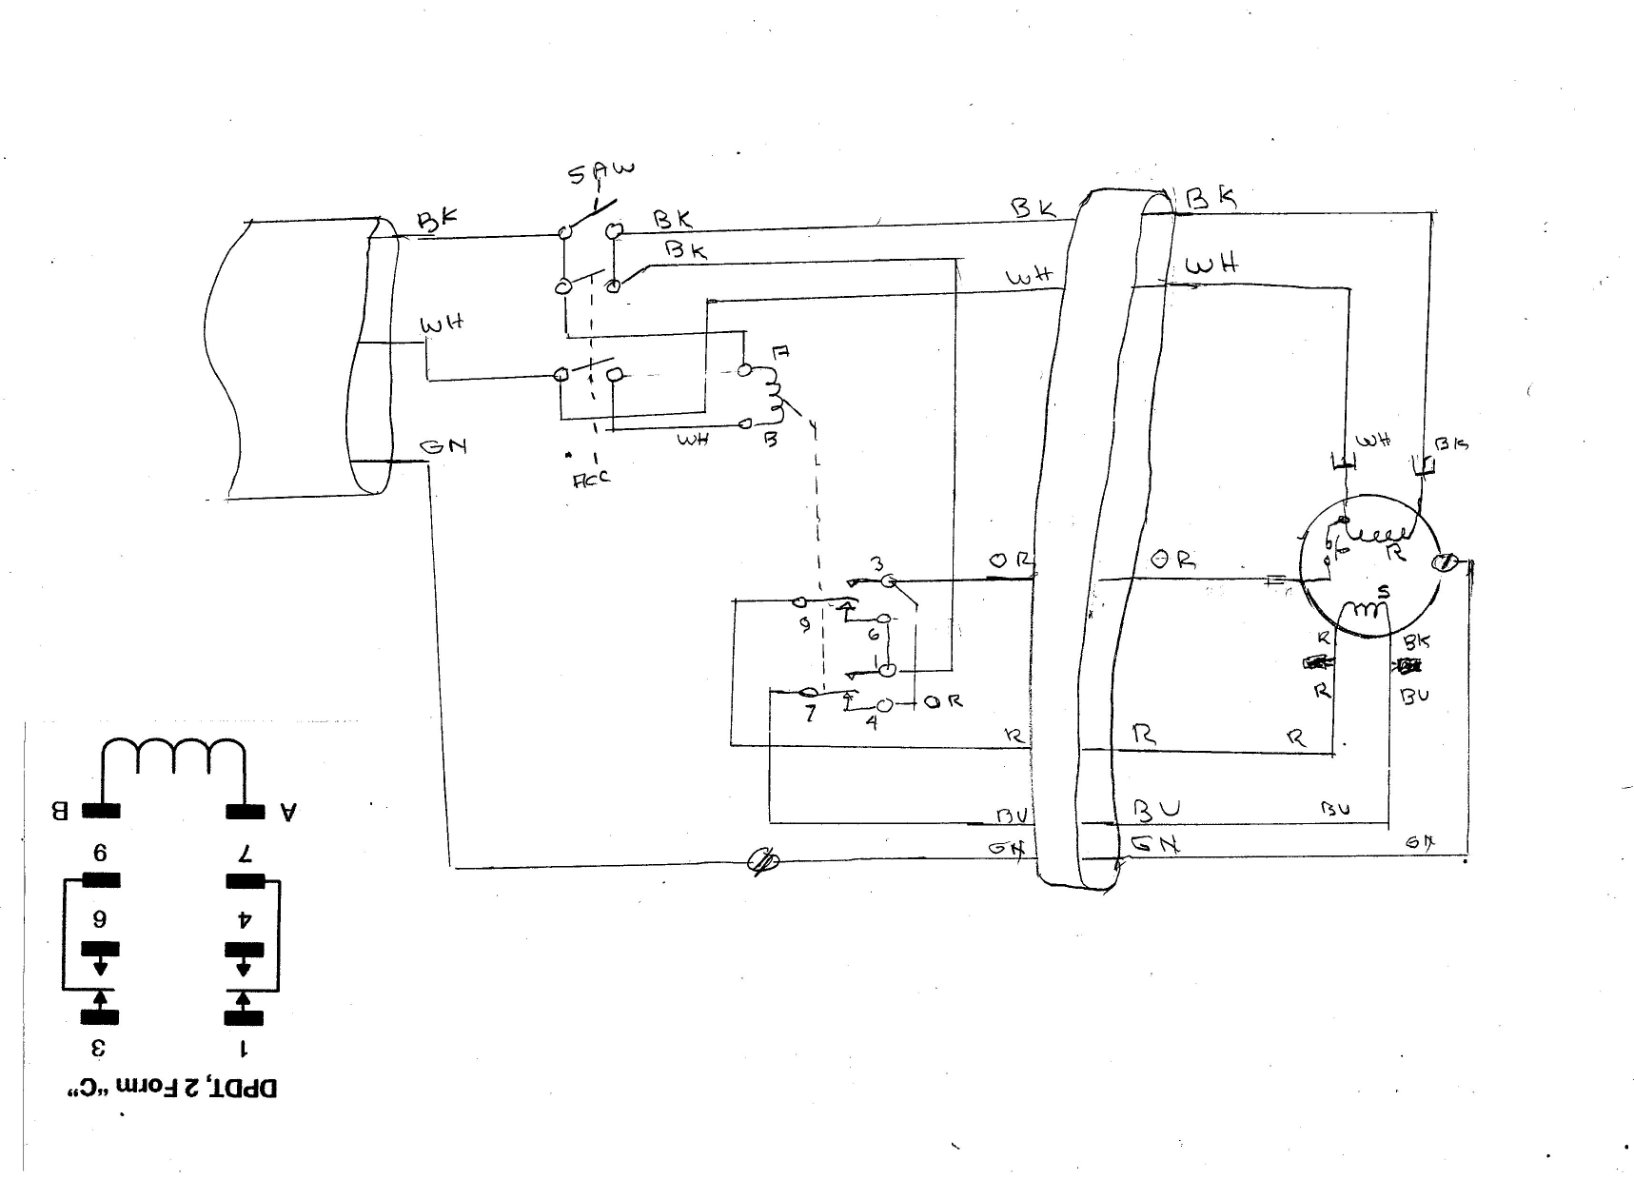
Below is the wiring diagram, the new relay, and the motor wiring of my setup.
So far, when either switch is turned on for only a second or two, the motor runs at about half speed, with a loud thumping noise, and there is arcing in the relay. What could be causing the problem?
Does your PS motor label say: "To Reverse Rotation Switch Red & Blk Leads?" Also, is the arcing momentary or continuous for the second or two you had it on? I found the schematics that Dusty drew in an earlier post in this thread to be more useful than the wiring diagram. Does the PN on the relay you received match the ad description as opposed to the ad picture? Especially ending in -120F not -12F? (Relay coil operating voltage, IIUC.)
- David
David,
Yes, my PS motor label does say: "To Reverse Rotation Switch Red & Blk Leads".
The arcing was momentary.
Yes, the PN on the relay does match the description. It is a -120F (120 VAC), Not -12F (-12 VDC)
Re: Crafter's Station - Request Wiring Advice
Posted: Wed Sep 11, 2024 8:34 am
by JPG
I am working on a logical schematic that also indicates point to point wiring gleaned from both Dusty's diagram, relay pix, relay specs and the SS wiring diagram.
I will post it after creating a good drawing(currently chicken scratchy). Will be later this afternoon.
I am assuming there are three splices at the motor(or-or, r-r, bk-bu) in addition to the bk and wh power connections.
I am surprised that the relay is only energized when the "accessory" switch is activated.
Re: Crafter's Station - Request Wiring Advice
Posted: Wed Sep 11, 2024 9:55 am
by DLB
JPG wrote: ↑Wed Sep 11, 2024 8:34 am
I am surprised that the relay is only energized when the "accessory" switch is activated.
A hint as to Chad's problem? He reports momentary arcing in the relay when either switch is activated. There should be no arcing in the relay when it remains de-energized in "saw" mode.
Chad - Can you provide a photo of the wiring side of your relay?
- David
Re: Crafter's Station - Request Wiring Advice
Posted: Wed Sep 11, 2024 10:34 am
by Chad
Here are the wiring diagrams I came up with (WIRING FOR DUMBIES, LIKE ME), all based off of Shopsmith's original Crafter's Station wiring diagram. I have thoroughly inspected them and they are a exact representation of the original. Note, the switch and the relay are mounted in a separate work box mounted to the frame. I do not add any additional holes to the headstock, frame, or legs to add these modifications.
Re: Crafter's Station - Request Wiring Advice
Posted: Wed Sep 11, 2024 10:45 am
by Chad
DLB wrote: ↑Wed Sep 11, 2024 9:55 am
Chad - Can you provide a photo of the wiring side of your relay?
- David
I wish I could, David. As of right now I completely disassembled the wiring modifications in order to check:
* the motor for damage and proper operation (wired as it was originally from the factory).
* the relay for proper operation (independent mechanical movement when energized, and de-energized).
I'll post my finding sometime after work this evening.
Re: Crafter's Station - Request Wiring Advice
Posted: Wed Sep 11, 2024 1:38 pm
by chapmanruss
I haven't had the Crafter's Station long so not too familiar with it yet. Checking the parts list for it and the Power Station they both have the same part number (515623) for their respective motors.
Re: Crafter's Station - Request Wiring Advice
Posted: Wed Sep 11, 2024 3:07 pm
by Chad
chapmanruss wrote: ↑Wed Sep 11, 2024 1:38 pm
I haven't had the Crafter's Station long so not too familiar with it yet. Checking the parts list for it and the Power Station they both have the same part number (515623) for their respective motors.
Russ,
That's valuable to know, thank you for sharing.
My Power Station is a model year of 1994, with a Emerson motor.
Re: Crafter's Station - Request Wiring Advice
Posted: Wed Sep 11, 2024 3:40 pm
by BuckeyeDennis
Part of the confusion may be due to different DPDT relays having different terminal positions. I've attached a proper data sheet for the NTE relay.
The motor leads aren't identified as to function, so I can't say what the connections
should be. JPG can undoubtedly help you sort that out.
 R55.pdf
- (464.35 KiB) Downloaded 50 times
Re: Crafter's Station - Request Wiring Advice
Posted: Wed Sep 11, 2024 5:09 pm
by JPG
As promised"
- CRAFTERS STATION WIRING.jpg (122.98 KiB) Viewed 1199 times
The relay pinout is shown upside down to match the ss manual orientation.
Some confusion is attributable to Dusty numbering the terminals differently.
I believe this matches all previous other pix etc. posted except Dusty's diagram/schematic(only swapped relay pole terrminal #).
P.S. it has come to be realized by me that there is a third terminal on the motor terminal board that the orange cable wire attaches to and there is NO wire nut splice to an orange wire from inside the motor. So my diagram is incorrect on that one detail.
P.P.S. I just noticed that the black wire from the accessory switch going to the relay actually connects to relay terminal 1 not terminal 6. Thus there are two black wires connected to terminal 1 and a single wire connected to relay terminal 6.
P.P.P.S The wiring diagram above has been replaced with a corrected one.
Re: Crafter's Station - Request Wiring Advice
Posted: Wed Sep 11, 2024 5:34 pm
by JPG
Chad:
If you understand those wiring for dummies diagrams thee definitely do not qualify as a dummy!
If it would help, I can show paths for the two different situations.
Quesion? Just WHAT are you doing? Are you including the two power switches. If not, the relay function is redundant.
A question in my mind is the orange wire and internal motor wiring relative to it. It may be a gotcha! Also is there a third terminal on the motor connection board which MAY BE the wire from the start switch. I do not recall one on any of my powerstations. In order for the red/black wire swap to work, the start switch MUST be in series with the start winding