Page 5 of 6
Posted: Fri Nov 15, 2013 5:39 pm
by wa2crk
Make sure that the stop rings ( the coil springs in the grooves in the headstock are in place) Also the split collar on the idler shaft should not move in the heasdstock casting. It is held in location by a pointed set screw and the cross bolt in the ears of the headstock casting. DO NOT overtighten the 1/4 inch bolt in the headstock casting lest you break off the casting ears.
Bill V
Posted: Sat Nov 16, 2013 12:16 am
by ryjonesacct
Help, I can't get the control sheave loop off the pork chop. I can't get it over the bump on the leaf spring.

Are there any tricks to this or am I just being a wimp?

Also wa2crk can you be more specific? I don't know what the "stop rings" or the "split collar" are. Sorry I'm still learning the names of all the parts.
Posted: Sat Nov 16, 2013 5:28 am
by dusty
ryjonesacct wrote:Help, I can't get the control sheave loop off the pork chop. I can't get it over the bump on the leaf spring.
Are there any tricks to this or am I just being a wimp?
Also wa2crk can you be more specific? I don't know what the "stop rings" or the "split collar" are. Sorry I'm still learning the names of all the parts.
To get the loop off the porkchop the speed control needs to be at High Speed.
Posted: Sat Nov 16, 2013 11:07 am
by wa2crk
The split ring is in the casting and holds the upper shaft in the headstock. You can see the outer one if you clean the bearing and it will be visible. If the outer one is missing or was not replaced during an earlier fix the upper shaft will walk out of the headstock. There is a second retaining ring is in the interior of the headstock and is to prevent the drive sleeve from moving to the interior of the headstock. The split collar is actually the eccentric bushing and if the pointed set screw is not tightened in the groove in the idler shaft bearing then the idler shaft can also move out of the headstock. The eccentric assembly is also held in place by a bolt that goes through two tabs on the casting. DO NOT OVERTIGHTEN either the bolt through the tabs or the pointed set screw as damage will occur
Bill V
Posted: Sat Nov 16, 2013 12:30 pm
by joshh
ryjonesacct wrote:Yes I did I appreciate it, and it is helpful, I was just hoping for something a little more like the Sawdust Session that goes painfully step by step through every little detail in a video. The SS is not mine it is my Father in Law's so I really don't want to screw anything up worse than it already is.
I could probably take everything apart from your pictures, but then I don't really know what I am looking for bad or good. I do appreciate your help, I just want to gather as much knowledge on this before I proceed so I don't screw up.
Watch these 2 sawdust sessions. It was all I needed to get a good understanding of all the internals & rebuild. The second link, labeled "rebuilding", will be better than the first at your stage in the game but both have good stuff in them.
Cleaning and inspecting:
http://www.shopsmithacademy.com/SS_Arch ... rn_Pt2.htm
Rebuilding:
http://www.shopsmithacademy.com/SS_Arch ... rn_Pt3.htm
Posted: Sat Nov 16, 2013 12:45 pm
by JPG
The 'leaf spring'(with the hump) must be depressed down close to the porkchop to move the 'hump' out of the way(tis a tight fit). The porkchop needs to be as far towards the control sheave as it will go. That distance limit is when the porkchop butts up against the high speed stop. That stop is the inside end of the screw that the spur gear and nut are located on(under the control knob).
As a LAST resort, the loop can be pulled out of the button on the end of the control sheave hub. The wire loop ends each extend about 1/8" into the button.
Posted: Sat Nov 16, 2013 12:53 pm
by charlese
ryjonesacct wrote:
Also wa2crk can you be more specific? I don't know what the "stop rings" or the "split collar" are. Sorry I'm still learning the names of all the parts.
Nothing to be sorry for! Learning the names is/are lessons of their own. You will probably be able to fix your headstock to purring condition before you get a handle on all of the names.
Been there - done that! Truth be known - still have to look up the names every once and a while.
Posted: Sat Nov 16, 2013 1:26 pm
by ryjonesacct
Hey so I have made lots of progress, but in order to get the control sheave out from the poly v belt I took out the speed changing assembly. I just couldn't get around it. And now I am questioning/ debating with my father in law where the pork chop should be in regards to the threads on the speed changing dial. We had to turn it WAY beyond "fast" in order to get the loop off the pork chop. Not sure where it should be now as we put in back together.
Posted: Sat Nov 16, 2013 1:45 pm
by joshh
The first several minutes of the rebuild video linked above goes through the names and shows them in a functional cutaway headstock. Definitely take the time to watch that video.
Posted: Sat Nov 16, 2013 1:47 pm
by joshh
ryjonesacct wrote:Hey so I have made lots of progress, but in order to get the control sheave out from the poly v belt I took out the speed changing assembly. I just couldn't get around it. And now I am questioning/ debating with my father in law where the pork chop should be in regards to the threads on the speed changing dial. We had to turn it WAY beyond "fast" in order to get the loop off the pork chop. Not sure where it should be now as we put in back together.
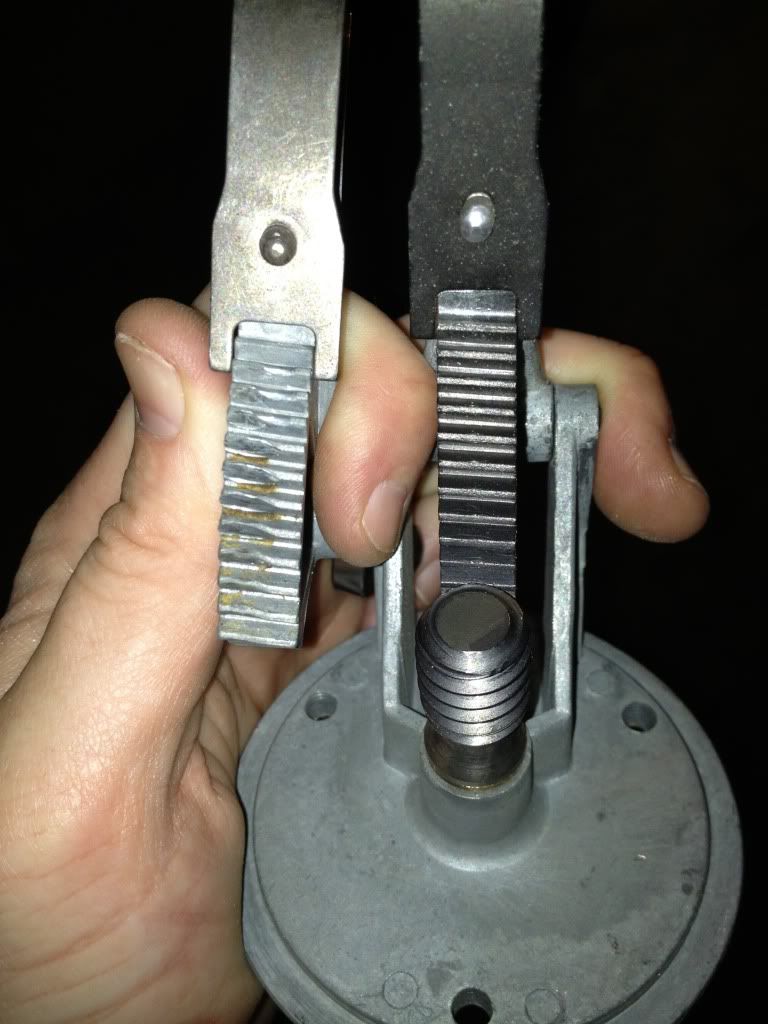
The wormgear should be centered on the threads of the porkchop. What can happen is the ears of the porkchop spread apart and the relationship of the gear/teeth shifts causing damage.
Here is a picture with a damaged one left and a new one right. While you are at it, Bill Mayo suggests replacing the rollpin with a bolt, star washers, and a locknut. This prevents the ears ever opening up again and holds it all together well.
https://forum.shopsmith.com/viewtopic.php?t=13231