Page 6 of 6
Re: Clearer Setup Diagrams/Instructions?
Posted: Thu Apr 14, 2016 10:07 am
by sreilly24590
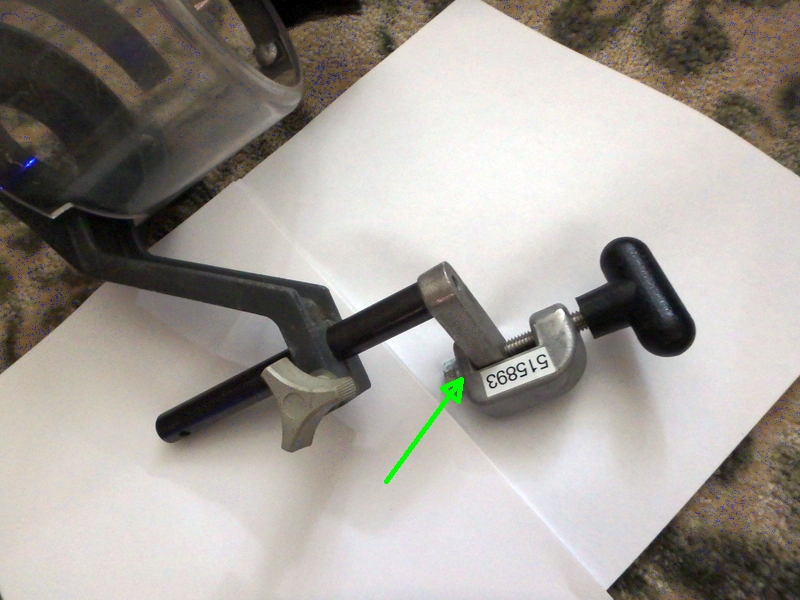
So my picture of the clamp without the second hole is where the problem is as I suspected. I guess I can try to drill it and tap the hole to make it work as need be. How hard is taping this hole, looks like a cast material? Just call me lucky I guess:(
Steve
Re: Clearer Setup Diagrams/Instructions?
Posted: Thu Apr 14, 2016 10:14 am
by Skizzity
Looks like 2 different clamps with 2 different part numbers....
Re: Clearer Setup Diagrams/Instructions?
Posted: Thu Apr 14, 2016 1:03 pm
by reible
Just to be clear, the hole in the clamp where the cap screw goes in not threaded right?

- 1a.jpg (354.13 KiB) Viewed 8636 times
Ed
Re: Clearer Setup Diagrams/Instructions?
Posted: Thu Apr 14, 2016 1:39 pm
by sreilly24590
I guess I wasn't thinking about that. It really shouldn't be threaded or even need to be. I'll drill and use the bolt and washer they provided.
Steve
Re: Clearer Setup Diagrams/Instructions?
Posted: Thu Apr 14, 2016 3:50 pm
by recurve1usa
Yes you are correct the hole in the top of the clamp is not threaded. The threads are in the foot piece, the same one as the rod that holds the shield.
The bolt goes through the top of the clamp and is threaded into the foot.
Good luck, it shouldn't be to hard to drill and tap the piece.
The hole in the top of the clamp part # 515893 is not threaded. It is smooth and the bolt just passes through it and is threaded into the foot part #518278. The hole in the foot is the same size and thread as the hole the thumb clamp threads into. Just size up the thumbscrew threads and you are good to go.
John
Re: Clearer Setup Diagrams/Instructions?
Posted: Mon Apr 25, 2016 6:44 pm
by reible
Drilled mine today. Used a couple of drills to get to the final hole since I was clamping it in a light duty vice and didn't want anything twisting around on me. The material is really easy to drill, soft aluminum.
I wasn't to sure on the hole size but the letter "V" was where I stopped, specs say "W" but it is a nice fit at "V" so that is what I'm at.
The bolt is 3/8 x 3/4" long but my collection only had x 1". For testing I used a couple of washers to keep the end of the bolt away from the table top. That works but I'll add a 3/4" one to my shopping list since that is really want it needs and that way I will not forget to make sure there are two washers in place.........
I didn't take a picture but you need or want one I can go back to the shop and take one.
Ed
Re: Clearer Setup Diagrams/Instructions?
Posted: Mon Apr 25, 2016 6:54 pm
by sreilly24590
I drilled mine a few days ago without issue and installed on the table. Good thing I can slide and adjust the angle to fit in front of the fence just right before clamping. Could use a third hand but once it's installed I shouldn't need to fool with it until I'm done. Should really help with the sawdust/chips too.
Steve
Re: Clearer Setup Diagrams/Instructions?
Posted: Tue Jul 19, 2016 3:17 pm
by Skizzity
I finally received mine today. Seems like it took forever. Ok, only a few months. Everything looks good so far.

