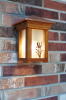
I finally was able to have a series of warm days with minimal wind, and applied the finish to the bookcase I started way back when. SWMBO is pleased
Here's a shot of the project in place:
[ATTACH]16857[/ATTACH]
If you have an interest in how I got from start to finish, I posted several shots on my web site.
On April Fools Day, no less!
Attachments
IMG_7339.jpg (25.53 KiB) Viewed 2122 times
Bud F.
1998 Mark V 510 bought used 2006, Jointer, 2 Bandsaws, ca 1960 Yuba SawSmith RAS
Projects and "stuff": http://www.bfulgham.com/JAlbum/Woodworking_Index/
charlese wrote:Very nice work, Bud!:D Especially, since wife is pleased.
Nice looking back - ship lapped?
Yes, sir. Slats are about 4" wide with a bead on one edge to help disguise the 'expansion' gap between slats.
[ATTACH]16859[/ATTACH]
And, yes, it's great when Susan is pleased......makes it much easier to get agreement when it's time to buy supplies for the next project
Attachments
IMG_7343.jpg (44.79 KiB) Viewed 2073 times
Bud F.
1998 Mark V 510 bought used 2006, Jointer, 2 Bandsaws, ca 1960 Yuba SawSmith RAS
Projects and "stuff": http://www.bfulgham.com/JAlbum/Woodworking_Index/
berry wrote:Great looking project. Can you show a detail pic or provide more detail on how your holding the glass in place?
Thank you.
The glass sits in a 3/8 wide x 1/2 deep (or so) rabbit on the back side of the door. I then used my 23ga pin-nailer to tack 3/8 x 3/8 (no glue) retainer strips in. I did not miter the corners of the retaining strips. Should the glass need to be replaced, butt joints should make it easier to remove the retainers. Here's a not-too-good shot of the back side. Maybe you can tell what I did.
[ATTACH]16883[/ATTACH]
Hope this helped answer your question. If you need more info, just let me know.
Bud
Attachments
IMG_7347.jpg (32.45 KiB) Viewed 2021 times
Bud F.
1998 Mark V 510 bought used 2006, Jointer, 2 Bandsaws, ca 1960 Yuba SawSmith RAS
Projects and "stuff": http://www.bfulgham.com/JAlbum/Woodworking_Index/
The glass sits in a 3/8 wide x 1/2 deep (or so) rabbit on the back side of the door. I then used my 23ga pin-nailer to tack 3/8 x 3/8 (no glue) retainer strips in. I did not miter the corners of the retaining strips. Should the glass need to be replaced, butt joints should make it easier to remove the retainers. Here's a not-too-good shot of the back side. Maybe you can tell what I did.
[ATTACH]16883[/ATTACH]
Hope this helped answer your question. If you need more info, just let me know.
Bud
Thanks for the detail. A couple more questions, if it's okay. Are those 'retaining strips' square or did you cut a 45 to nail into? Why'd you use the pinner? I'd have thought (if you consider glass replacement at some point) drilling & pushing in brads would be the way to go. Just curious - as I'll be doing a glass door on a wine cabinet in May.
Thanks again.
New Leaf Custom Woodworking
Berry Conway - Chief Dust Maker
berry wrote:Thanks for the detail. A couple more questions, if it's okay. Are those 'retaining strips' square or did you cut a 45 to nail into? Why'd you use the pinner? I'd have thought (if you consider glass replacement at some point) drilling & pushing in brads would be the way to go. Just curious - as I'll be doing a glass door on a wine cabinet in May.
Thanks again.
Yep, retainers are 3/8 square. The pins (3/4" in length) are headless, so I should be able to work something like a putty knife between the rail/stile and the strip; and hopefully work the strip off the pin. If I goober the strip up, it's a simple matter to form a new set. A couple of other reasons that I used the pin gun is that I'm a whole lot more comfortable with it than my fumble fingers and a hammer around glass and they are all but invisible. If you look very, very closely at the last pic just above the bottom left on the strip; that little dot is the pin hole.
Your method with brads will work just as well, if not better.
Bud F.
1998 Mark V 510 bought used 2006, Jointer, 2 Bandsaws, ca 1960 Yuba SawSmith RAS
Projects and "stuff": http://www.bfulgham.com/JAlbum/Woodworking_Index/
[quote="bffulgham"]Yep, retainers are 3/8 square. The pins (3/4" in length) are headless, so I should be able to work something like a putty knife between the rail/stile and the strip]
A short relief cut at the middle of each strip would make prying them loose easier.
╔═══╗
╟JPG ╢
╚═══╝
Goldie(Bought New SN 377425)/4" jointer/6" beltsander/12" planer/stripsander/bandsaw/powerstation /Scroll saw/Jig saw /Craftsman 10" ras/Craftsman 6" thicknessplaner/ Dayton10"tablesaw(restoredfromneighborstrashpile)/ Mark VII restoration in 'progress'/ 10E[/size](SN E3779) restoration in progress, a 510 on the back burner and a growing pile of items to be eventually returned to useful life. - aka Red Grange