Page 1 of 1
Greenie rebuild help
Posted: Sun Sep 16, 2012 1:52 am
by jweier80
Hi all, new member/SS owner here. Just got a Mark 5 "Greenie" this morning. I picked up an older model M5 from a retired gentleman via Craigslist for $75. He mentioned in his ad that it was set up as "single speed". I've been picking up and restoring vintage craftsman gear for the last year. I've heard nothing but great things about shopsmith. And as my GF is interested in learning to turn...and with our shop running out of space... I figured for the price this was a 'win-win'. We could have an good starter lathe for her, and when she's not using it a dedicated sanding station for me (once I pick up a belt sander attachment).
So I've been hard at it today doing research and reading up about the model we have. I understand the evolution of the tool (
http://www.songofthegreatlakes.com/ssmarkvevolution.htm)
And have read a few of the threads regarding greenie rebuilds here on SS Woodworking Forum. Not to mention the great video series on tearing down a Goldie over at shopsmithacademy's sawdust sessions. Which is how I've made it this far, 12 hours into shopsmith ownership lol.
But...and here is why I'm starting a new thread, my headstock has been seriously messed with. Here is where it sits right now (if I use the wrong terminology I appologize...I'm still a newbie):

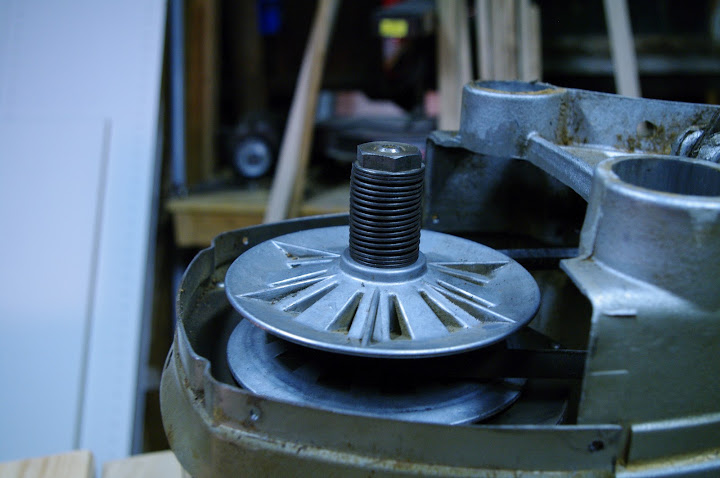
You can see that the control sheave has been removed and replaced with a standard pulley.

Another shot of the pulley in the control sheave's place.

The idler sheave still seems to be intact

And this is where I stopped the tear down. Everything I've read and looked at today hasn't shown the metal retaining pieces around the bearing in between the bolt.
Posted: Sun Sep 16, 2012 1:53 am
by jweier80

Another shot of the retainer.

Now in the box of parts that came with the Mark 5 I found the control sheave and I can tell there are some parts missing.

Other side of the sheave.

There was a little bag of parts, including what looks like what was once part of the control sheave.
Posted: Sun Sep 16, 2012 1:55 am
by jweier80

The speed adjustment dial was also in the box. Turning it didn't seem to move the worm gear at first. I got it to move, but it's very stiff. The teeth are looking pretty worn also.

This is obviously not the correct belt. There's a lot of slop and it's quite worn.
This is something else I haven't found information on. All the instructions I can find state that this spring is held down with a snap ring. On this one it's a nut. I'm not sure if it's just because of the vintage, or if I'm missing something.
So here is my first question; assuming the control sheave I have is worth salvaging, would this be the correct part to order?
http://www.ebay.com/itm/320629142415?ss ... 1438.l2649
If not, or if the sheave looks too far gone would this assembly work instead?
http://www.ebay.com/itm/170905842093?ss ... 1436.l2649
I found this belt kit also:
http://www.ebay.com/itm/350420054991?ss ... 1423.l2649
though if there is a standard for the belts that I could get locally I'd appreciate knowing.
Last thing is that retainer at the idler. Maybe it's just inexperience, but I'm really hoping that hasn't been monkeyed with.
So there you have it. This is my project (or should I say one of many) for the next couple of weeks.
Any help identifying what I would need to do to correct this basket case would be appreciated. Really just looking to get started with shopsmith stuff, and rebuilding them. Seems like once you have your first one, the second, third and fourth one follow.
Thanks in advance, and if something I haven't mentioned jumps out at you from the pictures please speak up. I have plenty of experience rebuilding old craftsman gear...but on this rig I'm a complete novice. I'll take all the help I can get.
Thanks!
Posted: Sun Sep 16, 2012 2:36 am
by JPG
jweier80 wrote:
The speed adjustment dial was also in the box. Turning it didn't seem to move the worm gear at first. I got it to move, but it's very stiff. The teeth are looking pretty worn also.
FIXABLE _ REPLACE PIN WITH SCREW?NUT, STRAIGHTEN "LEGS"(CAREFULLY) _ FILE TEETH IF NEEDED
This is obviously not the correct belt. There's a lot of slop and it's quite worn.
This is something else I haven't found information on. All the instructions I can find state that this spring is held down with a snap ring. On this one it's a nut. I'm not sure if it's just because of the vintage, or if I'm missing something.
NORMAL FOR AN EARLY GREENIE - BE AWARE - LEFT HAND THREAD
So here is my first question]
http://www.ebay.com/itm/320629142415?ss ... 1438.l2649[/URL]
MIGHT WORK
If not, or if the sheave looks too far gone would this assembly work instead?
http://www.ebay.com/itm/170905842093?ssPageName=STRK:MESINDXX:IT&_trksid=p3984.m1436.l2649 BETTER
I found this belt kit also:
http://www.ebay.com/itm/350420054991?ssPageName=STRK:MEWAX:IT&_trksid=p3984.m1423.l2649
though if there is a standard for the belts that I could get locally I'd appreciate knowing.
Last thing is that retainer at the idler. Maybe it's just inexperience, but I'm really hoping that hasn't been monkeyed with.
A NORMAL EARLY GREENIE
So there you have it. This is my project (or should I say one of many) for the next couple of weeks.
Any help identifying what I would need to do to correct this basket case would be appreciated. Really just looking to get started with shopsmith stuff, and rebuilding them. Seems like once you have your first one, the second, third and fourth one follow.
Thanks in advance, and if something I haven't mentioned jumps out at you from the pictures please speak up. I have plenty of experience rebuilding old craftsman gear...but on this rig I'm a complete novice. I'll take all the help I can get.
Thanks!
See embeded comments in
RED
It is late so I will leave finding relevant posts/thread for another day. Bill Mayo(and I) have posts/thread relating to speed control fix and the idler shaft retaining clips.
You have an early sand cast greenie. The headstock casting is heavier and rougher(IMHO better):)
Posted: Sun Sep 16, 2012 11:14 am
by algale
[quote="jweier80"]I've heard nothing but great things about shopsmith.[/quote]
[/b]
Really??? Funny I hesitated for quite a while before buying a Shopsmith because I had heard nothing good about them on other woodworking forums until stumbling quite accidentally upon this forum. I'm glad I did because the machine is amazingly flexible, modifiable and quite accurate if you spend the time to understand it and set it up properly.
You seem like you are well on your way to diagnosing what you need to do on this restore. The mods by the previous owner are curious. Did he tell you why he set it up as a fixed speed machine? One of the best things about the Shopsmith is the variable speed. The advantages for the lathe and drill press function are obvious, but there are also advantages for the table saw (more torque) and sanding (no burning). I'd guess that the speed control on this machine broke a long time ago, maybe during the period when shopsmith was out of business and before there was eBay and Craigslist to source repair parts so he decided to rig up a fixed speed unit.
Posted: Sun Sep 16, 2012 2:07 pm
by letterk
My guess is he broke the speed control and set it up to get it working as cheaply as possible. Looks like the retainer clip to the button bearing (if I using the right term) came loose/broke. That would be the backwards C piece in the last picture.
Perhaps, at that point he decided to set the speed to a fixed point and make the best use of it. The second picture shows the fixed pulley at a similar position as set to a high speed, which may not be possible to hold with a broken speed control. I would guess vibration would change speed if you could get it set correctly.
Posted: Sun Sep 16, 2012 2:10 pm
by jweier80
Thanks for the info JPG40504. I'm still getting accustomed to the way this forum works but I'll try to look for the posts you mentioned.
Algale, I should say that I've heard only good things about Shopsmith among the circle of vintage machinery restorers and wood workers I run with

. I know that there are a lot of guys out there who measure the quality of tools totally differently than I do. I look for 3 things; longevity, quality and accuracy...in that order. I can make just about any tool more accurate if the first two priorities are met.
The short story on what I've been trying to do with my shop is that my grandfather (who taught me woodworking) passed about 3 years ago. I was supposed to inherit his tools, but in the years between him selling his house, and moving to a small apartment they were "stored' by a friend of his. After his passing we never found out who had them, or where they were. So I've spent the last two years tracking down all the tools he had and rebuilding them. Most of his stuff was all vintage craftsman and delta/rockwell gear.
The shopsmith though unrelated to the project, is to address one big problem in my current shop...I'm running out of space lol.
So now that I know which way to turn the nut (thanks again JPG40504), and that the weird retainer in the idler is AOK, I'm going to continue tearing things down today.
Posted: Sun Sep 16, 2012 2:40 pm
by letterk
As you said, the Shopsmith's Sawdust Sessions, Videos 21-23 are very helpful. They show tear down and rebuilding, plus look over the blackboard on the page. Nick, the host had 5 pages of instruction in the downloadable PDF.
http://www.shopsmithacademy.com/Sawdust_Sessions.htm
Posted: Sun Sep 16, 2012 10:22 pm
by jweier80
Thanks for all the help so far guys. I know I'll be back here with more progress and questions. Two days into ownership and I'm blown away by the amount of support Shopsmith provides for their tools...all the way back to beginning. Not to mention the amount of knowledge you guys have on these machines, and your willingness to share it.
So I found your description of the two heads JPG40504. That was really helpful, and demystified some of the differences between the instructions I've found and what I'm actually working with.
I managed to get the head stock stripped down this morning. Cleaned it up after a long soak in some krudkutter and painted. I have a much better idea of what we'll need to order going forward.


Lots of cleaning to do yet.

I took a little time and built a headstock support as it's going to be a while before I start the base dis-assembly. I dry-fit some of the parts back together again just so my GF could get an idea of the color scheme (she's an artist...what can I say). I'm going to wait until the headstock is back together and tested before I start taking apart the base.