
A non-Shopsmith repair problem.
I am rebuilding my 30 year old Broilmaster Grill. Just after I got through fixing all the innards, one of the hing pins snapped. The hinge pin appears to be steel. The body of the grill is cast aluminum and the hinges are part of the aluminum casting. I need to remove the busted hinge pin and I am looking for suggestions on how to get it out. I have tried penetrating oil to no avail. The pin won't budge. I am wary of tying to drive these out with a pin punch for fear of breaking the aluminum casting. Anybody got a suggestion?
As shown in the attached photo, the piece of the hinge pin with the head is firmly stuck in the upper half of the hinge (to the right in the photo) and the other piece of the hinge pin is firmly stuck in the lower half of the hinge (to the left in the photo.
[ATTACH]21791[/ATTACH]
Incidentally, the other hinge pin is intact but also won't budge.
When I open the grill, the top half of the hinge rotates around the intact pin but the intact pin doesn't move at all. This suggests to me that the pin is designed to be loose in the upper half of the hinge and secured in the lower half; however, the broken pin won't move in either the upper half or lower half of the hinge.
Here's the intact pin.
[ATTACH]21792[/ATTACH]
Al
Fixing A Grill Hinge
Moderator: admin
Fixing A Grill Hinge
- Attachments
-
- photo(3).JPG (81.48 KiB) Viewed 4479 times
-
- photo(5).JPG (70.5 KiB) Viewed 4475 times
Gale's Law: The bigger the woodworking project, the less the mistakes show in any photo taken far enough away to show the entire project!
I suggest you drill it out. Pick a metal drill bet slightly smaller than the OD of the pin and drill right down the center. This will weaken the pin enough that it should be easy to pry or drive it out.
________________________________________________________________________________________________
1981 Mark V 500, bandsaw, belt sander, jig saw, jointer; contractor's table saw; multiple circular saws and miter saws; and a trailer full of tools.
"It is better to remain silent and thought a fool than to speak out and remove all doubt"
Abraham Lincoln
1981 Mark V 500, bandsaw, belt sander, jig saw, jointer; contractor's table saw; multiple circular saws and miter saws; and a trailer full of tools.
"It is better to remain silent and thought a fool than to speak out and remove all doubt"
Abraham Lincoln
Thanks, will give it a shot.anmius wrote:I suggest you drill it out. Pick a metal drill bet slightly smaller than the OD of the pin and drill right down the center. This will weaken the pin enough that it should be easy to pry or drive it out.
How's things in Wolfeboro? Spent a lot of summers as a boy on Lake Winnipesaukee but on the Moultonborough Neck area mostly. Boy do I miss that part of the country!
Al
Gale's Law: The bigger the woodworking project, the less the mistakes show in any photo taken far enough away to show the entire project!
-
joshh

- Platinum Member
- Posts: 723
- Joined: Tue Jan 08, 2013 8:53 pm
- Location: Dallas / Fort Worth, Texas
When drilling steel, a very slow speed and lubricant need to be used. If you don't want to buy special cutting fluid, you can get away with using whatever oil that your use on your shopsmith. No matter what, patience is a must.
We had very similar situations when I was a mechanic on rusted/frozen door pins. Many auto parts store have door hinge pin remover tools in their tool loaner program. You can also use a C-clamp (the leather washer pictured below is to protect the hinge from getting marred but you probably won't need it for your purposes)
Something like this: The top of the tool has a hole to allow the pin to pass through.
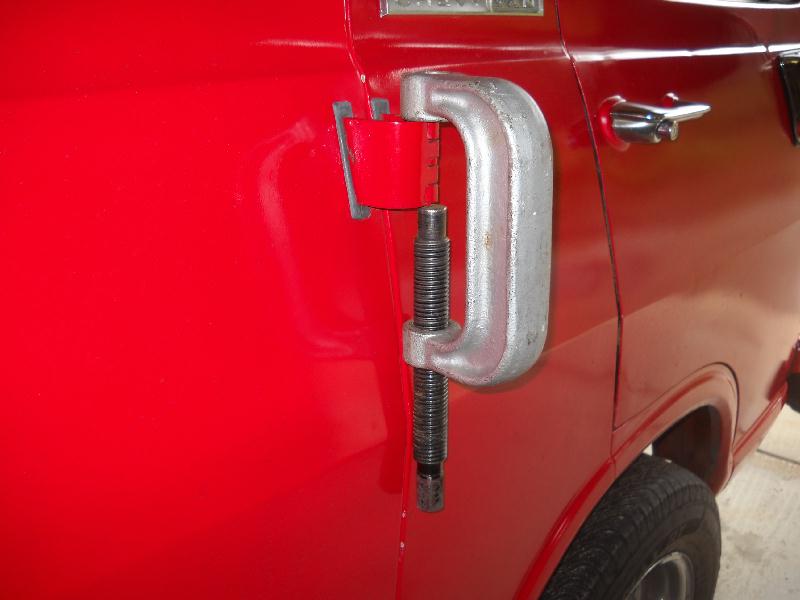
Or this: Since no hole is in the top of the clamp, you will need a socket long enough for the hinge to slide through)
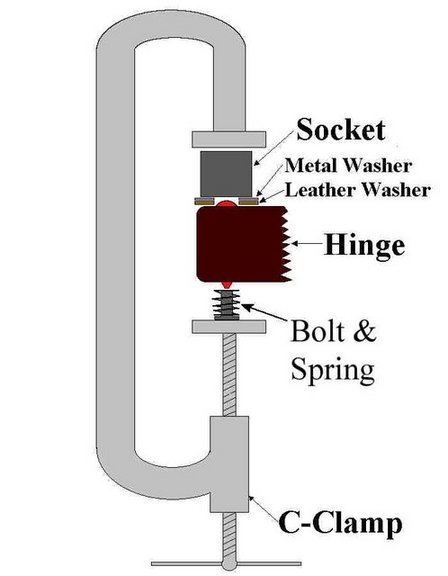
We had very similar situations when I was a mechanic on rusted/frozen door pins. Many auto parts store have door hinge pin remover tools in their tool loaner program. You can also use a C-clamp (the leather washer pictured below is to protect the hinge from getting marred but you probably won't need it for your purposes)
Something like this: The top of the tool has a hole to allow the pin to pass through.
Or this: Since no hole is in the top of the clamp, you will need a socket long enough for the hinge to slide through)

Good for you
Post some pictures when you have finished.
I bought a cast aluminum grill 20 years ago and have replaced the burners twice (have had to adapt the ones that were on closeout at HD because the original ones were no longer available. That's the design so people buy a new one. I've noticed that the new stainless steel ones aren't; they are stainless steel coated (if that's possible) because the burn out and rust out. They are also thin walled and don't last long.
My neighbor threw out a cast aluminum grill last week. I rescued it and am going to configure it to use charcoal.
I bought a cast aluminum grill 20 years ago and have replaced the burners twice (have had to adapt the ones that were on closeout at HD because the original ones were no longer available. That's the design so people buy a new one. I've noticed that the new stainless steel ones aren't; they are stainless steel coated (if that's possible) because the burn out and rust out. They are also thin walled and don't last long.
My neighbor threw out a cast aluminum grill last week. I rescued it and am going to configure it to use charcoal.
[quote="db5"]Post some pictures when you have finished.
I bought a cast aluminum grill 20 years ago and have replaced the burners twice (have had to adapt the ones that were on closeout at HD because the original ones were no longer available. That's the design so people buy a new one. I've noticed that the new stainless steel ones aren't]
Hi db5,
As I said, the innards are all replaced but aren't much too look at: a new bow tie burner, a new rack to hold the porcelain brickets, the brickets (reused them), and new griddles. Standard fare.
I did the same rebuild 13 or 14 years ago when the original burner rusted out (yeah, it is "stainless" but must be very thin as you say).
There's a couple of internet sites that sell replacement parts. If you know your make a model number, you may be able to get the parts you need. In my case, I was able to get an OEM stainless bow tie burner (the seller called me because it was his last one he had and he was surprised anyone still had this 30 year old grille). They no longer had the OEM porcelain covered cast iron cooking griddles/grilles; but they were able to supply some of the same dimension that fit and work fine. PM if you want the websites I used; I don't want to pollute the forum with a link that is for BBQ parts.
Frankly, I probably spent more on replacement parts than I would for a new, bigger one from the box store but this one is mounted to a post on our back concrete patio and is connected to a large underground propane tank so I decided to make the investment.
As for the hinge pin, I was able to drill out the broken one with a 5/32 bit. The bit wanted to wander a little, I guess because it was easier to drill the aluminum rather than the steel, but the job is done and only awaits a replacement bolt of the right size.
Al
I bought a cast aluminum grill 20 years ago and have replaced the burners twice (have had to adapt the ones that were on closeout at HD because the original ones were no longer available. That's the design so people buy a new one. I've noticed that the new stainless steel ones aren't]
Hi db5,
As I said, the innards are all replaced but aren't much too look at: a new bow tie burner, a new rack to hold the porcelain brickets, the brickets (reused them), and new griddles. Standard fare.
I did the same rebuild 13 or 14 years ago when the original burner rusted out (yeah, it is "stainless" but must be very thin as you say).
There's a couple of internet sites that sell replacement parts. If you know your make a model number, you may be able to get the parts you need. In my case, I was able to get an OEM stainless bow tie burner (the seller called me because it was his last one he had and he was surprised anyone still had this 30 year old grille). They no longer had the OEM porcelain covered cast iron cooking griddles/grilles; but they were able to supply some of the same dimension that fit and work fine. PM if you want the websites I used; I don't want to pollute the forum with a link that is for BBQ parts.
Frankly, I probably spent more on replacement parts than I would for a new, bigger one from the box store but this one is mounted to a post on our back concrete patio and is connected to a large underground propane tank so I decided to make the investment.
As for the hinge pin, I was able to drill out the broken one with a 5/32 bit. The bit wanted to wander a little, I guess because it was easier to drill the aluminum rather than the steel, but the job is done and only awaits a replacement bolt of the right size.
Al
Gale's Law: The bigger the woodworking project, the less the mistakes show in any photo taken far enough away to show the entire project!
Things are A-OK. Weather has been pretty good so far (very mild winter). This week is called Motorcycle Week and there are hundreds of thousands of motorcycles on the road and in the woods. The noise is deafening. But the tens of milllions of dollars they bring to the state helps a bit.algale wrote:Thanks, will give it a shot.
How's things in Wolfeboro? Spent a lot of summers as a boy on Lake Winnipesaukee but on the Moultonborough Neck area mostly. Boy do I miss that part of the country!
Al
________________________________________________________________________________________________
1981 Mark V 500, bandsaw, belt sander, jig saw, jointer; contractor's table saw; multiple circular saws and miter saws; and a trailer full of tools.
"It is better to remain silent and thought a fool than to speak out and remove all doubt"
Abraham Lincoln
1981 Mark V 500, bandsaw, belt sander, jig saw, jointer; contractor's table saw; multiple circular saws and miter saws; and a trailer full of tools.
"It is better to remain silent and thought a fool than to speak out and remove all doubt"
Abraham Lincoln
I remember Motorcycle Week! Do you know if Hart's Turkey Farm Restaurant in Meredith is still in business?anmius wrote:Things are A-OK. Weather has been pretty good so far (very mild winter). This week is called Motorcycle Week and there are hundreds of thousands of motorcycles on the road and in the woods. The noise is deafening. But the tens of milllions of dollars they bring to the state helps a bit.
Gale's Law: The bigger the woodworking project, the less the mistakes show in any photo taken far enough away to show the entire project!
-
BuckeyeDennis

- Platinum Member
- Posts: 3813
- Joined: Tue Jul 24, 2012 10:03 pm
- Location: Central Ohio

All the credit for that goes to my better half. My sole contribution was to move the stone to where she wanted it.BuckeyeDennis wrote:Love the ferns! The moss on the stone is very nice as well.
Gale's Law: The bigger the woodworking project, the less the mistakes show in any photo taken far enough away to show the entire project!