Hi all,
Two big boxes showed up today. I took some pictures of the unpacking and installation process:
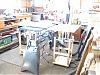
big boxes of toys!
You can see a picture of my sad old 500 in picture 1586, waiting patiently for its upgrade.
Everything was exceptionally well packaged in the boxes, and nothing was able to move around and cause scratches, nicks or dents. There is no single instruction sheet which lists everything a 500 owner should do, but I was able to work through it once I pulled all the instruction packets out of the various packages.
The main table upgrade instructions are poorly written, with lots of typos and many ambiguous instructions. I'll send some feedback to Shopsmith and post that feedback here as well.
The upgrade pieces have a very high quality feel, much more robust than my aging 500 was.
I have all the big pieces put together. I am still waiting for my Freud thin-kerf blade to arrive, then I'll install the blade and arbor. I also don't quite understand how the upper saw guard installs and aligns, but perhaps I'll give that a closer look tonight.
I admit I am a little overwhelmed by the floating table system. I think I need to do some alignment, because the tubes don't line up easily and it feels very awkward and jerky to adjust and move things around. I'm sure everything will feel better once it's cleaned, waxed and aligned. There are knobs on the underside of each table which lock the extension tubes into place, and I am not sure how tight I am supposed to tighten these. I guess getting indentations/marks on the extension tubes is normal and expected when tightening them down?
I ended up with the configuration shown in picture 1591, with the main extension table on the left side, and a set of extension tubes and floating table on each side of the main saw table. I wish I had one long pair of tubes, instead of four shorter ones. I know things need to be aligned because when I slide the tubes into the main table and lock them, they don't line up evenly with the left extension table. I'll work on that later.
This is the first time I've ever had a table saw with a featherboard. I can't seem to adjust the featherboard upwards very high. At its highest setting, I would still only be able to run relatively thin stock underneath it. Do I have it mounted incorrectly? Also, can anyone identify what the four screws in picture 1593 are used for? I put all the big bits on, and they are left over.
I am still waiting for my miter gauge and 24" miter extension to arrive, as they are backordered. So far so good! Once the remaining Shopsmith items arrive and the Freud thin-kerf saw blade arrives, I will be working on my first project - set of ceiling mounted storage shelves for the garage! Crosscutting the 8' stock was a dicey proposition at best on the old 500, but it should be a real piece of cake with the 520.
- Chris
Finally... my 500 to 520 upgrade experience!
Moderator: admin
-
chrispitude

- Gold Member
- Posts: 226
- Joined: Sat Feb 23, 2008 9:18 pm
- Location: Saylorsburg, PA
Chris:
Great pics. You will not regret the upgrade. The first alignments of course deal with getting the table perpendicular to the blade, and then the table and fence parallel to the blade. Shopsmith has a feather board (555783) that mounts to the top of the fence. I think this might be what you are looking for.
I suffered through crosscuts on long boards. Then the crosscut sled (555535)made the job easy and much more accurate.
Ah........that's the beauty of it.......always something else to buy!


This video may help you align the tubes/tables.
http://www.shopsmithacademy.com/SS_Arch ... gnment.htm
http://www.shopsmithacademy.com/SS_Arch ... gnment.htm
SS 500(09/1980), DC3300, jointer, bandsaw, belt sander, Strip Sander, drum sanders,molder, dado, biscuit joiner, universal lathe tool rest, Oneway talon chuck, router bits & chucks and a De Walt 735 planer,a #5,#6, block planes. ALL in a 100 square foot shop.
.
.
Bob
.
.
Bob
-
a1gutterman

- Platinum Member
- Posts: 3653
- Joined: Tue Jan 09, 2007 12:45 am
- Location: "close to" Seattle
chrispitude wrote:Hi all,
Two big boxes showed up today. I took some pictures of the unpacking and installation process:
big boxes of toys!
You can see a picture of my sad old 500 in picture 1586, waiting patiently for its upgrade...................Chris
It looks like somebody is having fun!

Tim
Buying US made products will help keep YOUR job or retirement funds safer.
Buying US made products will help keep YOUR job or retirement funds safer.
-
chrispitude
- Gold Member
- Posts: 226
- Joined: Sat Feb 23, 2008 9:18 pm
- Location: Saylorsburg, PA
Thanks Ed! I don't have a sanding disk, but I've threaded them into the provided adapter and stored it away.reible wrote:The four screws are for the sanding disk upgrade.
Wow, that is pretty nice. I wonder if my 24" aluminum miter extension will do the job with 8 foot 2x4s? It's backordered, but I suppose I'll be finding out soon enough...8iowa wrote:I suffered through crosscuts on long boards. Then the crosscut sled (555535)made the job easy and much more accurate.
Terrific link, beeg! Based on this video, I see some dependencies:beeg wrote:This video may help you align the tubes/tables.
1. Get new Freud saw blade and install on new 520 arbor.
2. Align main table to saw blade.
3. Align auxiliary table on right side of headstock using trunion adjustments.
4. Align auxiliary table on left side of headstock using way tube stop screw.
The new blade is supposed to be here by Friday or Saturday.
For you 520 owners, what's the minimum amount of extension tube that must go into the tables? I was thinking of taking a Sharpie and marking the last "N" inches of each tube's end so it's obvious when a tube has slid into a table by the minimum amount. I suppose the minimum would be where it has passed the floating table locking knob by at least an inch or two? This may be in the user's manual - I suppose I should go study up while I wait for the backordered parts to arrive.
- Chris
-
curiousgeorge

- Platinum Member
- Posts: 880
- Joined: Tue Feb 27, 2007 1:00 am
- Location: Fort Worth, Texas
Chris, since the connector tubes are what support and aligns the floating table, you would want them to go all the way through the table, and in some instances protrude far enough to attach the support legs. I invested in a set of 5' connector tubes. They are on sale right now in the Spring Catalog.For you 520 owners, what's the minimum amount of extension tube that must go into the tables?
http://www.shopsmith.com/ownersite/cata ... ntubes.htm
If you want to browse the Spring Catalog (as well as a ton of other things Shopsmith) just click on "Shopsmith Owner Page" at the bottom of this page.
George
Ft. Worth, TX.
Go TCU Froggies
Ft. Worth, TX.
Go TCU Froggies
-
chrispitude
- Gold Member
- Posts: 226
- Joined: Sat Feb 23, 2008 9:18 pm
- Location: Saylorsburg, PA
Thank you George! This is turning out to be an expensive hobby, and I haven't even turned the thing on yet. I just ordered:
521942 5ft. Connector Tubes 35.69
505506 Molder/Dado Arbor 23.37
555783 Fence Feather Board 20.44
555997 Exten Table Bracket 59.49
The total was $138.99 plus $16.49 shipping.
The extension table brackets look like they'd be very useful in some situations. Since I'll have some shorty tubes left over with the 5ft tubes, this seems like a nice way to put them to good use! (I found an outfeed roller at Harbor Freight for $10 on sale.)
- Chris
-
chiroindixon
- Gold Member
- Posts: 243
- Joined: Thu Jul 20, 2006 1:42 pm
- Location: QCA Iowa
-
chrispitude
- Gold Member
- Posts: 226
- Joined: Sat Feb 23, 2008 9:18 pm
- Location: Saylorsburg, PA
Hi all,
The new Freud thin-kerf blade came today! I found some time this evening to go down and play around with the alignment.
Boy, aligning the upper/lower saw guard and riving blade to the saw blade is a real PITA. I kept taking everything apart and playing with the stop screw on the guard's quill collar, but it seemed to have a mind of its own. Remove upper guard, remove saw blade, remove lower guard, play with set screw, reinstall lower guard, install saw blade, install upper guard, check - nope Rinse, lather, repeat. Eventually I got it to where I was happy with it, but it's not easy.
When I pretend to run a workpiece underneath the clear upper guard, it's hanging up on a ridge of clear plastic at the two back vertical edges of the guard. Those ridges catch on either the pivot pin in the back, or some sharp metal edges back there. Maybe I need to take a picture to explain what I mean. I'm thinking the easiest fix is to shave off those plastic ridges with a utility knife, but it seems strange that I would have to do this on something brand new (and expensive).
The other odd thing I noticed is that when I applied the rear rip fence lock (the upper handle), I heard a "crunchy" metallic noise from the back. When I took the fence off and looked at the back rip fence catch, I noticed that its grab arm was crooked:
back end of my 520 rip fence
The crunching noise was the sharp edge of that piece digging into the table. The pin is actually inserted into the fence at an angle (the holes on either side are in different places!). Is this really the way it's supposed to work, being crooked and digging in only an edge into the table? This seems strange, and it seems to be leaving nicks in the back edge of the table extrusion.
Thanks all!
- Chris