Newbie question...
Moderator: admin
-
tom_k/mo

- Platinum Member
- Posts: 856
- Joined: Mon Jul 14, 2008 3:58 pm
- Location: St. Louis, MO
- Contact:
Newbie question...
I'm still rather new to the SS tool. Made a bunch of sawdust today, and was able to configure it as a horizontal boring machine, table saw, lathe and belt sander SPT. I had some difficulties configuring the machine to use the belt sander. First off, I seem to be missing a metal hub for my power connector. I have 2 connector tubes, but can only find one hub, already attached to my bandsaw. I took the hub off my bandsaw and attached it to my quill in order to use the belt sander. I had a devil of a time getting the power connector to slide over the metal hub on the power head side. It went over the shaft on the beltsander easily. It wasn't the spring pressure I was experiencing, it was just as if the splines didn't want to match. I finally had to take the handle on the quill and extend the quill (with a bit of pressure) to get the metal hub to go inside the coupler. Is there a secret to this, is there something I can do to make coupling easier, or is this "normal". Also, do you know if you can purchase a metal hub for a coupler individually or only as a kit with a coupler tube?
ShopSmith MarkV-520 with Belt Sander, Jointer, Band Saw, Strip Sander, Scroll Saw and Biscuit Jointer SPTs and a DC-3300...
Woodworking Hobbyist (Check out all my Woodworking Plans (http://vbwhiz.isa-geek.net/plans)
Aspiring Sandcarver: Breaking glass one grain at a time.
Black Powder Shooter (love the smell of burning sulfur).
Woodworking Hobbyist (Check out all my Woodworking Plans (http://vbwhiz.isa-geek.net/plans)
Aspiring Sandcarver: Breaking glass one grain at a time.
Black Powder Shooter (love the smell of burning sulfur).
-
a1gutterman

- Platinum Member
- Posts: 3653
- Joined: Tue Jan 09, 2007 12:45 am
- Location: "close to" Seattle
At the risk of stating the obvious, Tom, you do realize that each end of the power coupler fits a different hub? There is a four spline hub and a five spline hub. I have never had any trouble, like what you are describing, as long as the two hubs line up properly, the power coupler should slide right in.
BTW, the Drive Hub (for the SPT side of the power coupler) is part #5035769. And the setscrew for it is #222458.
Also, I have never tried to use the quill to power the beltsander. I use the shaft on the opposite end of the headstock to power my beltsander, so I do knot understand why you needed to extend the quill to get the power coupler to slide onto the hub?
tom k/mo wrote:...I finally had to take the handle on the quill and extend the quill (with a bit of pressure) to get the metal hub to go inside the coupler....
Tim
Buying US made products will help keep YOUR job or retirement funds safer.
Buying US made products will help keep YOUR job or retirement funds safer.
Tom,
If you look at the each end of the power coupling you will see one end (without the spring) has 5 splines or ridges formed into it. The other end (with the spring) has 4 splines or ridtges formed into it. The SPT hub (in your case the belt sander) probably has the five grooved hub that will easily fit into the the non-spring loaded end of the power coupling. There is a, or you should have/need a 4 splined hub that will attach to the left end (not the quill end) of the upper headstock shaft. That is the end the spring loaded coupling easily slides into. I personally run all my SPT's off the left side of the headstock though I see that running the strip sander on the quill side would be a benefit in certain sharpening situations. In short you need a hub with 5 "grooves" in it and a hub with 4 "grooves" in it to use the power coupling. Hope this helps.
Regards,
Dwight
-
tom_k/mo
- Platinum Member
- Posts: 856
- Joined: Mon Jul 14, 2008 3:58 pm
- Location: St. Louis, MO
- Contact:
Boy, do I have egg on my face. No, I was NOT aware that there was a difference in the sides of the coupling. I knew the coupler was marked but didn't realize that one side and five splines and the other had 4. By taking the hub from the band saw and moving it to the quill I had 4 splines on both ends. That is why I had to use force. I was putting a round peg into square hole. Are special purpose tools not to be used on the right side of the unit?
Thank you very much for your quick response. Learning as I go..
Tom
Thank you very much for your quick response. Learning as I go..
Tom
ShopSmith MarkV-520 with Belt Sander, Jointer, Band Saw, Strip Sander, Scroll Saw and Biscuit Jointer SPTs and a DC-3300...
Woodworking Hobbyist (Check out all my Woodworking Plans (http://vbwhiz.isa-geek.net/plans)
Aspiring Sandcarver: Breaking glass one grain at a time.
Black Powder Shooter (love the smell of burning sulfur).
Woodworking Hobbyist (Check out all my Woodworking Plans (http://vbwhiz.isa-geek.net/plans)
Aspiring Sandcarver: Breaking glass one grain at a time.
Black Powder Shooter (love the smell of burning sulfur).
-
a1gutterman
- Platinum Member
- Posts: 3653
- Joined: Tue Jan 09, 2007 12:45 am
- Location: "close to" Seattle
Hi Tom,tom_k/mo wrote:Boy, do I have egg on my face. No, I was NOT aware that there was a difference in the sides of the coupling. I knew the coupler was marked but didn't realize that one side and five splines and the other had 4. By taking the hub from the band saw and moving it to the quill I had 4 splines on both ends. That is why I had to use force. I was putting a round peg into square hole. Are special purpose tools not to be used on the right side of the unit?
Thank you very much for your quick response. Learning as I go..
Tom
I am glad that that was the problem. A lot less complicated then it could have been. And that is what this forum is all about: helping others!
As far as the SPT's being used on the quill side of the Mark V. There may be some instances when you wood do that, but for the most part they are designed to go on the opposite end of the quill. Most of them are designed for the upper shaft, but the lower shaft is also used; at least for the jointer, and I think for the scrollsaw (I do knot have that, so I can knot be certain). The quill is mostly used for the table saw, disk sander, drill press, horizontal boring, lathe work, and some accessories such as the router chuck, molder and shaper heads.
Never hesitate to ask questions. A little embarrassment beats an expensive fix anyday.
Tim
Buying US made products will help keep YOUR job or retirement funds safer.
Buying US made products will help keep YOUR job or retirement funds safer.
-
dusty

- Platinum Member
- Posts: 21530
- Joined: Wed Nov 22, 2006 6:52 am
- Location: Tucson (Wildcat Country), Arizona
Tom,
I am glad you have resolved your problem so simply and so quickly; no sawdust time lost.
You may not have a need now but you asked if hubs could be purchased separately. Yes they can.
http://www.shopsmith.com/ownersite/partscat/couplerpartslist.htm
http://www.shopsmith.com/ownersite/cata ... oupler.htm
"Making Sawdust Safely"
Dusty
Sent from my Dell XPS using Firefox.
Dusty
Sent from my Dell XPS using Firefox.
-
tom_k/mo
- Platinum Member
- Posts: 856
- Joined: Mon Jul 14, 2008 3:58 pm
- Location: St. Louis, MO
- Contact:
Thanks Tim, I bought my SS used (but LIKE new) and am learning as I go. I've seen pics of ShopSmiths for sale on Ebay and Craigsist and some of them had SPTs hung on both ends, I guess it was just for the sale picture. I've learned something. I'll take my bandsaw off when I want to use the belt sander from now on... Thanks again.
On another note, that saw walked through 5/4 walnut like butter, no strain at all. I was impressed.
On another note, that saw walked through 5/4 walnut like butter, no strain at all. I was impressed.
ShopSmith MarkV-520 with Belt Sander, Jointer, Band Saw, Strip Sander, Scroll Saw and Biscuit Jointer SPTs and a DC-3300...
Woodworking Hobbyist (Check out all my Woodworking Plans (http://vbwhiz.isa-geek.net/plans)
Aspiring Sandcarver: Breaking glass one grain at a time.
Black Powder Shooter (love the smell of burning sulfur).
Woodworking Hobbyist (Check out all my Woodworking Plans (http://vbwhiz.isa-geek.net/plans)
Aspiring Sandcarver: Breaking glass one grain at a time.
Black Powder Shooter (love the smell of burning sulfur).
The Answer is YES! SPTs are to be used only on the left side of the headstock, or auxiliary side. If used on the quill side, the SPT will turn the wrong direction. If you look at the quill spindle head on - it rotates CCW. If you do the same to the auxiliary side - that hub spins CLOCKWISE.tom_k/mo wrote:Are special purpose tools not to be used on the right side of the unit?
Thank you very much for your quick response. Learning as I go..
Tom
It might be funny if the belt sander turned back wards. The stock would fly off the end and cause a cartoon. (sadistic!) (bombs away!:eek: ) Also the piece would wind up with dented edges or corners.
P.S. Come to think of it - if one would turn the belt sander around and connect the auxiliary side of it to the spindle, it would turn correctly (I think), the problem would be to adjust the posts of the belt sander to align it with the spindle. Never tried it. Don't know if it would work.
Octogenarian's have an earned right to be a curmudgeon.
Chuck in Lancaster, CA
Chuck in Lancaster, CA
-
a1gutterman
- Platinum Member
- Posts: 3653
- Joined: Tue Jan 09, 2007 12:45 am
- Location: "close to" Seattle
There is at least one exception to the "rule" about putting your SPT's on the "left" end. The Strip Sander will mount to either end of the headstock. When using it for sanding, DO put it on the auxillary shaft opposite the quill end; but, when using it for sharpening, in conjunction with the ShopSmith Strip Sander Chisel Sharpening Attachment #555812, you MUST mount it to the quill. A quick study of the picture on this page will reveal that: http://www.shopsmith.com/ownersite/itemfind.htm?item=555812&Submit=Find+Item
Also, in the description of the sharpening attachment in the printed catolog, it states, "Note: Due to rotational direction, your Shopsmith Strip Sander must be mounted to the Quill End of your MARK V during operation."
This link~ http://www.shopsmith.com/ownersite/itemfind.htm?item=5035769&Submit=Find+Item ~ will take you to the hub that fits the SPT shafts WITHOUT the set screw, and will fit one end of the Power Coupler. One link that dusty provided shows the "whole set" (555124) or a Power Coupler only (503574). The other link shows a breakdown of the set (it does knot include the hub for the accessory end):
[quote]
Coupler
[align=center]Click here for Exploded View[/align]
[align=center]Click here to Go Back to Misc. Accessories Index[/align]
Part Numbers indicated with a N/A are Not Available as a service part. [align=center]Ref. No.[/align]
[align=center]Part No.[/align]
Description [align=center]Qty.[/align]
[align=center]Price Each[/align]
[align=center]BUY![/align]
[align=center]--[/align]
[align=center]555124[/align]
Hub & Coupling Assembly (Incl. 301-302) [align=center]--[/align]
[align=right]wwwwww$19.04 Sale: $15.23[/align]
[align=center]BUY [/align]
[align=center]301[/align]
[align=center]503570
Spindle Hub (Incl. 304) [align=center]1[/align]
[align=right]3.89 [/align]
[align=center]BUY [/align]
[align=center]302[/align]
[align=center]503574[/align]
Power Coupling Assembly [align=center]1[/align]
[align=right]wwwwww$12.54 Sale: $10.03[/align]
[align=center]BUY [/align]
[align=center]303[/align]
[align=center]503738[/align]
Idler Hub (Incl. 304) [align=center]1[/align]
[align=right]3.60 [/align]
[align=center]BUY [/align]
[align=center]304[/align]
[align=center]222458[/align]
Setscrew, 1/4" long [align=center]2[/align]
[align=right]0.80 [/align]
[align=center]BUY [/align]
[/align]
[/B][/quote] [/color](boy, the copy/paste/quote function did something funny to this quote!)
the exploded view show the 503570 and 50378 are both 4 spline hubs WITH setscrews included. The difference is one is longer then the other, the longer one is intended for the lower auxillary shaft I believe. I was knot able to locate numbers for the hubs that go on the headstock, that did knot include setscrews.
Tim
Buying US made products will help keep YOUR job or retirement funds safer.
Buying US made products will help keep YOUR job or retirement funds safer.
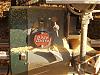
Quick ID of coulpler
I took a marker and highlighted the "ribs" of the coupler on both ends to help with alignment when I use the coupler. I also added a red stripe on the SPT end so I could tell at a glance which end was which.

Al B
Al B
- Attachments
-
- coupler.jpg (28.78 KiB) Viewed 28699 times
Al B
Shopsmith Greenie (my late Dad's); My 520, 6" Belt Sander, Bandsaw, Jointer, pro planer, scroll saw, Jig saw, strip sander, router table, OPR, dust collector, power station, & power stands
Shopsmith Greenie (my late Dad's); My 520, 6" Belt Sander, Bandsaw, Jointer, pro planer, scroll saw, Jig saw, strip sander, router table, OPR, dust collector, power station, & power stands