Reactivation of 1960 Mark V 500 – Lipstick on a 500.
Contents
Part 1
1. Loading/hauling the SS.
3. Jawa's and lost parts.
4. Second attempt to run the motor. Improved Test setup.
Part 2
5. Lipstick on a 500.
5. Request to Tech Service.
5. Pressure washing.
6. Proprietary Paint removal tools.
6. Sealed versus Shielded bearings.
8. Drive Sleeve Surprises.
Part 3
10. Getting a Buzz from the Switch.
11. Pits versus lesions.
12. Carriage Needed.
Reactivation Time and Expenses.
Definition of Reactivation of 1960 Mark V
Issues.
Part 4: Completion of the Reactivation w/Parts 1-3, URL's to references and more pictures available as an executable Parts 1-3 & 4 of Reactivation updated 11/03/08 Download and execute.
4 – 10-6-08:
With the castings free, the headstock out, and the legs stacked in a corner, there was several tracks for working off the sub projects. Concentrating on the preparation for painting was started because it has down times when the paint has to dry and cure. The side project, was tearing down the head stock to get it ready for painting and examining the parts.
An attempt to drive the roll pin out of the hinge pin ended in a bent driver and no movement. A request for technical assistance was sent to Shopsmith support that included a request for a paint recommendation and the reason why the hinge pin needed to be taken out; painting. Trying to drive the pin out from inside the casting didn't work either.
The Belt Cover was held in place by a pair of #10 pan head screws (big). A little rust inside the belt cover was caused by some water running through. The motor pan was similar, not too bad, but bare metal had a starter coat of rust.
The castings and sheet metal had loose paint or rust on most surfaces. The Tie bar was losing paint in 2 in. sq. chips. The ideal solution would have been to get them sand blasted to remove rust and paint. A source or cost for sand blasting was unknown, but it seemed like a budget buster to get the parts sand blasted. However, I have a pressure washer. It can be used to push grime off engines, lawn mower decks, walls, wheels and sidewalks, I'll use it.? That means the individual parts have to be separated for cleaning and painting.
The colors that had been found, included a hammered Gold from Hammerite and a hammered Copper. The hammered paints should cover the irregular surface of the castings and mimic the original finish. The Hammered Gold color looked a little too yellow but no other color was close to the original.
5 – 10-7-08:
The saw table insert, the quill handles, the carriage lock handle, and the table height lock were cleaned and treated with red paint. The Speed control dial, the speed control handle, and the logo cover were cleaned and refreshed with red paint. Selected knobs were cleaned and detailed with red paint in an effort to visualize what lipstick on a 500 might look like.
The quill was removed and the idler shaft. The sleeve drive was not removed thinking that it could be protected during painting rather than being removed. Remember, I am a casual mechanic with a few tools (You can never have enough tools).
The inside of the headstock was clean and nothing was sticking. In fact the control sheave kept sliding off the idler shaft. There was a little saw dust inside the headstock and by the fan sheave. Compressed air moved a small amount of dust out of the motor, where dust was a concern because it could point to bearing problems or indicate a lot of use.
The day of the pressure washing was preceded by an attempt to remove the sleeve drive. The initial attempt was abandoned when the stock that was going to be used to drive it was too big for the nylon sleeve. Some scrap was whittled down in an attempt to reach inside the sleeve to the sleeve shaft. It was driven out w/difficulty and only one bearing. Well thats better than having both bearings in the headstock. I'll be careful and not direct the spray on the bearing. The dowel was stuck in the splined shaft. I was able to pull it out by gripping the parts w/pliers. On Nick's Video, his dowel was bigger than mine and his didn't get caught in the shaft receiver of the drive sleeve.
The dust and paint washed off with a concentrated pressure stream, the light color washing off the castings more easily than the bronze, The Sheet metal of the steel needed a close spray, to remove paint, but the rust did not move. A afternoon was needed to wash the parts. A plastic crate was used to corral the small parts as they were washed,
I noticed an accumulation if grease and dust on the headstock casting near the sleeve bearing. This became a concern because I was looking for reasons why the motor would trip the breaker before coming up to speed. The residual oils on the headstock made me suspicious of the sleeve bearings. After washing, the headstock was placed on shelf with the bearing horizontal. A few drops of oil were placed on the side of the bearing with the intent on checking in the morning.
6 – 10-8-08:
In the morning, a thick oil was found on the lower side of the bearing. The oil had passed through the bearing seals. They're bad. All of the references to these bearings referred to them as sealed bearings. The SEAL on this bearing had failed..
I started down the yellow pages asking for bearings. One place stood out, in that they knew what the C2 designation was and could explain what the difference was between shielded and sealed bearings. A shielded bearing has less resistance because the shield doesn't touch both bearing races. A sealed bearing rubs on one of the races to seal the bearing from its operating environment. Shielded bearings are where the operating environment is warm or hot, like electric motors. C2 is a tight tolerance and C3 is a specification for a bearing that will work well when the operating environment is warm or hot usually from extended operation. The C3 bearings, for this size, seem to be more common and less expensive.
At this point, I was committed to replacing the sleeve bearings. My retail cost for the bearings was $17 ea. A request to a headstock reconditioner garnered a price for supplying and replacing the drive sleeve bearings. The price was was reasonable in consideration of the difficulty to install the bearings and retail cost of the bearings.
I started sanding the pressure washed parts. Where sanding was not possible the parts were scrapped. If you want to do this, I'll sell you my proprietary dull screw driver. The paint could be creased with the side of the screwdriver and then scraped off.
I was able to obtain some Tinnermann clips that were narrow and won't drop off into the motor pan. The clips fit very tightly on four of the five motor pan fastener holes. The new clips required fine thread pan head screws and were different than the fifth pan head screw used to hold the motor pan. These smaller clips work, scratch the headstock when installed, and are not recommended. The smaller clips do not fit the places where the belt cover screws attach to the headstock.
7 – 8-9-08
Scraping Headstock and Motor Pan. The bearing was driven out of the headstock using a Craftsman 3/4” thumbwheel and the largest dowel I could find. The thumbwheel still got bent.
8 – 10-10-08:
The bearings were obtained locally, at a premium. An acquaintance had a press and Hans consented to pressing the remaining bearing off. To press the front bearing off, a circlip had to be removed and the gilmer cogged drive slid away from the bearing, after which the bearing was easy to press off. The new front bearing was easily pressed. The rear bearing presented a problem, a large spring and collar had appeared after the circlip had been taken off. The first attempt to reassemble the sleeve the circlip did not seat in front of the collar. More fiddling and it was decided that there were burrs on the collar. Filling and emery cloth took care of the burrs, reforming the circlip, and repressing the bearing resulted in a reassembled sleeve. It was only through Hans attention to the details that got the sleeve properly assembled. The use of the headstock reconditioner is recommended because not everyone else can go over to Han's and get one day assistance and conversation.
9 – 10-11-08:
Painted Legs Fence Base, Lathe rests, Gold. Painted the Bench castings, caster brackets, and Tie Bar.
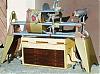
The OH !@#$%^ FOR THE DAY. I WAS PAINTING THE PARTS AND REMEMBERED that I hadn't taken pictures of it after the scraping process. Stopped painting, took pictures, and went back to painting. Had to stretch the paint a little. The gold on the legs and several small parts was the worst, and it sputtered out as I tried to complete the edges. Had some bronze left, so I painted the inside if the legs Copper. Copper was the surplus color...It sputtered out after an OK coverage of the parts and insides of the legs. I had checked the shed and garage for escaped parts before starting the legs w/Copper. OK, go for it. After, the can quit, I move parts into the shed and headed for the garage, past the unfinished one that was photographed. !@#$%^. This is a recurring problem for me. I spend a lot of time looking for things. I prefer tool boxes and storage trays that have visible defined storage for items.[ATTACH]2181[/ATTACH] Tool cabinet that glides under the SS. Two bays for miter guage, pro fence, saftey equipment) and 13 trays for lathe chisels, sanding disks, saw blades, band saw blades, arbors, in single machinist tool chest style w/place for almost everything. Top and Front dust panel are plywood stained as Rosewood.
10 – 10-12-08:
Reactivation of 1960 Mark V 500 – Lipstick on a 500. Part 2
Moderator: admin
Reactivation of 1960 Mark V 500 – Lipstick on a 500. Part 2
MK V 520; MK V 510 w/PP DIY Upgrade; MK 5 500; Jointer; Bandsaw; Sliding Table; Conical Sanding Disk; Sharpening Guide, Lathe Duplicator, Jigsaw, Scrollsaw, Beltsander, Ring Master, Biscuit Joiner.