Page 1 of 1
1982 Jointer Reassembly
Posted: Wed Feb 03, 2021 8:12 am
by Gio800
I have completely disassembled my 1982 jointer and painted. Now I need to reassemble. What lube/coating should I use for the slides?
They are bare metal and will never be seen again.

- Jointer1.jpg (164.43 KiB) Viewed 2075 times

- jointer2.jpg (229.13 KiB) Viewed 2075 times
Re: 1982 Jointer Reassembly
Posted: Wed Feb 03, 2021 9:40 am
by dusty
Gio800 wrote: Wed Feb 03, 2021 8:12 am
I have completely disassembled my 1982 jointer and painted. Now I need to reassemble. What lube/coating should I use for the slides?
They are bare metal and will never be seen again.Jointer1.jpgjointer2.jpg
no oil/grease. a good coat of Johnsons Paste Wax would be my choice.
Re: 1982 Jointer Reassembly
Posted: Wed Feb 03, 2021 11:12 am
by JPG
dusty wrote: Wed Feb 03, 2021 9:40 am
Gio800 wrote: Wed Feb 03, 2021 8:12 am
I have completely disassembled my 1982 jointer and painted. Now I need to reassemble. What lube/coating should I use for the slides?
They are bare metal and will never be seen again.Jointer1.jpgjointer2.jpg
no oil/grease. a good coat of Johnsons Paste Wax would be my choice.
With some powered grapite sprinkled on top of the still 'wet' wax.
Do NOT buff.
Re: 1982 Jointer Reassembly
Posted: Wed Feb 03, 2021 11:38 am
by RFGuy
JPG wrote: Wed Feb 03, 2021 11:12 am
With some
powered grapite sprinkled on top of the still 'wet' wax.
Do NOT buff.
Is that a special JPG trick? Never thought of doing both. Does it make a big difference? Thanks.
Re: 1982 Jointer Reassembly
Posted: Wed Feb 03, 2021 11:44 am
by dusty
I'm not inclined to do both. I fear that the combination would tend to form a paste.
Re: 1982 Jointer Reassembly
Posted: Wed Feb 03, 2021 1:49 pm
by chapmanruss
First make sure all paint is removed from the contact points. Especially in the tongue and groove side. You want to have smooth bare metal to bare metal. Use paste wax for protection and lubrication. If later it doesn't slide as well you can take it apart again and re-wax. It is only the one bolt that holds them together so not a difficult job. I haven't tried JPG's addition of graphite but you could try it if you wish.
Once you have it reassembled check the tables to make sure they are parallel by adjusting the cut to 0 and using a long metal straight edge across the infeed and outfeed tables. Once it is parallel you can set your depth of cut indicator to 0.
Re: 1982 Jointer Reassembly
Posted: Tue Mar 09, 2021 4:52 pm
by bgeagle
I too am reassembling my jointer after refurbishing it. I need to know where the pin in the attached photo goes? Thanks.
Re: 1982 Jointer Reassembly
Posted: Wed Mar 10, 2021 1:34 pm
by chapmanruss
Are you talking about the item circled in the picture below?
_
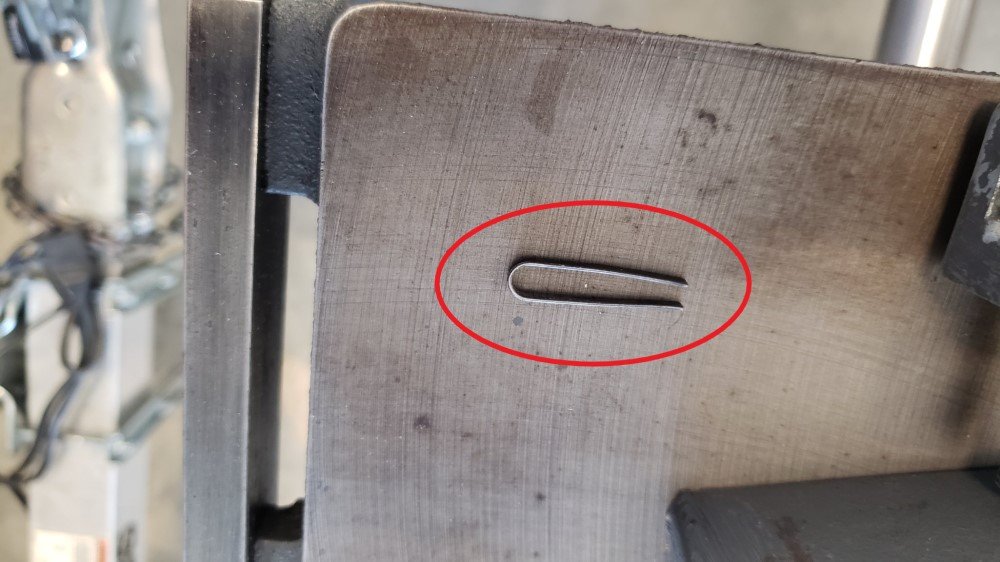
- Jointer part - circle.jpg (99.71 KiB) Viewed 1890 times
It looks like part of a paper clip. I don't know what it belongs to but is not from the Jointer. See the exploded parts drawing attached below. Although the drawing is for newer Jointers than yours made in 1980 most of the parts are the same. The main differences are the feather board blade guard, the other guards and the dust chute. These are available as upgrades from Shopsmith. It does show the old cutter head assembly like yours has.
_
Note for anyone else referencing this - the online parts diagram does not show the correct 5 hole wedges used in the new slightly larger diameter cutter head. The cutter head must be replaced as an assembly (except the blades) for the correct wedges and set screws. The blades are the same for all models.
Re: 1982 Jointer Reassembly
Posted: Thu Mar 11, 2021 10:31 am
by rpd
Might be a staple used in cheap furniture.