Page 1 of 1
Thermal Images After Rebuild
Posted: Thu Nov 11, 2021 5:57 pm
by SteveMaryland
Just finished a headstock rebuild. All new bearings and belts. As a check, I took some thermal images to verify no unusual hot spots. Images attached as PDF.
Everything runs OK but I now have a speed control problem where after running at high (P-Q) speed, the speed did not want to come down. So I dialed up the speed and then down a few times and finally it came down. I wonder if this is a break-in problem with a new belt? Have others here had this problem?
Re: Thermal Images After Rebuild
Posted: Thu Nov 11, 2021 7:35 pm
by JPG
No surprises other than the third set.
I have no explanation why the upper front case would be hot.
Sluggish response to slow speed adjustments can be caused by an unresponsive(insufficient lubrication?) floating sheave.
Re: Thermal Images After Rebuild
Posted: Thu Nov 11, 2021 10:08 pm
by DLB
SteveMaryland wrote: Thu Nov 11, 2021 5:57 pm
Just finished a headstock rebuild. All new bearings and belts. As a check, I took some thermal images to verify no unusual hot spots. Images attached as PDF.
Everything runs OK but I now have a speed control problem where after running at high (P-Q) speed, the speed did not want to come down. So I dialed up the speed and then down a few times and finally it came down. I wonder if this is a break-in problem with a new belt? Have others here had this problem?
In your FLIR images, is the temperature indicated in the upper left box associated with the cross-hairs or pipper in the center of the screen? Was the run time about the same for all images? I didn't see anything I'd worry about, just curious.
I agree with jpg regarding floating sheave. If not that, possibly control sheave not sliding easily or pork chop issue in the speed control. I don't see how the belt would do it.
- David
Re: Thermal Images After Rebuild
Posted: Fri Nov 12, 2021 6:41 am
by dusty
Very, very interesting. Is it possible that the sheaves are improperly oriented,
I sure am curious about some possible alignments (not adjustable).
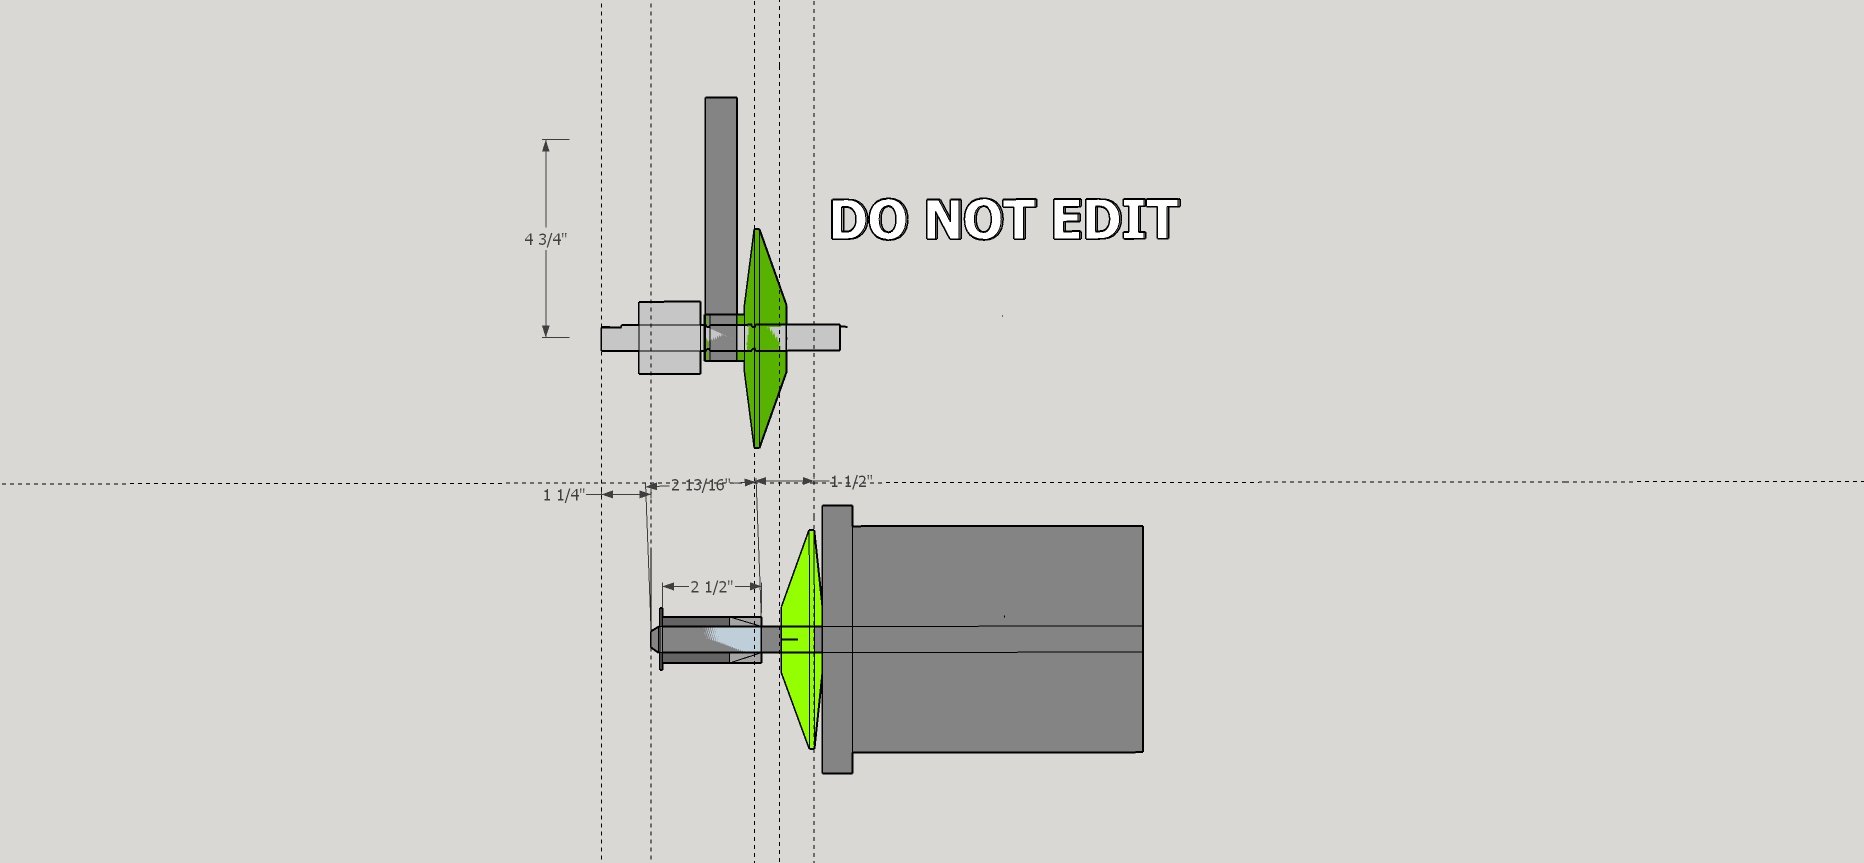
- Idler Sheave and Motor Sheave Assembly Ver 1.jpg (72.62 KiB) Viewed 2552 times
This is a sketch of the sheaves in my Mark V. I did this before I began a tear down. The numbers are accurate though THEY MAY NOT BE CORRECT. It does seem to me that the drive belt would travel in a plane perpendicular to the shafts and it does not.
Aligned as it is would certainly create more heat than it would if it rode centered in the sheaves.
Re: Thermal Images After Rebuild
Posted: Fri Nov 12, 2021 10:09 am
by SteveMaryland
[/quote] In your FLIR images, is the temperature indicated in the upper left box associated with the cross-hairs or pipper in the center of the screen? Was the run time about the same for all images? I didn't see anything I'd worry about, just curious.
I agree with jpg regarding floating sheave. If not that, possibly control sheave not sliding easily or pork chop issue in the speed control. I don't see how the belt would do it.
- David
[/quote]
Yes, the temp in the upper left is the temp where the bullseye is (all in degrees F). On the right is the range of temps over the whole image. Note that the very low temps occur when the sky is in the background - the sky is very cold to an IR camera!
As for the high-to-low speed-change problem, just finished a rebuild so sheaves are clean and lubed and sliding well. I also scotchbrited all the sheave conicals so maybe those surfaces are now so clean and unoxidized that the new belt rubber is grabbing too much and causing the problem. As I said, when I rock the speed dial back and forth multiple times the belt then behaves, but I don't want to have to keep doing that.
I also notice that much of the low frequency running noise I now hear seems to be coming from belt/sheave interface - the many "fingers" on the sheaves vs the belt producing a sound like a highway "rumble strip". Maybe a "soft'' or brand-new belt would cause both of these issues.
As for belt/sheave misalignment - well small variable misalignment are SOP with variator-type drives like these, and v-belts easily soak up such misalignment, so I don't think misalignment is the source of the problem.
Re: Thermal Images After Rebuild
Posted: Fri Nov 12, 2021 11:52 am
by chapmanruss
I am curious where you got the FLIR TI camera to use and which model was it.
Re: Thermal Images After Rebuild
Posted: Fri Nov 12, 2021 12:50 pm
by bainin
How did you correct for the emissivity of all those different materials?
For instance V-Belt vs metal case.
I like the convenience of an IR image-but it can be wrought with hidden difficulties. I would minimally double check some non-moving surfaces
with an RTD or thermocouple to verify accuracy. It should include painted versus polished or simple cast material and maybe a poly belt right after turning off the machine.
Heres a brief discussion of the issues when looking at various materials with different surfaces/emissivities.
https://www.flir.com/discover/professio ... l-imaging/
b
Re: Thermal Images After Rebuild
Posted: Fri Nov 12, 2021 7:45 pm
by SteveMaryland
bainin wrote: Fri Nov 12, 2021 12:50 pm
How did you correct for the emissivity of all those different materials?
For instance V-Belt vs metal case.
I like the convenience of an IR image-but it can be wrought with hidden difficulties. I would minimally double check some non-moving surfaces
with an RTD or thermocouple to verify accuracy. It should include painted versus polished or simple cast material and maybe a poly belt right after turning off the machine.
b
Camera is a FLIR C2. Not a top of the line, but intended for first-pass thermal inspection of equipment and occupied spaces.
I have used this camera for home insulation and electrical equipment inspection. I have discovered missing insulation, hot motor bearings, bad wiring, leaky windows, heating system inspection, water leaks and vermin nests behind walls.
Emissitivity is set at 0.95, which covers most non-metallic and painted metallic surfaces found in built environments. Will not accurately read specular surfaces such as mirrors, polished or unpainted metal. Will read window glass with ballpark accuracy. Emissitivity can be adjusted but 0.95 is recommended for most applications. Focal distance is another variable that can be set as needed.
Re: Thermal Images After Rebuild
Posted: Fri Nov 12, 2021 8:36 pm
by chapmanruss
Thanks for satisfyingly my curiosity. I had worked with FLIR when they were originally developing their T I Cameras, both the helmet mount and hand held, for the Fire Service and I did most of the original live fire tests for them. They are in the Fire District I worked for before I retired.