I've read a bunch on outfeed tables and attaching them to the table top so that the raise and lowering of the top keeps the outfeed table in line.
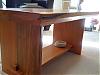
Here's another take on an adjustable out-feed table some may be interested in.
The inspiration was my wife's ironing board.
Block and tackle controlled, scissor action from 34 to 46 inches high, height adjustable, dado jointed torsion box. Total size 48x30.
Right now the block and tackle has a ratchet mechanism but I plan on replacing the pulley's with simple sheaves and a cleat.
Cheers,
Hud
Outfeed Table
Moderator: admin
-
hudsonmiller
- Gold Member
- Posts: 41
- Joined: Sat Dec 06, 2008 12:27 pm
- Location: Denver, Colorado
Outfeed Table
- Attachments
-
- Outfeed1.jpg (40.97 KiB) Viewed 4673 times
-
- Outfeed2.jpg (39.91 KiB) Viewed 4629 times
-
- Outfeed3.jpg (41.92 KiB) Viewed 4615 times
-
a1gutterman

- Platinum Member
- Posts: 3653
- Joined: Tue Jan 09, 2007 12:45 am
- Location: "close to" Seattle
-
hudsonmiller
- Gold Member
- Posts: 41
- Joined: Sat Dec 06, 2008 12:27 pm
- Location: Denver, Colorado
Nope, Yep, Nope :-)
I just finished the outfeed table so I don't have much time with it yet. My initial impression is that it's a little jiggly in the plane it sits in currently but when I rotate it 90 degrees it's much more stable.
It adjusts well. I need to re-work the positioning of the block and tackle and add a cleat so it can all be done from one side of the table.
And well - no. Not in England. Virginia.
Cheers,
Hud
It adjusts well. I need to re-work the positioning of the block and tackle and add a cleat so it can all be done from one side of the table.
And well - no. Not in England. Virginia.
Cheers,
Hud


out feed Table idea
Can you give us a few more details please, seems like a good idea. I found that using a sled in my planer requires a lot of adjusting out-feed and in-feed heights. The SS planer moves the table not the cutter, so you need to change the supports after a cut. I have been looking for a way to have a stable arrangement and be able to make small (1/16 to 1/8) changes quickly and easily. This idea might be the "way to go". I toyed with the ironing board as an out-feed table, but rejected it because it made to big a jump with each change. This seems to solve that. Thanks
Saw dust heals many wounds. RLTW
Dave
Dave
-
a1gutterman
- Platinum Member
- Posts: 3653
- Joined: Tue Jan 09, 2007 12:45 am
- Location: "close to" Seattle
Hi dlbristol,
Regarding: Saw dust heals many wounds. RLTW
I do knot see anything on your public profile to give this away, but as my Dad was a Marine, I think I will go with Semper Fi rather then RLTW. Thank you for serving.
Regarding: Saw dust heals many wounds. RLTW
I do knot see anything on your public profile to give this away, but as my Dad was a Marine, I think I will go with Semper Fi rather then RLTW. Thank you for serving.
Tim
Buying US made products will help keep YOUR job or retirement funds safer.
Buying US made products will help keep YOUR job or retirement funds safer.
-
hudsonmiller
- Gold Member
- Posts: 41
- Joined: Sat Dec 06, 2008 12:27 pm
- Location: Denver, Colorado
Outfeed Table - More details
dlbristol-
Here's some more details.
The table is constructed with 4 2x4"s cut to 56"'ish. There is a piece of threaded rod connecting each pair of 2x4"s at 27" from the top. The threaded rod is connected by threaded T nut - through the 2x4"s - through a stand off to keep the pair of legs separated from the adjacent set - through those 2x4"s and then bolted snug with a nylon nut.
Same story on the top - although in retrospect the threaded rod is probably unnecessary - just keep the legs braced apart.
One side of the table has fixed legs the other pair move when the pulley is adjusted.
If doing it again I'd put in a double block on the fixed end and a single on the moving end with a cleat. This should give plenty of mechanical advantage and allow the table to be adjusted from a single side.
For your application I'd orient the table so you are working in line with the legs - plenty of stability in that direction. If you are able you could use threaded rod to raise and lower the table and should give a much "stiffer" table top. The rope approach has a little give in the top stability as the rope gets taught.
If you have any other specific questions, let me know and I'll try and clarify.
Hud
-
dusty

- Platinum Member
- Posts: 21481
- Joined: Wed Nov 22, 2006 6:52 am
- Location: Tucson (Wildcat Country), Arizona
Outfeed Table by hudsonmiller
Nice job hud. Not only does it look like a keen solution to the outfeed table requirement...it also looks like it might find a lot of other uses where an adjustable table height is needed.
"Making Sawdust Safely"
Dusty
Sent from my Dell XPS using Firefox.
Dusty
Sent from my Dell XPS using Firefox.
Thanks!
I served proudly as a Ranger in the highlands of Vietnam. I was a Long Range Recon Patrol leader. (LRRP) Would not take a million dollers for the experience and the guys I worked with, would not do it again for ten Million. The kids serving now are the ones we need to keep suporting. Simper Fi will do. Lots of good men and women who I am honored to have known as well.
That said, I will need a bit of time to get my old Ranger brain wrapped around this idea. Shows promise and much more fun than buying something!
That said, I will need a bit of time to get my old Ranger brain wrapped around this idea. Shows promise and much more fun than buying something!
Saw dust heals many wounds. RLTW
Dave
Dave
More questions
Hey Hud, I am going to try this idea. Questions;
1. Do the sliding legs just ride along on the bottom surface of the table, or are they in a slot?
2. The fixed legs are mounted on a piece of stock that hangs below the tables lower surface, did you have to adjust the other legs length or does it just level itself up? ( I think I know the answer, but sure as I don't ask!!)
3 I am thinking of using an old 48in pistol grip clamp to pull the legs together, what do you think? It would keep everything under the table and I can fasten it to the table on each end. Might stiffen things up and keep the pistol grip in easy each.
4. How thick did you make the table? I made a mock up of the legs and tried them on my planer height. I may need to shorten the legs a bit to get the thing low enough if the table is too thick.
All salvaged stock for the first run, I trust the design, but the execution is another question. My first trys often leave considerable room for improvement.
Thanks
Saw dust heals many wounds. RLTW
Dave
Dave