Some wood I planed down today. The wood was ran through the kiln by mistake lumber graders pull it of as they were grading poplar. It had layed behind the graders booth for a few months. I saw it and with a big on my face asked the supervisior could I have it. Sure just scrape lumber clean the deck off boy did I
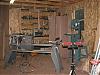
It was 5/4 rough sawn black walnut 12 foot long 8 inches wide. Sad to say someone got most of the black heart but I did get a few twisted check bad pieces but what the heck free wood . Well anyway this is what some of it looks like planed and edged. I was thinking of making a table out of it. I had to run it through the planer. I ran the bow up taking small cuts till I got the saw markes out and done the same to the other side still has some bad bows in the wood as it was not 1/4 sawn . Is there anyway I could get the wood flat to glue ? any and all help greatly need thanks ......John
A jointer is the best tool for flattening lumber, but if you don't have an 8" jointer (not many do), I have heard that you can build a sled for your planer to hold the wood stable while you flatten it with the planer. You need to use wedges where the wood is bowed up so that the planer's rollers don't take the bow out of the wood while planing. I think there is a thread on this site that talks about building planer sleds. Use the search function.
You betcha, Ed. Lay the board out on a long, flat surface such as your workbench or, if nothing else is available, the floor. Position wedges and shims under the wood to prevent it from rocking -- this takes a good deal of patience. The shims and wedges must be spaced no more than 12" apart along the length of the board, or about half the length of the planer bed. Once all the wedges and shims are positioned, carefully lift the board up so as not to disturb their position. Apply carpet tape to the upper surfaces of the shims and wedges, then lower the board back down on them and test that it doesn't rock.
Reduce the pressure of the feed rollers to about half of what it is for normal planing operations. This is fairly easy on the Shopsmith Planer, just back off the four screws above the feed roller pressure spring 1 to 1-1/2 turns. (If the feed roller pressure is too high, the rollers will distort the wood when they are pressing down between the wedges and shims.)
Adjust the height of the bed so the highest part of the board will pass well below the knives. Set the feed rate to as slow as possible and feed the board into the planer while simultaneously raising the bed. Stop raising the bed when you hear the knives begin to cut wood.
Make shallow "skim" cuts, raising the bed no more than 1/32" between each pass, until the top surface of the board is dead flat. Turn the board over, remove the shims and wedges, and repeat for the other surface.
Remember to readjust the feed roller pressure before resuming normal planing.


