I got the five raised panel doors built - four in the bedroom, one in the bath.
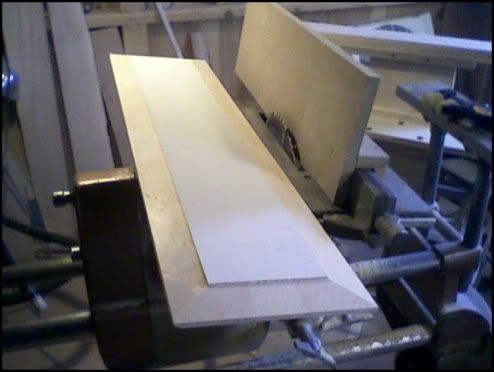
Here's a shot of the jig and one of the panels - My wife did decide that two panels per door rather than one would be better. Sorry for the quality of the pictures - they're from my phone.
Jig and Panel
Here's a shot of one of the doors in the bedroom. Not yet hung, just resting on the ground. The space to the left of this small closet will be built in drawers with raised panel drawer fronts to match the style of the closet doors.
Raised panel closet door
The Shopsmith performed admirably with the panels. I used my 9" Freud thin kerf carbide blade. It did bog down a bit when doing the cross-grain end cuts on the panels. I had to go slow and easy and I still got a wee bit of burning at the shoulders. I think if I had a 1 1/8 HP motor it might have been avoided. I had no problem with the longer cuts with the grain.
I'll let all the doors warm up in the house overnight then sand and glue up tomorrow. The shop temps have been between 19 and 34 degrees! I had to get this done this week though as I have some time off. Happy new year and God bless! Alec
1960 Aniversary Model Mark 5 500 "Goldie" with most SPT's
Thanks Mike. I was a bit surprised. But the saw blade is high with these bevel cuts and its only the edge of the outer teeth that clear the face of the board. Note that the burning is at the shoulder. The fact that I had no problems cutting with the grain is interesting though. Evidently the work load is greater with the cross-grain cuts. Alec
1960 Aniversary Model Mark 5 500 "Goldie" with most SPT's
I clamped the panel to the jig - the jig itself slides down the fence. Works like a charm! That is the jig from PTWWFE minus the bolt on clamp. My panels were too long for that. Alec
1960 Aniversary Model Mark 5 500 "Goldie" with most SPT's
That's the kind of job I tend to shy away from due to lack of confidence. I commend you (and others) for taking on such a challenge, and producing such great work.
It looks like a great job, Alec. The taper jig seems to have worked real well. However, I have a question. How did you make the cut that terminates the taper? It appears as though that edge is at 90 degrees to the face of the door panel (not done at the same time as the taper).
"Making Sawdust Safely" Dusty
Sent from my Dell XPS using Firefox.
You've done a very good job cutting those on a Shopsmith with a jig. I've done that in the past for a large kitchen job that I had. The difficulty level of those bevels prevented me from even thinking of doing them on the SS. I made them with a jig on a larger table saw. Since then I've invested in the set of bits to do those kinds of cuts on the router table.
You should be commended on the quality of the finished product knowing the difficulty of the task.
Thanks Dusty - the jig is really simple and works as advertised! There is a slight taper at the shoulder of the panel, about two thirds the thickness of the blade, but a couple quick passes with a hard sanding block and it is not noticable. It is possible to cut a kerf into the face of the board before cutting the bevel, but I wasn't that concerned about it. Alec
1960 Aniversary Model Mark 5 500 "Goldie" with most SPT's
bhurley - thanks for your kind words - but really the credit must go to the Shopsmith, and not me! From cross cutting the rails and stiles, to cutting the grooves and tenons for the rails and stiles to beveling the panels the SS can handle it all! With the extension table on the left I could easily do the rabbet on the back side of the ends of the panels in order to have the face of the panels flush with the rails and stiles. There really was no job that the SS wasn't up to! Thanks again - Alec
1960 Aniversary Model Mark 5 500 "Goldie" with most SPT's