I've long wanted a ZCI that could be replaced without having to make a new one. A little slack time in the shop and came up with this prototype.
Started with a piece of 1/2" MDF. Just like making a new insert, using a trim router and a template, made one to fit. Then trimmed it on the router table to the correct thickness around the edges. Turned it over and cut a 1" wide recess,
[ATTACH]7560[/ATTACH]
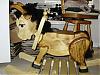
Cut a piece of walnut for the replaceable insert, rounded the ends and drilled the holes.
[ATTACH]7561[/ATTACH]
[ATTACH]7562[/ATTACH]
Fits pretty good.
[ATTACH]7563[/ATTACH]
The next one will be BB and 1/4" ply for the insert. And, make templates for use of the OPR.
What do you think?
Gene
New replaceable ZCI prototype
Moderator: admin
New replaceable ZCI prototype
- Attachments
-
- 004.JPG (91.7 KiB) Viewed 3323 times
-
- 003.JPG (91.27 KiB) Viewed 3325 times
-
- 002.JPG (94.73 KiB) Viewed 3322 times
-
- 001.JPG (93.13 KiB) Viewed 3318 times
Gene
'The true soldier fights not because he hates what is in front of him, but because he loves what is behind him.' G. K. Chesterton
'The true soldier fights not because he hates what is in front of him, but because he loves what is behind him.' G. K. Chesterton

-
a1gutterman

- Platinum Member
- Posts: 3653
- Joined: Tue Jan 09, 2007 12:45 am
- Location: "close to" Seattle

-
kd6vpe
- Platinum Member
- Posts: 585
- Joined: Mon Jun 11, 2007 8:53 pm
- Location: Owasso, Oklahoma
- Contact:
Very nice work there Gene. I saw Norm had one simular on his saw it was metal you have come up with a great idea. Can't wait to see what the rest of you come up with next for the 510/520's. thank you
SS 500 upgraded to 510; SS bandsaw; SS jointer
SS Oscillating Drum Sander; Universal Lathe Rest;
lathe duplicatior, shaper fence and shapers; SS Belt
Sander
Jim
www.youtube.com/kd6vpe
SS Oscillating Drum Sander; Universal Lathe Rest;
lathe duplicatior, shaper fence and shapers; SS Belt
Sander
Jim
www.youtube.com/kd6vpe
-
Ed in Tampa

- Platinum Member
- Posts: 5834
- Joined: Fri Jul 21, 2006 12:45 am
- Location: North Tampa Bay area Florida
Great Idea. One consideration though. The two hold down screws on the SS also serve as a leveling screws for the insert. SS inserts the insert is coined (slightly bent) therefore as the two screws are tightened the insert is pulled down. The instruction manual explains adjusting the height of the insert to table adjustment is made by tighten the screws as you check the eveness of the insert to the table.
No big problem to overcome but you have to be mindful that as you make the insert the thickness of it on edges will effect how it sets in your table. Too thick and the insert will set high too thin and it will set low.
No big problem to overcome but you have to be mindful that as you make the insert the thickness of it on edges will effect how it sets in your table. Too thick and the insert will set high too thin and it will set low.
Ed in Tampa
Stay out of trouble!
Stay out of trouble!
It took some T&E to get it perfect but, I now have some "set up blocks" for repeatability.Ed in Tampa wrote:Great Idea. One consideration though. The two hold down screws on the SS also serve as a leveling screws for the insert. SS inserts the insert is coined (slightly bent) therefore as the two screws are tightened the insert is pulled down. The instruction manual explains adjusting the height of the insert to table adjustment is made by tighten the screws as you check the eveness of the insert to the table.
No big problem to overcome but you have to be mindful that as you make the insert the thickness of it on edges will effect how it sets in your table. Too thick and the insert will set high too thin and it will set low.
I haven't used a stock insert for probably 15 years. My old method was to mill a bunch from 1/4" ply, apply hot melt glue in spots around the perimeter and, put it in place. When it cooled, I had custom levelers. I always marked which direction to set it in.
You don't realize that 1/4" plywood varies so much, even from the same sheet, until you work with such tolerances.
Gene
'The true soldier fights not because he hates what is in front of him, but because he loves what is behind him.' G. K. Chesterton
'The true soldier fights not because he hates what is in front of him, but because he loves what is behind him.' G. K. Chesterton
-
dusty

- Platinum Member
- Posts: 21530
- Joined: Wed Nov 22, 2006 6:52 am
- Location: Tucson (Wildcat Country), Arizona
kd6vpe wrote:Very nice work there Gene. I saw Norm had one simular on his saw it was metal you have come up with a great idea. Can't wait to see what the rest of you come up with next for the 510/520's. thank you
Good show there Gene. I like that.
Gene has already done the design work for a generic insert. Just make some minor changes to facilitate the squared off outfeed end of the 510 table insert and you have it.
Gene's design (with mods) will work on the 510.
[ATTACH]25723[/ATTACH]
[ATTACH]25724[/ATTACH]
- Attachments
-
- ZCI with replaceable insert (Custom).png (18.29 KiB) Viewed 3029 times
-
- ZCI without insert (Custom).png (39.17 KiB) Viewed 3028 times
"Making Sawdust Safely"
Dusty
Sent from my Dell XPS using Firefox.
Dusty
Sent from my Dell XPS using Firefox.