
Hi,
Some weeks or was it months back(?) we were talking about driving some MT2 tools on the shopsmith. I had a few ideas for making this happen. I did a few sketches and played with somethings on paper. Then I forgot about it until now, well yesterday as it is 12:44 now.
I opportunistic took advantage of the unseasonably warm weather and went in the garage/shop to get a few things done. Since the subject of turning has been on my mind and since I was putting away some lathe tools... well I decided to take my ideas and make a prototype.
One really major problem was that the shopsmith is only half accessible. The good news it is the business end, the bad news is that I can not access the tail stock area. The project more then likely needs the tail stock and access to it to come out right. However I went ahead with the project anyway, figuring the worst that can happen is that it turns out to be unusable, only the waste of a few hours and some scraps of wood. The good part was I was going to do some woodworking and would gain knowledge by trying.
I was able to finish it but it was too late for testing so tomorrow I think I can manage enough time for that. If it works out great, if not then I know I have to work some magic and get access to the tail stock area and do it right.
Drum role please.
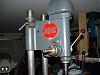
Here it is the prototype:
[ATTACH]15535[/ATTACH]
[ATTACH]15536[/ATTACH]
Ed
My light duty MT2 shopsmith chuck
Moderator: admin
My light duty MT2 shopsmith chuck
- Attachments
-
- DSCF2842sc.jpg (70.74 KiB) Viewed 2801 times
-
- DSCF2843sc.jpg (67.56 KiB) Viewed 2801 times

-
dusty

- Platinum Member
- Posts: 21530
- Joined: Wed Nov 22, 2006 6:52 am
- Location: Tucson (Wildcat Country), Arizona
OKAY, maybe I am ignorant but I do not understand this exercise.
I see that you have used a faceplate and therefore can mount on the Mark V. I also see that you have mounted a MT fitting in the "flywheel".
This facilitates the conversion but is that the only reason for the plywood flywheel (somewhere to house the MT)?
I see that you have used a faceplate and therefore can mount on the Mark V. I also see that you have mounted a MT fitting in the "flywheel".
This facilitates the conversion but is that the only reason for the plywood flywheel (somewhere to house the MT)?
"Making Sawdust Safely"
Dusty
Sent from my Dell XPS using Firefox.
Dusty
Sent from my Dell XPS using Firefox.

I knew there was a reason I was hoarding all these MT2 10ER adapters............
www.wirewerkes.com
Hiding in a Joshua Tree.
Hiding in a Joshua Tree.
-
robinson46176

- Platinum Member
- Posts: 4182
- Joined: Mon Mar 09, 2009 9:00 pm
- Location: Central Indiana (Shelbyville)
Will it work out to put a stove bolt through the center of the faceplate to serve as a draw-bolt to prevent the taper from working loose?
.
.
--
farmer
Francis Robinson
I did not equip with Shopsmiths in spite of the setups but because of them.
1 1988 - Mark V 510 (bought new), 4 Poly vee 1 1/8th HP Mark V's, Mark VII, 1 Mark V Mini, 1 Frankensmith, 1 10-ER, 1 Mark V Push-me-Pull-me Drillpress, SS bandsaw, belt sander, jointer, jigsaw, shaper attach, mortising attach, TS-3650 Rigid tablesaw, RAS, 6" long bed jointer, Foley/Belsaw Planer/molder/ripsaw, 1" sander, oscillating spindle/belt sander, Scroll saw, Woodmizer sawmill
-
JPG

- Platinum Member
- Posts: 35600
- Joined: Wed Dec 10, 2008 7:42 pm
- Location: Lexington, Ky (TAMECAT territory)
robinson46176 wrote:Will it work out to put a stove bolt through the center of the faceplate to serve as a draw-bolt to prevent the taper from working loose?
.
Methinks this will always be under compression due to the 'other' end(tail stock) always also being used.
This was brought up in a thread this month(mounting MT2 widgets to the quill).
Nice 'solution'!

╔═══╗
╟JPG ╢
╚═══╝
Goldie(Bought New SN 377425)/4" jointer/6" beltsander/12" planer/stripsander/bandsaw/powerstation /Scroll saw/Jig saw /Craftsman 10" ras/Craftsman 6" thicknessplaner/ Dayton10"tablesaw(restoredfromneighborstrashpile)/ Mark VII restoration in 'progress'/ 10E[/size](SN E3779) restoration in progress, a 510 on the back burner and a growing pile of items to be eventually returned to useful life. - aka Red Grange
-
JPG
- Platinum Member
- Posts: 35600
- Joined: Wed Dec 10, 2008 7:42 pm
- Location: Lexington, Ky (TAMECAT territory)
So that is why they are 'scarce'!:Dwiredone wrote:I knew there was a reason I was hoarding all these MT2 10ER adapters............
╔═══╗
╟JPG ╢
╚═══╝
Goldie(Bought New SN 377425)/4" jointer/6" beltsander/12" planer/stripsander/bandsaw/powerstation /Scroll saw/Jig saw /Craftsman 10" ras/Craftsman 6" thicknessplaner/ Dayton10"tablesaw(restoredfromneighborstrashpile)/ Mark VII restoration in 'progress'/ 10E[/size](SN E3779) restoration in progress, a 510 on the back burner and a growing pile of items to be eventually returned to useful life. - aka Red Grange
╟JPG ╢
╚═══╝
Goldie(Bought New SN 377425)/4" jointer/6" beltsander/12" planer/stripsander/bandsaw/powerstation /Scroll saw/Jig saw /Craftsman 10" ras/Craftsman 6" thicknessplaner/ Dayton10"tablesaw(restoredfromneighborstrashpile)/ Mark VII restoration in 'progress'/ 10E[/size](SN E3779) restoration in progress, a 510 on the back burner and a growing pile of items to be eventually returned to useful life. - aka Red Grange
I did not have a lot of time today but I did take time to check for run out, wish I had better news here, .042" TIR....... I had hoped for much better on this first attempt.
Now I have to try and figure out where it is all coming from. Looking at the forecast this will not be until end of Feb. or some time in Mar. I will disclose the stack up and a few things I did which might help if some one else wants to make one.
I use scraps of baltic plywood, assumed to be flat and uniform thickness.
The stack up is 4 layers of '3/4'" in order to have room to mount a MT2 shaft with tang.
I used the shopsmith faceplate (AL) one and drilled using the faceplate as a guide for hole placement.
I know now that the bolts do not give perfect alignment as after I bolted it together and turned it it was very smooth, after taking it apart and reassembling you could feel the difference. Next version will correct this with either full length bushings or added alignment bars.
Here is what it looks like as it is pulled apart. In this first picture you see the face plate separated from the stack up. The hole is 5/8" and allow you to tap out the MT2 part you put in. Just a note here, MT type mounting is and has been used for a long time, parts do NOT fall out in fact post times they have to be taken out using a tool. Drill presses of the more commercial don't even use a chuck, the drill comes with the taper.
[ATTACH]15546[/ATTACH]
As that layer comes off you see the next layer, it too has the 5/8".
[ATTACH]15547[/ATTACH]
As it flips over you see it has some counter sunk holes, one is for the nut, the other for the shaft providing open space so nothing binds. You can see the the remaining layers are connected by the MT2 adapter. The larger hole is 1-1/2" and I made it too deep at a 1/4". It is hard to get a wrench on it because it so deep, next time I think I will use 1/8". The smaller hole for the shaft of the adapter is 7/8" and those last two places were drilled with the 7/8" bit at the same time so this helps align those two pieces.
[ATTACH]15548[/ATTACH]
Some of those details might be clearer in this next pictures.
[ATTACH]15549[/ATTACH]
[ATTACH]15550[/ATTACH]
The next post will finish up the details
Ed
- Attachments
-
- DSCF2847sc.jpg (56.21 KiB) Viewed 2769 times
-
- DSCF2848sc.jpg (62.86 KiB) Viewed 2746 times
-
- DSCF2849sc.jpg (62.14 KiB) Viewed 2750 times
-
- DSCF2850sc.jpg (57.78 KiB) Viewed 2744 times
-
- DSCF2851sc.jpg (59.97 KiB) Viewed 2743 times
The final piece of the stack and the part you see when it is complete is shown next.
[ATTACH]15551[/ATTACH]
The recess was put in just in case the stack was not as uniform as it might be, the bottom of the hole will be even if the very front of the pieces is not.
So that is about it.
Feel free to make one and test your skills, comments are welcome, think you have a better idea, great show us.
Ed
- Attachments
-
- DSCF2852sc.jpg (51.53 KiB) Viewed 2744 times